All posts by Gerhard Marx

Psychiatrist and Woodworker

Woodworking recluse

20/2/2015

IMG_2594-2

I would like to thank Siavosh Bahrami sincerely for including my site on www.woodspotting.com. I have been documenting my woodwork journey since March 2013, without knowing whether there is anyone out there benefitting from it or not. Since he included me on his blog aggregator, two things have happened. In the first place, I have found heaps of other blog sites that I learn from and enjoy. In the second place, I can see that a few woodworkers are starting to look at my posts.

Being stuck in woodworking hinterland can be quite challenging when it comes to sharing ideas and that feeling of being part of a community. Since frequenting woodspotting, I’ve realised that there are several other woodworkers in a similar position, but I think I might still take the cake (so to speak). So far I have not found any other woodwork blogger from Africa, a continent that is home to 1 166 239 000 souls. It looks like Namibia is once again leading the way on the African continent! Or have I missed someone?

It is fascinating to see pictures of the different weather conditions that prevails outside some of the blogger’s shops. It got me thinking. I should start taking pictures of the unique semi-desert/savanna terroir around my shop. Even the shots of birdlife, as per Peter Follansbee’s site, is inspiring. My son is doing a science project at present where he records all the indigenous birds we see in our garden. Once I have a decent lense for my 7D, you might see some pictures of the Shaft-Tailed Whydah, Paradice Flycatcher, African Red-Eyed Bulbul, Green-Winged Pytilia, etc etc. In the meantime, you will have to be content with the picture of Zebras taken in the Etosha Game Reserve a few years ago.

Anyway, it feels good to at least have some vague sense of being part of a woodworking community.

Siavosh, you are a legend mate.

Cheers

Gerhard Marx

My 18th Century Workbench in progress 28

16/2/2015

This was one of those weekends in the shop were I did not feel I got much done despite working almost 2½ days. I am still busy with the two sliding deadmen for my bench. One of them will double up as a sliding leg vise, a la plate 279 of “L’Art du Menuisier” (pictured below). Mine however, will be on a smaller scale and retains it’s deadman anatomy too. The point being, this is slow and fiddly type work.

roubo240prRouboGermanBench

Cutting the thread for the wooden screw.

IMG_3233IMG_3234

One Assegaai wooden screw being cut. This antique German screw box is frighteningly sharp. It felt like I was cutting custard.

IMG_3235IMG_3236IMG_3237IMG_3238IMG_3239IMG_3240IMG_3241

Here I started working on the leg vise’s jaw.

IMG_3242IMG_3243IMG_3244IMG_3245IMG_3246

Each deadman has a base which slides on top of the bench’s long stretchers. The joinery is a complete overkill (as per usual). It includes, through mortises that were wedged and draw bored. As you might gather from the pictures, I experimented with slow setting epoxy and normal PVA wood glue for the draw pins. The epoxy, which has a consistency similar to vaseline, certainly improves the ease of clobbering them home. I think it has to do with the fact that it acts as a lubricant and also does now lead to immediate swelling of the dowel, which is the case with the water based glue.

IMG_3253IMG_3254IMG_3255IMG_3256

The protruding tenons and wedges were worked flush by passing it over the table saw several times followed by paring. The surfaces which will be in contact with the top of the stretcher were then covered with sealskin.

IMG_3260IMG_3261IMG_3257IMG_3258IMG_3259IMG_3262IMG_3263IMG_3264IMG_3265

I simply do not have the technical vocabulary to describe what I did here. The pictures will have to tell the story.

IMG_3280IMG_3270IMG_3271IMG_3275IMG_3276

Just to be different, I decided to use an eggbeater drill as inspiration for an alternative looking sliding-deaman-leg-vise. With a bit of imagination, you will probably be able to deduct where this is heading.

IMG_3272IMG_3273IMG_3274IMG_3277IMG_3278IMG_3279

This is a very handy idea if one wants to shape and sand small round parts. This piece is destined for the eggbeater-leg-vise-deadman.

IMG_3266IMG_3267IMG_3268IMG_3269


OK, one more clue dressed in sealskin.

IMG_3281IMG_3282IMG_3283

Dog maker

9/2/2015

My nearly finished workbench needs a profusion of dogs. In order to speed up the production and have some degree of consistency, I made this dog maker out of a scrap piece of beech. It has a multitude of “high-tech features” such as:

IMG_3151

1) Self-tapping screw to hold the stock in position.

IMG_3152

2) A hole for drilling the bullet catch hardware hole.

IMG_3156IMG_3161


3) A kerf to saw a flat face (leaning 2º forward from the vertical position, ensuring that the upper most tip would touch stock first)

IMG_3153IMG_3162IMG_3163

4) A kerf to cut each dog to the exact same length.

IMG_3154IMG_3155

That is followed by a few more steps, once the dog is liberated from it’s maker. The pictures tells the story.

IMG_3157IMG_3159


IMG_3160IMG_3164


IMG_3165IMG_3166IMG_3176IMG_3227

The Old Warhorse

9/2/2015

I bought this Stanley no. 77 dowel machine from Jim Bode in October 2014. It took 3 months to reach me in Deep Dark Africa. If you are interested in reading the travel journal of the package it traveled in (absolutely riveting, by the way), check out this post:

http://www.jenesaisquoiwoodworking.com/protracted-tool-perambulations-through-sub-saharan-africa/

Anyway, this is one of the earlier models as the later versions were blue (rather than black). I am not sure in which year the colour change transpired. My came with a ¼” cutter.

IMG_3202IMG_3203IMG_3204

It has three oil holes (sure there must be a better term), that got fed this weekend.

IMG_3205IMG_3206IMG_3207

I found a piece of scrap wood that already had the correct dimensions to fix the main casting to. This enables me to quickly clamp it to the assembly table. When I need dowels.

IMG_3208IMG_3209IMG_3214IMG_3215IMG_3216IMG_3217

I first tried Ysterhout (Olea capensis macrocarpa), but this stuff is so hard and wild that even the old warhorse had trouble taming it. That was followed by beech, which were a lot more agreeable as you can see.

IMG_3210IMG_3211IMG_3212IMG_3213

My 18th Century Workbench in progress 27

9/2/2015

On Friday afternoon I finally fitted the planing stops. It must be at least 3 months since the Ysterhout scraps were laminated. During the coarse of these months, I had several different ideas as to how the planing stops should be kept in place. In the end I simply went with a very tight friction fit. In other words, you take a mallet and bliksem (colloquial Afrikaans meaning many things, depending on the context, in this particular case ‘clobber’ comes to mind) them in and out of their little nest. So far it works like a charm, but I will report on how it turns out in the long run.

I decided to place the planing stops in front of the leg vise, rather than behind it as seen in most traditional benches. This shortens the bench surface available for planing, but also means that most of the planing can be done without having to lean over the leg vise. For longer boards I will eventually have a stop at the very end of the bench as well.

IMG_3113IMG_3114IMG_3115IMG_3116IMG_3117IMG_3118IMG_3119IMG_3120IMG_3122IMG_3123IMG_3124IMG_3126IMG_3127IMG_3131IMG_3132IMG_3133

During the course of last week, I moved all my bench planes to their new address. You will notice that some of them have leather sleeping bags to stop them from collecting excessive woodworking debris. I am slowly stitching these by hand during weekends away from the shop.

IMG_3143IMG_3135IMG_3137IMG_3138IMG_3140IMG_3141

The idea all along was to fit a traditional crochet to operate in tandem with the leg vise, but last week I saw this idea on another blog (unfortunately I can not remember which). I simply drilled four x 3/4″ holes in the side of the top beyond the leg vise. A simple Assegaai dog can now be used in the appropriate hole as a stop.

IMG_3167IMG_3168IMG_3169IMG_3170

This weekend was actually the first opportunity to use my new bench properly. In the pictures below you can see how it assisted in an array of different ways to do bread-and-butter type operations. I am working on a sliding deadman for each side of the bench.

IMG_3145IMG_3171IMG_3172IMG_3173IMG_3174IMG_3175IMG_3176IMG_3177IMG_3178IMG_3179IMG_3180IMG_3181IMG_3182IMG_3183IMG_3184IMG_3185IMG_3186IMG_3187IMG_3188


IMG_3197IMG_3198IMG_3199IMG_3200IMG_3201IMG_3218IMG_3220IMG_3221IMG_3222

I wrote a separate post on this shop made beader, which you should find in the recent posts section. I added the beads to hide the laminated nature of the stock that makes up the deadman.

IMG_3223IMG_3224IMG_3225IMG_3226IMG_3228IMG_3229IMG_3231

Shop made beader

9/2/2015

… or at least that is what I think it should be called. I have been in the market for a beader for some time now. I found a nice pre-1900 Stanley no. 66 recently, but it is still hanging with Patrick Leach in the US of A. Patrick usually hangs on to my acquisitions until “critical mass is reached” (as he puts it) to justify a shipment.

This weekend I wanted to use beads to hide the fact that the two sliding deadmen I am currently working on are laminated. So I whipped this little guy together from some scrap Witels (Platylophus trifoliatus). I saw the design idea in a Fine Woodworking article (I think), a few years ago. It is armed with a Lie-Nielsen blade. According to LN, these blades will fit the Stanley no. 66. I will hopefully be able to report on that in the not too distant future.

As you can see, it did a sterling job.

IMG_3223IMG_3224IMG_3225IMG_3226IMG_3228IMG_3229IMG_3231

Shop made tools used in building my 18th century bench

5/2/2015

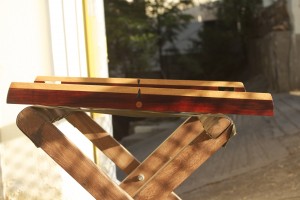
Seeing that my 18th century inspired bench is getting very close to being finished, I though it might be an interesting exercise to look at all the shop made tools that contributed to the final product. As you might know by now, I am based in Namibia. This means that I do not have the luxury of buying good quality woodworking tools from stores. At first it used to frustrate me with a vengeance, but over the past three years it became apparent that it is a blessing in disguise. Since I started building my own tools and restoring quality vintage tools, my learning curve went into overdrive.

Once you have managed to build (and to a lesser degree restored) a tool, you tend have a much better understanding of how it works. I also find it much more satisfying to use a shop built tool than any other.

So lets look at the lineup that helped me to build this bench. I simply picked photos from the 26 (at this stage) posts documenting the building process in superfluous detail. These posts are all entitled “My 18th Century Workbench in progress” followed by a number. I include links to posts I wrote on how each tool was built for in case you might want to take a closer look.

IMG_3093IMG_3094

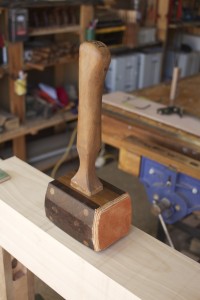
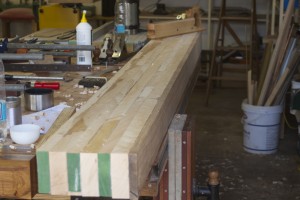
This is a shop made dowel plate and the mallet that did 90% of the damage needed to cut all the gargantuan through mortises.

http://www.jenesaisquoiwoodworking.com/its-a-dowel-plate-mate/

http://www.jenesaisquoiwoodworking.com/mallet-mania/

IMG_2380IMG_2381IMG_2280

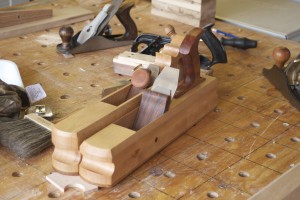
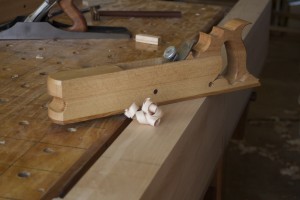
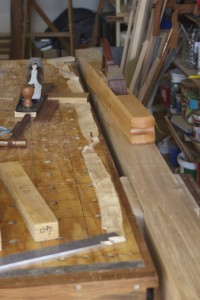
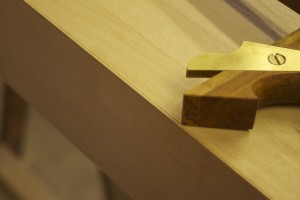
This picture features a shop made wooden fore plane (right) and scrub plane (left). We will deal with the scrub plane later.

http://www.jenesaisquoiwoodworking.com/building-a-wooden-fore-plane/

IMG_2201

These sanding planes were used extensively during the tedious lamination phase.

http://www.jenesaisquoiwoodworking.com/proletarian-sanding-contrivances/

IMG_2106IMG_9879IMG_9880

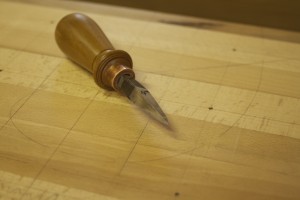
My version of a birdcage awl (right), which I fashioned out of an old centre bit. The marking knife was made using an old plane blade and a scrap piece of Tamboti.

http://www.jenesaisquoiwoodworking.com/brace-bit-birdcage-awl-also-known-as-bbba/

http://www.jenesaisquoiwoodworking.com/tamboti-and-witels-marking-knives/

IMG_2036IMG_2085

This is my heavy dead-blow mallet that was indispensable during the assembly of such massive joinery. It is also featured in the post entitled “Mallet Mania”

IMG_1894IMG_1672IMG_1673

This turned Assegaai mallet was employed for the majority of the fine-tuning that the joinery needed.

IMG_1931IMG_0395

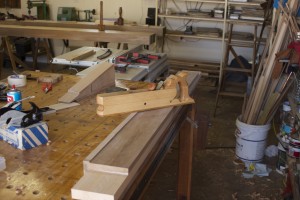
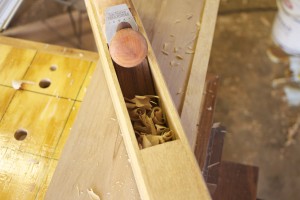
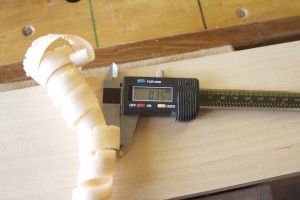
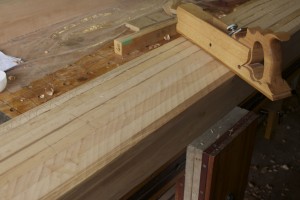
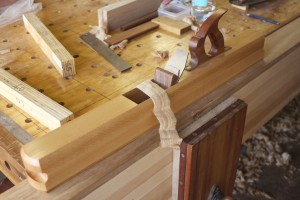
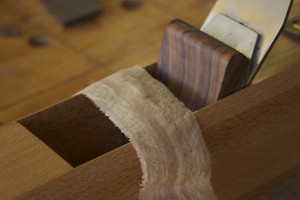
At this stage I have to say that this scrub plane is my favourite shop made tool. It absolutely mutilates (in a good sort of way) any excess material that needs prompt attention. It also comes in handy as an aggressive fore plane due to it’s length. If it was not for this warmonger, I would still be trying to flatten the two laminated beams that makes up the twin-top of the bench.

http://www.jenesaisquoiwoodworking.com/scrub-plane/

IMG_1918IMG_1922IMG_1442IMG_1443IMG_1459IMG_1463IMG_0006IMG_0007IMG_9954IMG_9957

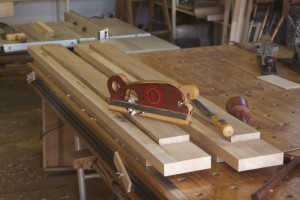
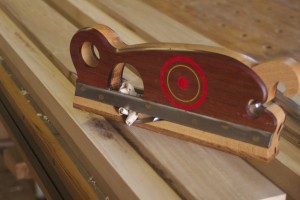
A large shoulder plane with some je ne sais quoi.

http://www.jenesaisquoiwoodworking.com/building-a-wooden-shoulder-plane/

IMG_1763IMG_1764

This is my version of a Melencolia square.

http://www.jenesaisquoiwoodworking.com/shop-made-melencolia-square-with-the-marxian-improvement/

IMG_1735IMG_1739IMG_1740

Winding sticks

http://www.jenesaisquoiwoodworking.com/shop-made-winding-sticks/

IMG_1493IMG_1495


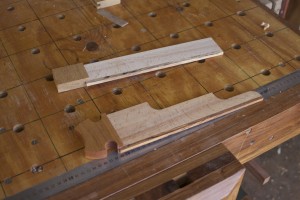
In the pictures below you can see a wooden jointer and straight edge.

http://www.jenesaisquoiwoodworking.com/building-a-wooden-jointer/

http://www.jenesaisquoiwoodworking.com/shop-made-ysterhout-straight-edge/

IMG_2652

IMG_1440IMG_1421IMG_1422IMG_1423


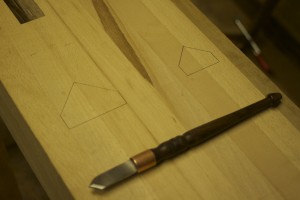
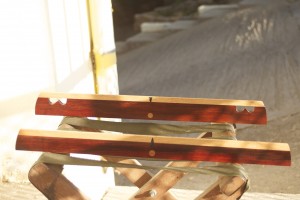
This is my version of a panel gauge.

http://www.jenesaisquoiwoodworking.com/makeshift-panel-gauge/

IMG_1391IMG_1392IMG_1380


A few bench hooks.

IMG_0896IMG_0884


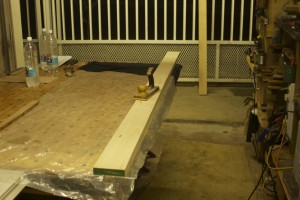
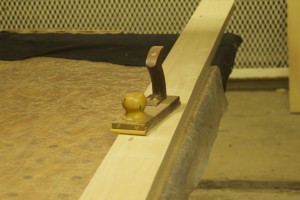
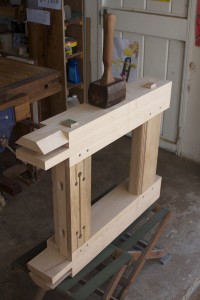
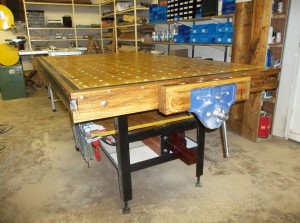
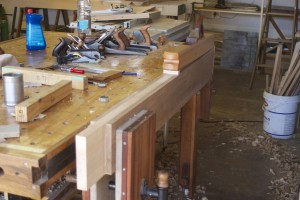
My assembly table was probably the most indispensable shop made tool in building the bench. In the the pictures below you will also see the legvise and sliding deadman I built to enhance the repertoire of the assembly table. I chose a few photos that illustrates how the assembly table made short work of otherwise tricky tasks.

http://www.jenesaisquoiwoodworking.com/alternative-workbenchassembly-table-chapter-one/

http://www.jenesaisquoiwoodworking.com/alternative-workbenchassembly-table-chapter-two/

http://www.jenesaisquoiwoodworking.com/alternative-workbenchassembly-table-chapter-three/

http://www.jenesaisquoiwoodworking.com/alternative-workbenchassembly-table-chapter-four/

http://www.jenesaisquoiwoodworking.com/alternative-workbenchassembly-table-chapter-five/

100_0293100_0285IMG_0875IMG_0877IMG_0878IMG_0879IMG_0880IMG_0886IMG_0384IMG_0233IMG_0241IMG_0239


http://www.jenesaisquoiwoodworking.com/legvise-with-a-twist-chapter-one/

http://www.jenesaisquoiwoodworking.com/legvise-with-a-twist-chapter-two/

http://www.jenesaisquoiwoodworking.com/legvise-with-a-twist-chapter-three/

http://www.jenesaisquoiwoodworking.com/sliding-deadman-with-a-twist/

IMG_0417IMG_0368


A flush plane

http://www.jenesaisquoiwoodworking.com/shameless-flush-plane-knockoff/

IMG_0362IMG_0142IMG_0143


Some shop made squares.

IMG_0281IMG_0289

I hope that this might inspire other novice woodworkers to build their shop and tools with their own shop made tools. It is a very satisfying journey.


Fourth acquisition from Patrick Leach

25/9/2014

My fourth shipment from Patrick Leach arrived this week.

It included:

1) This Stanley no. 203 bench clamp. It is in the process of being rehabilitated in this picture.

IMG_2286

2) Stanley no. 923 12″ brace. In the picture I am cleaning and lubricating the chuck.

IMG_2239IMG_2240IMG_2241

3) This Disston no. 12 18″ 12pt cross cut panel saw. Unfortunately I did not take a picture of the blade befor sending it to Kenney for a clean. It was rusted on one side. According to my research it would have been made between 1896-1917.

IMG_2242IMG_2243IMG_2490IMG_2491

4) Sargent no. 407 smoothing plane and a Stanley no. 3.

IMG_2244

Goes without saying.

IMG_2245IMG_2246

Ditto.

IMG_2247IMG_2248

… and Marples gouges.

IMG_2249IMG_2250

My 18th Century Workbench in progress 26

2/2/2015

On Friday afternoon I turned plugs for all the holes created in the bench top to attach hardware. They were then glued in overnight and worked flush to the top first thing on Saturday.

IMG_3063IMG_3064IMG_3065IMG_3066IMG_3067IMG_3068IMG_3070IMG_3071

Initially I had plans to build quite elaborate sliding tool trays to occupy the space between the twin-top of my bench. After lots of thought I decided to first build very basic trays in order to get an idea of what I really need by using them for a while. This train of though produced these Masonite and Tasmanian Blackwood trays held together with 32 self-tapping and four traditional wood screws (each).

As you can see there are five trays in total. There are three that operate in the top groove and two in the bottom. They slide effortlessly to enable the bench user to be able to open up space when he/she would like to use F-style clamps through the split in the top. They also provide a very handy storage option for the bread and butter tools that are constantly used at the bench.

I made lids for the top three trays to prevent unwanted debris from nesting in them. The bottom two trays hide under the top ones, so they do not need lids. The top surface of the lids sit roughly 3 mm below the top of the bench, which creates a handy area to place tools that might want to roll off the bench. This is illustrated in the pictures by the Yankee screwdriver.

IMG_3073IMG_3074IMG_3075IMG_3082IMG_3083IMG_3085IMG_3086IMG_3087IMG_3088IMG_3089IMG_3090IMG_3103IMG_3104IMG_3105IMG_3106IMG_3107

The building phase of this project had it’s first birthday on Sunday the 1st of February. I managed to apply the first coat of finish only hours before the celebrations. For this purpose I prepared a 1:1:1 mixture of Tung Oil, Mineral turpentine and diesel. From my reading it seems as if wood borer (which frequents this particular neck of the woods) loves beech, so I though the addition of some diesel might persuade them to seek alternative pastures. In the pictures you can see how it made the Kaapse Swarthout, Witpeer, Ysterhout and Assegaai come alive, while It gave the beech a very slight amber tinge. It was followed up on Sunday with a coat of Wooddock. You might notice that I did not apply any finish to the top as it still awaits it’s final flattening. The plans is to use a Tung Oil and Varnish mixture for the top. Please note that it might be useful not to sand between coats as it creates a grippy texture, which is desirable on a workbench.

IMG_3076IMG_3079IMG_3080IMG_3081IMG_3091IMG_3093IMG_3094IMG_3095IMG_3096IMG_3097IMG_3098IMG_3099IMG_3100IMG_3101IMG_3102IMG_3103

My 18th Century Workbench in progress 25

November 2014

My final job towards finishing my bench for 2014 was to start building the twin screw vise jaw. I managed to prepare the two beech boards (pictured) by hand a month or so earlier. Thus it had quite some time to settle. Lie-Nielsen provide a very detailed pdf document on how to build the jaw that goes with their hardware. It took some work with the router, a glue-up and Bob’s your Uncle!

IMG_2689IMG_2690IMG_2691IMG_2692IMG_2693IMG_2694IMG_2695IMG_2696IMG_2697IMG_2698IMG_2699IMG_2700IMG_2701

19/1/2015

I decided to take a few pictures to document the state of the bench prior to any work done for 2015.

IMG_2943IMG_2944IMG_2945IMG_2946IMG_2947IMG_2948IMG_2949IMG_2950

2015 started off with some very tricky fitting work in order to get the twin screw vise fitted to the bench. The main reason for this is that I decided to drill holes in my 4″ bench top to accommodate the 2 ACME threaded rods, rather than to cut 2″ deep dados.

The Witpeer breadboard end had to be sawn off flush with the edge of the top before I could even start to fit the vise.

IMG_2999IMG_2998IMG_3003IMG_3004IMG_3005IMG_3006IMG_3007

I did not take too many photos (during installation) as I was too busy swearing and struggling, but here are some pictures of the end result.

IMG_3008IMG_3009IMG_3010IMG_3011IMG_3012IMG_3013

26/1/2015

This weekend I focused on getting the end vise finished.

IMG_3016IMG_3017IMG_3020IMG_3021IMG_3022IMG_3024IMG_3077IMG_3078IMG_3025IMG_3026IMG_3027IMG_3028

Then I made the two handles for the other two vises, using Assegaai and Beech.

IMG_3029IMG_3030IMG_3031IMG_3032IMG_3033IMG_3043IMG_3050IMG_3051IMG_3052IMG_3053

Here are my first shop made Assegaai bench dogs in action.

IMG_3059IMG_3058IMG_3054IMG_3055IMG_3057IMG_3061IMG_3060