Category Archives: Frank Bartlett’s posts

Cape Yellow Wood Tool Chest Journey

7/6/2016

Thanking Gerhard once again for opening up his website to woodworking friends and Toolgaloots. What follows is my Cape Yellow wood tool chests’ journey –  and some more!

Not surprisingly, not very long after I developed the fatal fascination/affinity for old tools, I realized that these restored things of beauty can’t forever reside wrapped in pieces of cloth, all around the shop. No, they needed a nice little tool chest/enclosure, a wooden one, not plastic, not that I had that many old woodworking hand tools at that stage! Included amongst the antique restored tools was a Lie Nielsen dovetail (just missed the Independence era when I bought it) and a set of octagonal Boxwood handled Robert Sorby chisels. Otherwise, the majority of the tools were antique (another “less vintage” set of tools was kept elsewhere).

So, off I went and built a little chest out of the available wood I had, 12mm plywood….. By the way, the chest is sitting on a Kiaat wood (Pterocarpus Angolensis also called Bloodwood, Mukwa, Dolfhout) 8 chair dining set made about 40 years ago by Kavango residents in the Northern Namibia bushveldt. Having no electricity, the logs used to be cut in a saw pit (one guy on top and the other at the bottom of the pit) and the resulting planks then left upright against trees to dry. The finer “kilning” details I know not! Do they frequently turn it, how come it doesn’t warp and twist??!! I’ve heard that it tends to shrink very little from its green state, that perhaps being the reason. Never seen them stacked and stickered, but must have been! These bush artists used to make beautiful furniture, this set an example using just saws, jack planes and for the carved bits, little self made axes (with astounding accuracy and dexterity) and homemade knives, finishing by sanding it (with sanding paper!!). Just furniture polish was then applied. Working on loose sand as reference, these furniture were often a bit wonky and therefore often needed to be trimmed at home, once bought. This set is 40 years old and going, still using it!

ToolkassieToolkassie0

Back to my effort.

Toolkassie1

Somehow, the dovetails ended up on the side of the little chest….

Toolkassie2

As the infatuation with old tools grew, the requirement for proper storage increased. At some stage I started to do away with doubles and triples (also read a very sensible Chris Schwarz article on reducing your tools and rather getting to know the one’s you have better), I still continuously strived to upgrade some of the tools that I already had, to more valuable ones. The old Disston D8 and #7 was not good enough, no-no, it had to be a set of #12’s. Since the ordinary wedged-stem plough was hurting my office hands, a Mathieson 9B would be more practical…… Often now, in hindsight (also looking at the costs incurred), I’m in two minds whether to kick myself or not!! Must have been the “collector” part in me (but does it mean I’m an official ToolGaloot???). But….. must admit, these tools are “rather nice” to have in your hands, albeit they come at a price (and which took endless times of bidding on eBay because these type of tools demand mostly ridiculous prices). You have to search for “old plough” (with bad pics) instead of “Mathieson 9B”. Also “old rusty wood saw” (with bad pics) instead of “Disston #12”. And then ask questions and hope for honest answers. And so we have all burnt our fingers once (or twice…). But also in hindsight, one should also strive to still keep a balance in your live and your daily responsibilities, because these old tools research, collection, restoration etc etc could become a obsessive beast, consuming all your free time and energy and may just pull you away from your family! Should always be viewed as just a hobby!

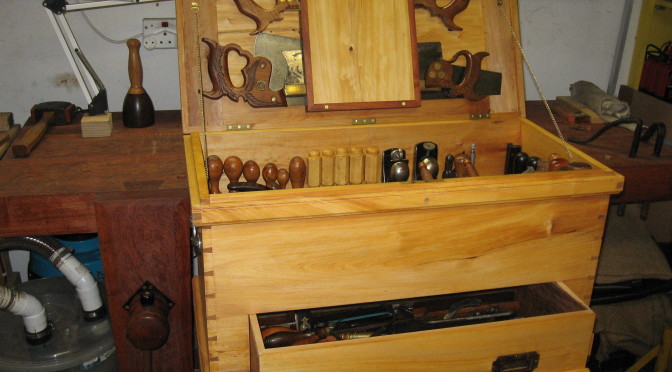
So, me being friends with “planning and scheming” started to make drawings en noting down ideas of what I require and would like to have eventually to store the majority of my old tools in. Again, as with my Roubo, not too large, not too small. Collected endless photos of other tool chests and played it off against what I wanted (and space I had). Because of my specific requirements, I didn’t really favour the idea of a large traditional floor standing tool chest. Have a bad back, so I wanted  it sitting on a wheeled chest of drawers (with my lathe tools and accessories in the drawers). Furthermore I wanted a drawer to keep my measuring tools and other small items apart from the large tools. Didn’t like the idea of diving into a toolbox in order to access something at the bottom! But all this is purely personal and what works for me! The downside is that it takes more planning in order to cater for the tools hanging down from the top part in order to optimize space available. And because you run the risk of losing real estate for tools just because you want your tools to be a little more accessible and visible, you have to have quite tight tolerances, measuring each tool and plan your drawer and drawer compartment accordingly. I have built-in dividers keeping the chisels in the sides away from the side of the drawer.

Also liked the Seaton idea  of some of my saws sitting in the lid (without overstuffing the lid). While the lid arrangement was a practical decision because of my smaller sized tool chest, it also serves a display purpose to me (remember I’m not just a user, I’m a collector-user)! I’m not working in the shop because I have to, no, I’m “playing” in the shop because I want to! “Playing” because I’m still not overly confident in many of the daily woodworking skills required in my cave, but love every step I take to up my knowledge, every new skill I acquire along the way. I suppose I’ll be a student until the day these old hands can’t hold these old tools anymore, just like the old hands that held them before me.

Lets continue now with the chest at last!!? Starting the project in parallel with my Roubo, you’ll notice some of the work was done on the old, metal framed bench (not wonder I struggled to get my panels flat!) Here I was also evaluating my newly acquired Mathieson jack and smoother.

Toolkis1Toolkis2

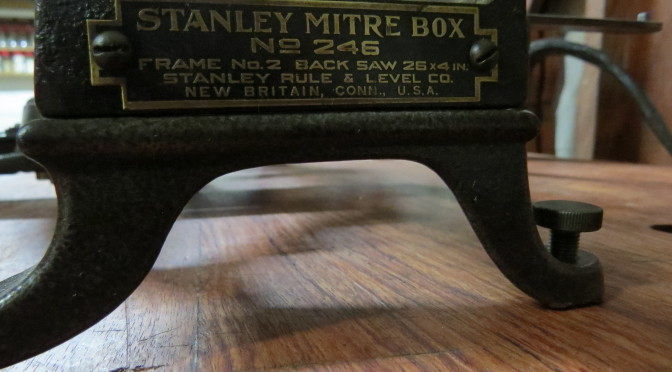
Great timber to work with (also refer to my first post on the Stanley 246 regarding the Cape Yellow wood or Real Yellow wood (Podocarpus Latifolius)

Toolkis4

Doing panel tails

Toolkis5Toolkis6

Cleaning up

Toolkis7

Trying my best with a mitre joint of the skirt…

Toolkis9

Doing a very, very delicate balancing act. With a very, very expensive 607 on the oak bottom…..! What we’ll do for a work in progress pic…

Toolkis10

Starting to work on the lid.

Toolkis14Toolkis18

Panel insert

Toolkis19

Decided to use brass detailing because I also have an affinity for Campaign furniture (not that I own any). Also practical to protect the corners, because Cape Yellow wood, although beautifully grained, is a lighter type of wood (just 510kg/m3 and a Janka of 830). Such a nice wood to work with, workability very similar to pine but ten times more beautiful (especially when aged). Bought the brass new and then “antiqued” it (files-sandpaper-ammonia fumes-rub/polish). Examples of the tree stages; new, fumed, final (the fumed one had not been man handled before the process, was just experimenting)

Toolkis21

I treated it with a few coats of BLO, polish and finally a polissoir.

Toolkis24 (1)

Inside the lid:

Toolkis26Toolkis27

Top half:

Toolkis28Toolkis29

And then the drawer, which is still not finished. Want to make one or two trays that will drop into the drawer to really keep my measuring tools out of harms’ way. Cork or felt bottoms perhaps. And, trying to be extremely clever in an effort to use one piece of plank for the front, bottom of the chest (inclusive of the drawer front), I now have to make a cock bead (or something) for the drawer (in a 17mm thick front), because I’m not satisfied with the 1mm (saw width……) gap on the sides. The top on the drawer engages air tight (i.e. no saw width sized gap!!). Lets not go into the drawer planning detail… Perhaps I’ll just make another drawer when I REALLY have nothing else to do. I’m not as fast and experienced in drawer making as most of you guys! But as they say practice…..

Toolkis30

Reviewing my chest now after using it for a while:

I’ll have to re-fit the inside chisel rack because I recently replaced the octagonal Sorby’s with Witherbys (re-handled with Kamassi ie Cape Boxwood).

Also, while its nice to have the Mathieson jack and smoother, and though I’m using them sometimes (the smoother much more often) which is a real kick, it means that my other (very nice and very old) planes (Stanley 4½, 5, 6 and 7) are sitting in a wall mounted cupboard – and gets used more often. As previously mentioned, I’m still trying to reduce my tools but it is very difficult for me to say “bye” to my Mathiesons! Bit of a dilemma.

Furthermore, I have replaced the very nice tough looking cast iron “Campaign like” handles that I bought via eBay (which snapped first time I tried it out) with brass Campaign handles from Whitechapel. Still don’t trust these handles, even though they’re brass…..

The lid holding chains, even though they may be appealing, are not very practical. Might be looking at a simpler lid stay ala Chris Schwarz, just not as ugly (sorry Chris)!!  Also have to take into consideration that I have to remove my saws from the lid without interference. Speaking about the lid, I’ll have to revisit the saw till as well, because while removing a saw is quick, but to put it away takes double the time and more care, not a simple out and back in, especially the Disston #12. I have to guide the saw a bit. Tried to design and built too tightly with too close tolerances. But, currently it works, so why change something that works!!

Although I achieved what I wanted with this chest in that it is unique as well as suit my personal requirements (also trying to built heirlooms), perhaps I should have given more attention to ratios, like in Golden ratios… Even if I increased the width by an inch or two, it would have looked less “upright”. But then it would have taken space away from the chest of drawer top, in front of the tool chest, which was a design requirement of mine. But given me more space inside the chest. Should have sacrificed that outside space….. Eish.

Regards

Frank Bartlett

Cape Town

African Rosewood Roubo

30/5/2016

I’m sure this must be the millionth Roubo journey that’s been blogged about! Thanking Gerhard again for the opportunity, this time to convey my African Roubo experience to you, here goes yet another one.

Since reading Chris Schwarz’ Popular Woodworking Magazine blog entries on workbenches years ago, I have always wanted to build me a decent solid workbench. Nothing less than a Roubo. I like working with my hands and I’m not scared to strive to acquire new skill sets (still have a hard time with welding and plastering though…). Sure, at that stage I already had a few projects under the belt. Some of you may associate with this, you know, sawing on the stairs with the wife standing on one end, planing on a temporary table in the shop and picking the work piece up from the floor every few minutes because of makeshift bench stops, sanding outside on the lawn etc. And surprisingly these projects came out fine (also despite working with “hobbyist class” tools). Later I got my hands on a workbench that was quite sufficient but it was an ugly, impractical apparition. Partially perhaps because it doubled for the previous owner as a metalworking bench – steel framed, scaffolding plank top with a 16mm plywood sheet screwed onto it. Adding a vise and bench stop eased the pain a great deal.

Simultaneously I developed the need for better quality tools (not that I deserved them). That was when I started visiting antique shops looking for quality, antique bargains. And soon had the unfortunate life changing experience by discovering eBay (and the intimacies of shipping costs).

Fast forward to the Roubo. I started to investigate what lumber to use that was available in at least 4″ thickness. Didn’t really feel like following the “laminated pine” route, rather wanted to use solids as opposed to laminated wood. Our Pine is also generally softer than the US version(s), except perhaps for the Cape grown lumber, which has much tighter growth rings than those from up north in Southern Africa (because of less favourable growing conditions, I assume). I considered using railway sleepers and then just plugging all the holes but that could turn messy (and ruin your tools). Oak was available from a local timber agent but prohibitively expensive in such dimensions. Started to contact mills for rough cut lumber (any lumber of sufficient dimensions) and eventually got referred to a company that were importing and then kiln drying lumber from countries up north (Southern Africa). It turned out that they did have four sleeper sized beams that they wanted to get rid of, the reason I can’t remember anymore (not that the reason really mattered to me!). Between 2,4 and 3,2m lengths and 110mm (4½”) thick. It was African Rosewood (Guibourtia Caleosperma), family of Bubinga. Eisch!

Roubo0

For R400 (about US$30) all in all. Kiln dried at no extra cost (the courier down to Cape Town was about R900)!! Ridiculous, I know, a real giveaway!! Although I felt remorse using such beautiful timber for a workbench, I reasoned if I strive to do a real special job, I may eventually pass it down to my son as a heirloom! Furthermore, I have sentimental value to the tree species, since my dad and me used to camp under these species trees on our numerous hunting trips in the far north of Namibia. Winters in Namibia makes for a grey/drab landscape and these trees were the only evergreen trees in the veldt. It is ideal to set up camp under one of these. They call it “Ushivi” up there).

Usually, I can be quite a pain when planning something, because I have another pet hate, and that is to have to do something over, just because I messed up because of a lack of planning or because I was rushed. Perhaps a tiny bit of Kavango-bush mentality (“there is always tomorrow) left after all these years? Therefor I prefer to take my time, investigate something pretty thoroughly and only then commence with my project (which therefor often seems to take forever). And yes, I know I’m boring. I’m also well aware that I’m a jack of many trades but master of none. So, since I’m doing this part-time, there’s no rush? If some chores around the house comes up, it tend to take priority (or gets made my priority…) and my woodwork projects tend to gather dust. So, the bench for this part time wood butcher had to be not too large (I have limited shop space), not too small, dimension ratios acceptable, tenon selection also had to be a special feature without building a bells and whistles thing. And simultaneously optimising usage of my available lumber.

Also decided to build it with hand tools (bit of a traditionalist, but lets not go there yet), so ripping and cutting these beams into manageable pieces was a mountain I had to cross, sooner or later. But by just Googling a few black and white pics of (must be) “desperados” cutting down rather large Redwoods in the early days with hand saws and axes, made me feel much more positive about my intentions! The more the bench took shape in my mind, the more urgent my urge became to start plonking away!

Roubo1 (1)Roubo2

Sure enough, the project slowly started to gather momentum. Dimensioning the legs on my old workbench to 120x100mm (5×4 inches)

Roubo3 Poot

Dimensioning one of the tree top beams. Note, because of its sheer weight I required no clamps except for an improvised “bench stop”, just in case…

Roubo4 Blad

After the top glue-up, it was time for the leg top tenons. Decided (speciality factor) on rising dovetails (inspired by Roy Underhill, I think), which I knew was going to be fun and games in these large dimensions, all three cuts being taper cuts. To start the cut correctly, snugly next to the line on this tough hardwood, is really the key (second to the initial accurate measurements and marking, of course). Saw just wants to (and does) slip in the tough end grain. Chiselling to the line to aid the start (First Class cut),  helped with some of the cuts. If done carefully, minimal planing is required afterwards. Still, it is a workbench, so it doesn’t have to be perfect!! This timber weighs 800kg/m3 and has a Janka of 2090. I orientated the legs so that my cut would be more or less vertical using my sash. At that stage I still had trouble sawing accurately to a line, so I sawed 10mm at a time and then scrutinised my cut, until the cut was complete. Took forever, but the result, I felt, was acceptable. Had no room (read extra wood) for major errors. This is not necessarily a stronger or less stronger joint than the other traditional joints being used on Roubo. Just a bit of a fancy joint (for that x-factor aka je ne sais quoi!!) that I strived for to make the bench special. Also one of the joints the woodwork community calls “impossible joints”, because once assembled, it appears to have been impossible to assemble.

Roubo7 RDT pootRoubo8 RDT pootRoubo9 RDT pootRoubo10 RDT pootRoubo11 RDT pootRoubo12 RDT poot

Turning to the top 1800x600x100mm (72x24x4″)was ideal to test a recently restored 1″ Witherby, but I found it was almost too small for the job at hand.

Roubo13 RDT blad

Then the horizontal supports.

Roubo14 poottap

With lapped dovetails in front.

Roubo15 spartapRoubo16 DT spartap

The jaw (200mm or 8″ wide) was also a challenge to shape with ordinary spoke shaves etc

Roubo17 kaakRoubo18 kaak

Think these were sold as antique book clamps but they appeared acceptable to be used in the vise. Used the least chipped thread (almost 2 inches diameter) because there were some wear and tear on them. Not a nice tight fit on the female thread anymore after all these years but had to do. Using beeswax on them to reduce friction.

Roubo19 skroef draad

Something else that I found quite challenging was the glue-up because all the parts had to be simultaneously glued, fitted and clamped in the limited open time. Do you ever have enough clamps?? By the way, dry fitting (and disassembling) these tight fitting huge tenons was not a walk in the park either. Eventual result was fine though. Then used a caster wheel with a 6mm sawn off drill bit as axis to ease/support the vise operation. Also did something similar at the rear end of the vise (top of the tenon hole of course, in order to support leverage of the vise)

Roubo20 kaak glide

African Blackwood (Dalbergia melanoxylon) for the garter and handle knobs. Will probably inlay the garter later on (when I feel like acquiring inlaying skills!!)

Roubo21 garterRoubo22 garter

And finally the tool rack that’s mounted to the left rear of the top. Will add additional bench dog holes etc as required. Didn’t want to start boring holes just to find out later on: “this hole actually needs to sit 1,357211cm to the left…”!!

Roubo23 toolrak

Eventually, after flattening and some Danish Oil, voila!

Roubo24 kaakRoubo25Roubo27 (1)

Some reminiscences…. After working with it for a few years now, I have no regrets (of course I would say that…). There’s nothing bothering or irking me. Every shop should have a solid workbench and by building one yourself, it teaches you lots of skills along the way. I like the size of my Roubo and adjust my work accordingly. The final height is 870mm (34,25inch) because I’m tall-ish. The darker wood works perfectly fine, although I think lighter wood may perhaps have been more practical. Would have liked more natural light in my cave though, but have to make do with extra artificial light. Would like to replace the vise screw sometime (with another wooden one) but at least this one is not jumping threads and actually works fine! I have added a traditional bench stop recently and drilled two or three extra holdfast holes. Thinking about a sliding dead man but haven’t really had the need to use one yet and there are other ways to circumvent that. Oh, yes, and then perhaps an end vise, even one with just a 20cm range span could also be a helpful feature. Personally I’d prefer not to bolt a Record 52 or something similar to the end of the bench to double up as ‘n end vise, but that’s purely personal. This thing weighs a ton, so I’m currently satisfied to use it just as it is. Saves a lot on medical bills, by not having to manipulate it (yet) for additional mods!

Hope I didn’t bore you with this African Roubo experience! Just thought many of you may relate to much of this.

Cape Town greetings!

Frank Bartlett

Stanley no. 246 Mitre box/saw restoration

26/5/2016

This is Frank Bartlett’s first post on Je ne sais quoi Woodworking. I hope it is the first of many as he is clearly a very talented woodworker and hand tool encyclopedia. I realise that I have an advantage in making that assessment as I have had the privilege to see some of the other projects he has done. Of course he gave me grief regarding the compliments, but I decided to leave it in the text as it is my honest assessment. So for now just trust me, you will come to enjoy his contribution to this site. Both Frank and I want to encourage other (especially African) woodworkers to become involved in this way. Feel free to contact me if you consider writing up some of your projects.

So without further ado, over to Frank Bartlett from the Cape of Storms:

Looking for an old mitre box had almost been an obsession of mine, for some time now (refer to Gerhard’s blog entry on his Langdon). But being in Africa, that is like looking for a needle in a haystack (suppose that is why Gerhard was (willingly) “forced” to turn to Jim Bode for his beautiful Langdon). I once saw a Stanley advertised up in the Free State, but it was one of those: “I know what its worth, make an offer….” ads, which is a pet hate of mine and which I’m not very good at. Needless to say, the seller didn’t bother to return my urgent emails after my offer! Anyway, that one went down the tubes although I still think my offer was fair given the condition.

So, after Gerhard’s notice that there may be one available on a 160km round trip, I had trouble sleeping that night, after reading through Bob Demers’ (The Valley Woodworker) prep of his box…. Anyway, eventually found the shop and there she was, at the entrance! Without a price…. Now, that could mean a few things, one of which of course, its not for sale. Which it turned out to be. After munchos small talk, the lady indicated she was keeping it as a rarity and furthermore, her son had told her on a previous occasion that he would like to have it. She also added that it “was very expensive anyway”. Turned out to be R900. For its condition I thought “eisch”, but presented the money (in small notes, and lots of them). The eyes lit up but nah, first wanted to contact her son to get his opinion. Fortunately for me, being in Africa, her son was somewhere out of cell phone range.

Paid up, grabbed and went for it. Must have been quite a sight walking with this (heavy) old thing merrily the odd six blocks (REALLY been looking for this shop…) because I turned not just a few heads. The photo below was taken in the antiques shop.

Stanley 246 1 (1)

Back at home I was able to scrutinise it thoroughly. Appears to be circa 1912-1916 model (because the length stop was only patented in 1916). Although there were a few parts missing, it was still surprisingly complete (most importantly missing the Disston medallion, trip clamp, one stock guide, one knurled tie bar screw and saw guide stop screw). Now these screws have really weird threads. So, not really critical components that I can get in due course.

Stanley 246 2Stanley 246 3Stanley 246 4

Once it was stripped and it was off to the wire wheel. I recently changed from a 1000rpm 5inch wheel to this 8 incher at 3500rpm on this 1930’s B&D. Whew! My fingers took quite a beating, not wanting to use gloves or pliers or vice grips on tiny (weird) threads… Unnerving experience, but tried to take as much care as I could (except for holding these things with my fingers)!

Stanley 246 5

On larger surface areas I prefer to use wire wool and turps and then clean it afterwards with White Spirit. The screws however, went the wire wheel way and was left bright and shining. To get an artificial patina back, I applied Birchwood Casey Gun Blue paste on the wire wheeled parts. Worked wonders. Afterwards the bottle of Boeshield T-9 was utilised because living in an area (where two oceans meet, nonetheless), rust is never far away. So, I tend to use this on tools or parts that I don’t get to oil regularly. For daily use on saw plates or planes etc, before storing them, I have a can of Jojoba oil handy.

Stanley 246 6Stanley 246 7Stanley 246 8Stanley 246 9

Then to the sacrificial frame board. I chose Cape Yellow wood  (Podocarpus latifolius or Geelhout) because its soft. Cape Yellow wood is probably the second most famous timber from South Africa (second only to Stinkhout or Ocotea bullata or Black Stinkwood). I first flattened the board and then jointed it. The last picture in the below set is a Podocarpus latifolius growing on the slopes of Table Mountain.

Stanley 246 10Stanley 246 10 1

Time then for sawing and pairing the rabbets for the stock guides (what is that Cape Boxwood handled Witherby doing so close to the edge, I’m asking myself now…)

Stanley 246 12Stanley 246 13

Drilling and forming the cutouts

Stanley 246 14

And there you go!

Stanley 246 15

Just some last thoughts on the 11ppi Disston saw. Apologies for not posting pics on the restoration, was just too exiting! Handle is flawless, especially after I doused it with Kramers Antique Improver. Teeth still cuts good but I still want to do the sharpening deed myself, just because..! Very little etch left unfortunately, no matter how careful I removed the rust (with turps, 400grit wet and dry, wrapped around a pad). There was just nothing left (not even the gun blueing/sandpaper trick worked). Very interesting, I saw on an old catalog that the box comes with a 26×4 inch saw, yet mine measures 24,5inches along the teeth. If you extrapolate the cutaway, you measure 26inches and 4 deep. I guess thats how they define the “26×4” on the brass plate.

Just one word of advice, this is a biggy and needs storing space, although it is difficult to store when you just want to look at it all day.

Cape Town greetings!