All posts by Gerhard Marx

Psychiatrist and Woodworker

End grain chopping board

December 2014

Shortly before embarking on our usual end of year holiday I decided to take the incumbent chopping board in our kitchen along to the beach house. This meant that I needed to replace it in a timely fashion for fear of life threatening marital discord. Therefore I started on this improved version even before we left the tropics.

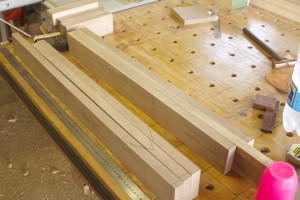
As you can see from the pictures below, I went for contrasting colours in choosing Witpeer (left) and Kershout (right).

IMG_2709IMG_2710

Here you can see both boards ripped on the table saw and the resultant strips cut to length by hand.

IMG_2711IMG_2712IMG_2713

The first glue-up.

IMG_2714IMG_2715IMG_2716

I removed the excess glue with my shop made flush plane …

IMG_2717IMG_2718

… and fed it to the planer.

IMG_2719IMG_2720

The board was then chopped in halve and glued again. The reason for this way of doing it was to make it possible to feed the first glue-up (250mm or 10″ wide) through the planer as the second glue-up (500 mm x 500 mm) would have to be done by hand. One of the end grain edges were then flatened by hand in order to have a perfect reference surface for the table saw.

IMG_2721IMG_2722IMG_2723

I then ripped the second glue-up, turned each strip by 90º (end grain thus facing up and down) and flipped every second strip head over tail in order to end up with a chess board appearance. The third glue-up followed the mentioned procedure. You can see that I used shop made cauls to cut down on the amount of end grain planing post glue-up.

IMG_2724IMG_2725

I used my Lie-Nielsen bevel-up Jack plane with a toothed blade for the bulk of the end grain leveling. With such incredibly hard wood it took quite some time to get it flat.

IMG_2726IMG_2729

6/1/2014

Once back from holiday I dug out a piece of Oregon pine I nicked out of someones rubbish skip. It looks like it might have been a roof beam of some description in a previous life.  It worked perfect as a jig (for lack of a better word) to draw a particular curve on each side of the chopping board.

IMG_2951IMG_2952IMG_2953IMG_2954IMG_2955IMG_2956IMG_2957IMG_2958 IMG_2959

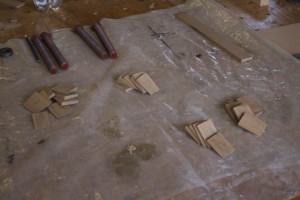
I then prepared some thin strips of Witpeer and Kershout. The bandsaw got rid of the unwanted side of the curve, after which I used a block plane and my shop made sanding planes to smooth it out.

IMG_2960IMG_2961

My Oregon jig was then used to bend the strip around the curve while gluing it into place. The same process were followed for each of the other edges.

IMG_2962IMG_2963IMG_2964IMG_2976

Some more flattening work followed. You can see the tools used, as well as the specific order in which they were used in the pictures below.

IMG_2978IMG_2979IMG_2981IMG_2982IMG_2983IMG_2984IMG_2985

A couple of block planes and a few sanding planes were then employed to shape the four edges.

IMG_2988IMG_2986IMG_2987

I use liquid paraffin (also known as paraffinum liquidum) a highly refined mineral oil on chopping boards as it is apparently safe for this purpose. Please do not quote me on that and do not try this at home kids.

IMG_2989IMG_2991

These Kershout strips are supposed to keep the board flat and off a potentially wet surface. The final product made all the effort worth while (I felt).

IMG_2992IMG_2993IMG_2994IMG_2995IMG_2996IMG_2997

December 2014 tool finds.

15/1/2015

This December holiday turned into a fairly successful tool solicitation exercise. I met some people dealing in antique stuff and found new tool hunting grounds for future purposes. In the picture below you can see the artifacts I managed to secure.

IMG_2916

This massive “treksaag” I bought at an antiques auction.

IMG_2914IMG_2915

I met a lady who is the owner of an antiques/coffee shop in Groot Brakrivier at the auction. I later bought a few old tools, including this brass and leather bound tape measure from her.

IMG_2917IMG_2918IMG_2919IMG_2920IMG_2921

She also sold me this old ink roller, which is destined to become a glue roller.

IMG_2922IMG_2923

This medium sized screw driver (embossed with “Yankee patent made by Stanley”) I bought for R65 (US$5,64 with todays exchange rate). They fetch between US$50-75 (shipping not included) if bought form antique tool dealers. I love these and only had the large version until now. I use them all the time, so this would probably be my favourite of the lot.

IMG_2928IMG_2929

My father in-law gave this more recent version of the Yankee patent to me as a present. This one (large size) has only the Stanley name on it. He bought it new in 1978 for R18,40 as you can see on the original box. It has a plastic red handle, as opposed to the wooden handles of the earlier models. I think this could become my son’s first Yankee!

IMG_2924IMG_2925IMG_2926IMG_2927

Speaking of Didi, I also bought this run down Stanley Bailey no. 4, which we will rehab together. It will be his first bench plane. It was R300 (US$26). I am certainly no expert, but it looks to be a Type 17 (ca 1942-1945).

IMG_2930IMG_2931IMG_2932IMG_2933IMG_2934IMG_2935IMG_2936IMG_2937IMG_2938IMG_2939IMG_2940IMG_2941

This a collection of wooden smoothers and joiners found in 2013 and 2014. I will use these for decorative purposes in the shop.

IMG_2942

Protracted tool perambulations through sub-Saharan Africa.

9/1/2015

One of the joys of living in Africa entails serious challenges in acquiring quality vintage woodworking hand tools. Therefore, you end up being at the mercy of kindhearted internet-based antique tool vendors such as Jim Bode and Patrick Leach. So far all my acquisitions from Patrick Leach went swimmingly (pun unintended) in terms of the transatlantic journey of the merchandise.

However, my first acquisition from Jim Bode Tools turned into an unexpected drama. This was, I have to say, through no fault of theirs. It was simply an inevitable consequence of life on the dark continent. Just to be clear, I love living in the cradle of humankind, but like every other location it has it’s vexations.

It all started on the 8th of October 2014 when Jim shipped 4 items that I have been buying over a few months time. He kindly held onto the tools until there were enough to justify a shipment as it is quite expensive to haul solid hunks of metal across the equator. I tracked the parcel’s movements via the US Postal website as per usual. On the 22nd of October it checked into a sorting facility in Zambia! I immediately knew that this meant trouble. None of the previous 10-ish parcels that found me via US Postal from the USA ever visited Kenneth Kaunda.

For some (not particularly) mysterious reason the parcel then went into hibernation. It did not move again according to the website (until this day in fact). My incumbent practice manager spent days on end to try and locate it. She spoke to just about everyone in Zambia apart from Kenneth himself, hence my deduction that it had a protracted high tea appointment with the former statesman. At some point she was told that it left Zambian shores en route to Azania (aka South Africa in this particular instance).

Problem was that the feeble Azanian Postal Services were in the midst of yet another strike. I am not sure why they even strike, because I am sure that is more work than what they get up to during the brief spells between strikes. Anyway, it meant that we would have no way of establishing where the parcel was. More correspondence with the entire population of Zambia followed, which produced a rumor that the parcel might have joined ZANU-PF in Zimbabwe!! What next?

By the 24th of November I requested Trish Bode to make an enquiry with US Postal as you need an American address to do so. She opened a case to track the package and the local postal service (presumably in Zambia) explained that they need 25 business days to complete the “investigation”. In sub-Sahara Africa that could mean anything between 2 and 10 years. At this point I decided that I would never have the pleasure of seeing these tools.

We left on holiday for three weeks and returned on the 5th of January. The next day my practice manager phoned to inform us that the parcel arrived!! Hallelujah!!

It was obvious from the packaging that the parcel perambulated the entire SADC Region en route to the Land of the Brave, but the contents were in pristine condition.

IMG_2965


IMG_2966IMG_2968


As you can see, it is a real special ensemble of priceless tools, hence my acute melancholia when it seemed as if it might be MIA. The ensemble includes an early Stanley no.77 dowel making machine (the later models are blue) with a ¼” cutter, a 9″ Witherby drawknife, a 24″ 7tpi cross cut No.12 Disston saw and a small Stanley cross pein hammer

IMG_2970

IMG_2971

IMG_2972IMG_2973IMG_2974IMG_2975


I hope that the members of touring party are ready to work after their extended travels through paradise.

Tour de Shop and project inventory 2014

13/11/2014

My last proper weekend in the shop for 2014 has now come and gone. It is therefore now time to start reviewing what I have managed to accomplish during this year and to take a quick look around the shop.

It all started with the rehabilitation of the two planes I happened to buy at an antiques sale in RSA over the December holidays. The Bedrock no. 606 has become one of my go-to tools.

http://www.jenesaisquoiwoodworking.com/resurrection-of-two-cast-iron-fore-planes/

IMG_9022IMG_9024IMG_9036IMG_9604IMG_9605IMG_9607IMG_9608


I also bought this no.78 Rabbet plane from Stanley at the same auction, but it’s rehab took quite some time as it had several parts missing.

http://www.jenesaisquoiwoodworking.com/stanley-no-78-rehabilitation/

IMG_9038IMG_9040IMG_9041IMG_9981


This was the last of my holiday shopping, a no. 45 Plough Plane from Stanley. It was covered with a thick black paint, and had no iron/s. I decided to tidy it up for shop decoration purposes.

http://www.jenesaisquoiwoodworking.com/stanley-no-45-rehabilitation/

IMG_9044IMG_9621IMG_9622IMG_1772IMG_1773IMG_1774IMG_1775


I managed to finish turning all those file handles that I started with at the end of 2013.

IMG_9596


My major project for 2014 started on the 1st of February and is not finished by quite some way. I spent at least 80% of my shop time this year working on my 18th century workbench and am pleased to say that it is at least assembled by the end of 2014. You can read all about it in a series of posts entitled “My 18th Century Workbench in progress”

IMG_9580IMG_9581photo 3photo 4


My 17 m³ wood finally completed it’s journey when it took occupation of it’s purpose built shed.

http://www.jenesaisquoiwoodworking.com/the-lumbering-odyssey/

IMG_9643IMG_9642IMG_9804IMG_9654IMG_9661IMG_9671IMG_9857IMG_9860

These exquisite chisels from Lie-Nielsen arrived after a wait of several months. I made this very basic storage to keep them out of harm’s way.

http://www.jenesaisquoiwoodworking.com/chisel-storage/

IMG_0005IMG_0003IMG_0004


Didi (my son) started his woodworking journey by turning this mallet for himself.

IMG_0071IMG_0072


I used an antique brace bit from my father’s collection that had key parts of it’s business end missing to fashion this birdcage awl. It is a real winner.

http://www.jenesaisquoiwoodworking.com/brace-bit-birdcage-awl-also-known-as-bbba/

IMG_0128IMG_0180

Didi’s next project was this bird feeder.

IMG_5595

I revamped and sharpened this old scissor.

http://www.jenesaisquoiwoodworking.com/scissor-rehab/

IMG_0201IMG_0215IMG_0227

This shop high stool saw a bit too much action during the 14 years since I first made it. I re-upholstered it with leather and strengthened the base, while (clearly) not worrying too much about je ne sais quoi.

http://www.jenesaisquoiwoodworking.com/shop-high-stool-facelift/

IMG_0330IMG_0337

Didi learnt a few more skills by producing this beautiful Assegaai handle for an old axe we had lying around.

IMG_0418IMG_0421IMG_0422

This Miller’s Falls no. 88 joiner gauge was successfully rehabilitated.

http://www.jenesaisquoiwoodworking.com/millers-falls-88-perfection-jointer-gauge-rehab/

IMG_0913IMG_0907

The wife and I managed to make a team effort of the re-upholstering of “die rooi bank”.

http://www.jenesaisquoiwoodworking.com/die-rooi-bank/

IMG_1071IMG_1084IMG_1078IMG_1101IMG_1148IMG_1412IMG_1414

In order to hand plane the two edges of my benches top parallel, I had to first build this large panel gauge.

http://www.jenesaisquoiwoodworking.com/makeshift-panel-gauge/

IMG_1360IMG_1361IMG_1362IMG_1364

In order to create the space for my 18th century bench, I had to rearrange  some of the power tools. This planer and radial arm saw were placed on the same steel table and lined up to become each other’s out-feed table.

http://www.jenesaisquoiwoodworking.com/level-playing-field/

IMG_1404IMG_1405IMG_1406

A set of winding sticks.

http://www.jenesaisquoiwoodworking.com/shop-made-winding-sticks/

IMG_1493IMG_1494IMG_1749IMG_1751

My favourite shop made wooden plane received some cosmetic surgery. I added a thin strip of Tamboti to it’s chipbreaker/lever cap and covered the lever cap screw with Kaapse Swarthout. This is a true workhorse as it makes short work of all scrub plane and very aggressive fore plane tasks.

http://www.jenesaisquoiwoodworking.com/scrub-plane/

IMG_1664IMG_1713IMG_1714IMG_1715IMG_1716

My own version of a Melencolia Square.

http://www.jenesaisquoiwoodworking.com/shop-made-melencolia-square-with-the-marxian-improvement/

IMG_1735IMG_1736IMG_1739IMG_1740IMG_1741IMG_1742

Custom made leather apron.

http://www.jenesaisquoiwoodworking.com/custom-made-leather-apron/

IMG_1743IMG_1744IMG_1745IMG_1746IMG_1748

Restored a Stanley no. 10 Rabbet plane (ca 1900) and a Bedrock no. 607 Jointer.

http://www.jenesaisquoiwoodworking.com/stanley-no-10-rabbet-plane-rehab/

http://www.jenesaisquoiwoodworking.com/stanley-bedrock-no-607-jointer-rehab/

IMG_1804IMG_1799IMG_1800IMG_1976IMG_1978IMG_1979IMG_1980

Replaced my ½” Lie-Nielsen mortice chisel handle with a shop made Ysterhout version. So far it is standing up to heavy abuse without breaking a sweat.

http://www.jenesaisquoiwoodworking.com/replacing-lie-nielsen-mortise-chisel-handle/

IMG_2180IMG_2169


A custom made pairing handle for my bevel edge chisels.

http://www.jenesaisquoiwoodworking.com/shop-made-pairing-handle-for-my-lie-nielsen-bevel-edge-chisels/


IMG_2170

Finally got round to making an Ysterhout straight edge.

http://www.jenesaisquoiwoodworking.com/shop-made-ysterhout-straight-edge/

IMG_2270IMG_2271IMG_2272

Restored this Stanley no. 203 bench clamp.


IMG_2286IMG_2289IMG_2329

Restored this Stanley no. 9½ block plane.

http://www.jenesaisquoiwoodworking.com/stanley-no-9½-block-plane-rehab/

IMG_2482IMG_2483IMG_2485IMG_2486IMG_2512IMG_2641IMG_2643IMG_2645IMG_2644

I started restoring this Stanley no. 8 Jointer (ca 1896), but there is a lot more work to do next year. I will replace both tote and knob.

IMG_2478IMG_2479IMG_2481IMG_2487IMG_2618IMG_2619


Tour de Shop at the end of 2014

This is simply a series of photos documenting the state of the shop at the end of 2014. The major change from last year has been the addition of the assembled (though not finished yet) 18th century style workbench. I also managed to collect quite a few new hand tools with the help of Patrick Leach and Jim Bode. As I am writing this my first shipment from Jim has not arrived yet despite leaving the States on the 12th of October. My guess is I will never see those tools or money again. Just one of the joys of living in Africa.

(9/1/2015 – I am very happy to report that the shipment arrived in Namibia on the 6th of Jan 2015 without as much as a scratch. I will write a post on this saga in the near future)

IMG_2620IMG_2621IMG_2622IMG_2623IMG_2624IMG_2625IMG_2626IMG_2627IMG_2628IMG_2629IMG_2630IMG_2631IMG_2632IMG_2633IMG_2634IMG_2635IMG_2636IMG_2637

My 18th Century Workbench in progress 24

3/11/2014

Now that the pressure is off, I am enjoying the woodwork more than the few weeks leading up to assembling the bench. I have now returned to my usual rhythm of tinkering here and then tinkering there while listening to some jazz. In fact my woodwork is akin to the jazz genre in that my work follows my mood on the day. This a luxury one can only afford with a true hobby. As soon as you have to generate an income out of it, the work starts dictating your mood.

Anyway, here are two precious Assegaai (Curtisia dentata) boards being prepared for the lathe next year during the rainy season. I will use it to turn wooden dogs and thought that it would be best to do that during high humidity so that they will not get stuck at some stage. The last two pictures show the stock soaking in diesel. I could not work out whether the few signs of wood borers were active or inactive. To make sure, I gave it a diesel spa for halve a day.

IMG_2599IMG_2615IMG_2616IMG_2617IMG_2682IMG_2683

Here I used the pictured tools to fit the Witpeer breadboard end. Only the two outside tenons were glued to allow the tops to move freely towards each other during times of high ambient humidity. The two inside tenons therefore also have mortises that allows space for the mentioned movement. You will also notice that I used draw pins to further strengthen the joints. It is important to remember to cut a slot (rather than a hole) for the draw pins on the inside tenons, in order to also allow for the movement.

IMG_2651IMG_2652IMG_2653IMG_2654IMG_2657IMG_2658IMG_2659IMG_2660IMG_2661IMG_2662IMG_2664IMG_2668IMG_2669

I also started preparing stock for the two sliding “deadmen”. After much thought I dropped the idea of building the very extravagant design I originally planed. The main reason for this is to improve access to the shelve as much as possible. Therefore I thought that a simple yet solid Witpeer beam in the shape of an inverted T would work best. Here I am laminating the stock and doing some of the early prep work.

IMG_2665IMG_2667IMG_2670IMG_2673IMG_2674

Here I started quite an elaborate process of fitting the quick release end vise and ensuring at the same time that the two ends of the twin-top are lined up perfectly.

IMG_2666IMG_2675IMG_2676IMG_2684IMG_2688

I made a “cap” (for lack of a better term) for the bottom surface of the aprons. It ensures a better clamping surface and hides the 20 mm nuts.

IMG_2685IMG_2686IMG_2687


Mallet facelift

17/11/2014

A week ago I damaged the non-leathered end of my shop made heavy dead-blow mallet, while getting carried away with hitting some Assegaai dowels (draw pins) home. It needed quite a bit of persuasion and I did not realise how hard those dowels are. Anyway, so I drilled out the damaged area and filled it with slow setting epoxy. I will report back on this post how it worked out after some abuse in the shop.

IMG_2677IMG_2678IMG_2679IMG_2680IMG_2681

Stanley no. 9½ Block plane rehab

27/10/2014

These little beauties were made between 1873 and 1981. This one is an example of the final design (in the tool’s evolution) as far as I can gather from the literature, but could still be anything between 40 to 100 years old. I bought it from Patrick Leach.

IMG_2482IMG_2483IMG_2484IMG_2485IMG_2486

As per usual I sent the various part off to get bead blasted. Then I applied the usual sequence of coats to the main casting and lever cap.

IMG_2512IMG_2514IMG_2515IMG_2516IMG_2517IMG_2530

Kenney also plated the lateral adjustment lever, the lever that adjusts the throat and the depth adjustment lever with Cadmium. Now I only need to sharpen the blade. The last picture shows the leather pouch I made for it.

IMG_2641IMG_2642IMG_2643IMG_2644IMG_2645IMG_2646

My 18th Century Workbench in progress 23

27/10/2014

I started chopping off the tentacles created by the protruding through-tenons locked in place with wedges and the draw pins. I used my newly acquired Disston no. 12 (ca 1896-1917), which has not been restored completely. I tried to saw off the first tentacle, but found that the saw could do with a sharpening. After that it performed admirably. You will notice that one saw nut is missing as I quickly put the saw back together for this job. I want to clean up the handle and do more work on the blade before finally reassembling it for years of excellent work.

The next tool used is also a rehabilitated old timer. The Bedrock no. 606 was used to plane the end grain flush to the surface of the bench.

IMG_2494IMG_2495IMG_2496IMG_2497IMG_2498IMG_2499IMG_2500IMG_2501IMG_2503IMG_2504

I thought it might help in future when observing wood movement in the bench to document what the ambient humidity was around the time the bench was assembled. It remained very stable over the past 4 months ranging between 27-30%.

IMG_2502

The bench was then turned on it’s side to get at the stretcher and apron tenons.

IMG_2505IMG_2506IMG_2507IMG_2511IMG_2519IMG_2520IMG_2521IMG_2522


Once that was done, I started fitting the shelve. You will remember the Kaapse Swarthout (Maytenus peduncularis) boards I prepared some time ago for this purpose. The cleats were made up of Tasmanian Blackwood (Acacia melanoxylon) grown in the Knysna forrest. The shelve boards were addressed with my Lie-Nielsen tongue and groove plane before cut to final length. You can see how I made slots for the screws


IMG_2523IMG_2524IMG_2525IMG_2526IMG_2528IMG_2538IMG_2539

In an earlier post I mentioned that the drawpin holes are not staggered as one should do. Mine are in the same plane. This for technical reasons to do with the design of my tenons. The way I got around this problem was to tap in drawpins that were in the order of 100 mm from the business end and a shorter one (pictured) from the other end to make it look as if they run all the way through the leg.

IMG_2508IMG_2509

Each tongue and grooved shelve board were fixed to the cleat with two traditional wood screws sitting in a slot that allows for plenty of wood movement.

IMG_2563IMG_2557IMG_2558IMG_2559IMG_2560

The kids helped to assemble the shelve and clearly enjoyed the finished product.

IMG_2567IMG_2568IMG_2569IMG_2570IMG_2571IMG_2572IMG_2573

Now I will turn my attention to the legvise. You will find the pictures and write-up in the post entitled “My 18th Century Workbench in Progress 18”

http://www.jenesaisquoiwoodworking.com/my-18th-century-workbench-in-progress-18/

IMG_2574IMG_2575IMG_2576

My 18th Century Workbench in progress 22

12/10/2014

The bench was finally assembled on Sunday 22/10/2014!!!

We managed to do the glue-up in two very stressful hours between 15h30 and 17h30, after working under the gun all weekend to get the last prep work done.

At the beginning of the week I drew up a list of the most important bits to get done before assembly, which was scheduled for Sunday. As you can see it is a curious eclectic ensemble of Afrikaans and English.

IMG_0172IMG_2393


Early in the week I made these custom 20 mm bolts, which will fix each of the two parts of the twin-top to the aprons in two places.

IMG_2308IMG_2309IMG_2310IMG_2311IMG_2312IMG_2317IMG_2318IMG_2313IMG_2316IMG_2319IMG_2320IMG_2321IMG_2325IMG_2327IMG_2326IMG_2328


This is the board of Assegaai I transformed into drawpins. The process is documented chronologically in the pictures. Curtisia dentata is especially well suite to use as draw pins due to it’s characteristics of being extremely tough, strong and elastic. Dry Assegaai also shrinks less than most other wood, which is why it was the preferred wood to use for wagon wheel spokes in the Old Cape Colony.

IMG_2303IMG_2330IMG_2331IMG_2332IMG_2333IMG_2334

IMG_2351IMG_2352IMG_2353IMG_2357IMG_2358

IMG_2377IMG_2366IMG_2367IMG_2378IMG_2379IMG_2368IMG_2380IMG_2381

Some handcut Witpeer wedges to lock the through-tenons permanently in place.

IMG_2336IMG_2337IMG_2354IMG_2355

The tenons of the long stretchers ended up looking like this, shortly before being glued into place for ever (I hope).

IMG_2374IMG_2375


The final dry run went very smooth. I expected something to not fit perfectly, but for a change it was not the case. You can see how my wife and friend Siegmund Mengersson (who happened to be around) helped, as this is not a one man job.

IMG_2338IMG_2339IMG_2340IMG_2342IMG_2343IMG_2344IMG_2346IMG_2348IMG_2350


We then took the whole thing apart and took a few photos with the whole family. The reason being that the whole family spent the weekend wondering in and out of the shop.


IMG_0182IMG_0180IMG_0181


Then on Sunday afternoon we mixed the epoxy (discussed in an earlier post) and raced through 2 hours, which felt like 15 min. We only just managed to get the job done within the recommended 2 hours open-time of this particular epoxy adhesive.

What impressed me most was how the Assegaai drawpins closed up the shoulders of the aprons and stretchers. We used clamps to take the stress off the pins while hitting them home, but could visually see how they tightened up the joints. We removed the clamps immediately after and the joints stayed perfectly tight and closed up.

What worked particularly well, was the 13 mm x 150 mm drawpin that was tapped through the sliding-dovetail-through-tenon into the top. These did not need any assistance from clamps. It simply pulled the leg into the top as if they were made out of the same piece of timber. I have never seen this method used for the mentioned joint, but I can really recommend it (from this case study of one).

IMG_2394IMG_2395IMG_2396IMG_2397IMG_2398


A few pictures of an exhausted yet relieved wannabe-18th-century-woodworker, his heir and the object of his toil since the 2nd of February 2014.

photo 1photo 3photo 4

It is done!!!

12/10/2014

Well, not quite, but it is glued up!!! And that before the humidity changed. At 15h30 on the 12th of October 2014, my wife and I started assembling the bench. It was a very stressful 2 hours, but now I can relax and work at my usual leisurely pace.

I will soon have some better photos, but here are a few to wet the appetite.

photo 1photo 3photo 4