Roubo sharpening bench – part 8

24/8/2015

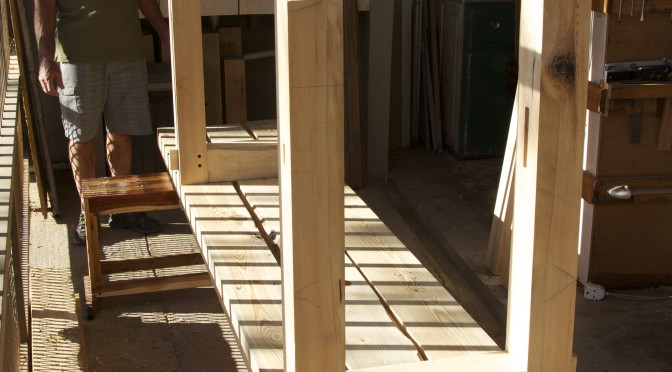
The time finally came to properly use my new Bad Axe tenon saw. As you can see in the pictures below, I used it to cut the massive tenons of the long stretchers. It was quite easy to cut with the aid of the saw horses that held the stretchers at a comfortable hight. The saw wasted no time on these cuts as it has a fairly aggressive tooth geometry.

IMG_4913IMG_4914IMG_4915

The shoulders were done with a Lie-Nielsen crosscut backsaw. You can appreciate the surface of the tenons after the sawing (second and third picture below).

IMG_4916IMG_4917IMG_4920

I added these two pictures to show a trick I discovered by accident. The row of dog holes along the front edge of my bench that operates in tandem with my quick-release end vise has two areas where a couple of holes are missing due to the placement of the leg. When I have a piece of timber that is of that particular length, it is a bit of a hassle to find a scrap piece of wood as a spacer in order to pinch the timber between dogs. The other day I realised by shear luck that my Veritas Wonderdog can solve this problem without much fuzz.

IMG_4918IMG_4919

I then used a Stanley no. 10 rabbet plane to shave the tenons down to it’s exact size. You will notice how it also improved the surface of the cheeks (which is the important glue surfaces of the joint).

IMG_4922IMG_4931IMG_4932

Here I am chopping the shoulders to the knife line.

IMG_4933IMG_4923IMG_4925

I am not sure what this dimension of the tenon is called (?edge maybe?), but I trued it up with a pairing chisel and block plane.

IMG_4934IMG_4935IMG_4936

Before reassembling the bench in order to mark out the correct location of the mortises of the long stretchers, I drilled the holes through the top that will accept a bolt to fasten it to the apron. The idea being that I could then use that hole to mark the exact location of the corresponding hole through the apron, while the bench is assembled.

IMG_4937IMG_4938

Here you can see the bench assembled. The aprons are in their correct position, but the short stretchers sit at the top of the legs in order to line them up correctly without being in the way of the longstretchers.

IMG_4939

I usually use these batons to located the exact position of the stretchers, as referenced off the apron’s through tenon.

IMG_4940IMG_4941IMG_4943

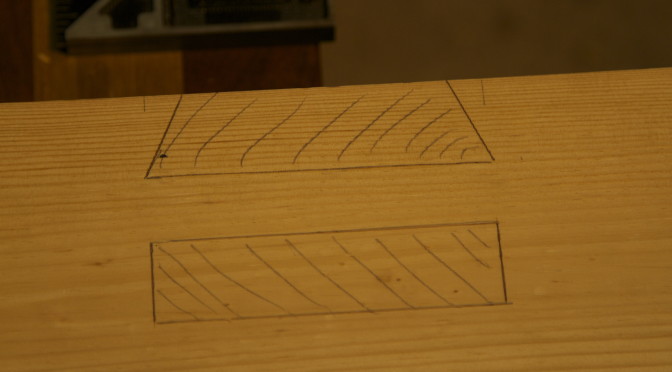
The following two pictures might help to explain how the short stretcher’s tenon (traced off in pencil on the leg) will eventually pass through the long stretcher’s tenon to also become a through tenon that can be wedged. I got this idea from some Japanese joinery I saw some time ago and is one of very few subtle changes I have made to the design compared to my first bench.

IMG_4944IMG_4945IMG_4947

With the holes for the bolts marked out on the aprons, I could drill them out after de-assembling the bench once again. I started with a 40 mm hole that will accept the massive nut. I used a Forstner bit (in the drill press) as it creates a flat bottom for a washer (plus I simply did not have a big enough bit for my brace). That was followed by a 1″ Irwin auger bit to allow for some wood movement as I will use a 20 mm threaded rod to produce my custom bolt.

IMG_4948IMG_4949IMG_4950IMG_4951IMG_4954

I tried to copy (unsuccessfully) my friend Jonathan’s excellent photo of the in side of a rubbish bin. Check it out on his superb site by going here.

IMG_4958

Marking out the mortises for the long stretchers.

IMG_4952IMG_4953

Here I am drilling the set of dog holes along the front edge of the top and at the far end drilling out the waste from the mortises in the legs.

IMG_4959IMG_4960IMG_4961IMG_4972

Roubo sharpening bench – part 7

10/8/2015

It was a wonderful day when I was able to move on to  activities other than planing this past weekend. I first drilled out most of the waste from the massive mortises in the top with a 1″ Irwin bit and Stanley no. 923 brace (12″). Then followed the removal of the waste from the sliding dovetail part of the famous Roubo joinery.

This was the first time I used my new Bad Axe back saw on a project. It is not called a Roubo Beast Master for nothing. After doing damage with the saws and chisel, I used a router plane (Lie-Nielsen) and a Stanley no. 10 Rabbet plane to perfect the sliding dovetail mortise wall (unfortunately not pictured).

IMG_4886IMG_4887IMG_4890IMG_4891IMG_4892IMG_4893IMG_4894IMG_4895IMG_4896

Next up was the chopping out of the standard mortise. You can see how my shop made saw bench doubles up as a seat at the chopping station.

IMG_4902IMG_4900IMG_4901

Here I am in the process of fitting the legs. Non of them needed much persuasion to occupy their new home. I think these pictures also testify how well my bench handles these massive beams, which are currently in the order of 84 mm x 181 mm x 3300mm.

IMG_4897IMG_4898IMG_4899IMG_4904IMG_4905

By Sunday afternoon, I assembled the bench in order to mark out the exact location of the long stretcher’s shoulders. I always enjoy this stage of proceedings as it is the first opportunity to really get an idea of what the bench will look like.

IMG_4906IMG_4907IMG_4908

My father-in-law was so kind to help me, while enjoying the pleasant late afternoon winter sun.

IMG_4909IMG_4910

My final task was to do the rest of the marking out of the tenons. They are now ready for the Bad Axe Roubo Beast Master. You might notice that the tenons are off centre by quite a margin. I deliberately designed them this way. These stretchers sit flush with the front of the leg so I decided to move the tenon as far away from the front edge as possible. This should ensure a stronger joint to the leg as there will be more timber left between the front of the leg and the stretcher’s tenon.

IMG_4911IMG_4912

Roubo sharpening bench – part 6

3/8/2015

I really like my hand planes, but if I do not see them for the next few months it will be a blessing of note. After almost a month of hand planing these freaking beams for the top of the bench, I am sooooo over planing it is not funny. In the pictures below you can see the final phase of planing, which happened over the weekend.

After establishing a reference edge, I used my shop made panel gauge to mark out the opposite edge.

IMG_4847IMG_4848IMG_4849

I used a Stanley no. 9½ block plane to create a bevel to prevent splitting of fibers while working crossgrain.

IMG_4862IMG_4863IMG_4864

The bevel enabled me to take quite aggressive crossgrain  cuts with my scrub plane to get rid of the bulk of the waste. That was of course followed by a truck load of longitudinal planing with a fore plane followed by a jointer plane.

IMG_4865IMG_4866

Here they are after a month worth of removing nails, scrubbing away sand and bits of stone that got entrenched in the timber and planing. I include a few before photos to make me feel better about the ridiculous effort.

IMG_4790IMG_4789IMG_4792IMG_4794IMG_4796

… and after.

IMG_4867IMG_4868

Finally I was able to move on to marking out the location of the mortises for the legs. Before settling on a location, I moved the legs up and down with consideration for the length of the long stretchers (pictured) to ensure that they end up away from any knots. You will notice that the legs are still over-long, they will get shortened at a later stage.

IMG_4869IMG_4870IMG_4871IMG_4872IMG_4873

Before the final marking out the legs were clamped with their aprons to mimic the exact position once glued up.

IMG_4874IMG_4875

A glass of Whiskey to celebrate the end of another long day in the shop.

IMG_4876IMG_4877IMG_4878

I decided to drill out halve of one of the mortises, just to do a non-planing activity before the end of the weekend.

IMG_4879IMG_4880IMG_4881