Category Archives: For the kitchen

A tribute to Ying

18/5/2016

We recently spent a week in Thailand before moving on to Hong Kong for the Royal Australian and New Zealand College of Psychiatrists’ Annual Congress. I have to warn you that this post contains minimal woodworking, but there might be something towards the end that interests spoon carvers. However, I think that our woodwork is often inspired by a range of different things, not only the work of grand masters. It is my wish that this post will illustrate what I mean by the aforementioned statement.

It is amazing how a trip to a foreign country can inspire new ideas for the shop even without trying to find it. What struck me most was how the Thai people live close to nature and use everything it provides them with to the fullest. The best example of this is their use of the humble coconut. Literally every part of it is used and often for a number of different tasks. I will elaborate on this later.

Let’s first take a tour around the island of Koh Samui. I bought a stunning painting of the Buddha from this artist.

IMG_2806

Yes we did have many Happy Hours during our 1 week stay.

IMG_2836

There are so many perfect beaches it is difficult to know which one to enjoy.

IMG_2837

These are called “long-tail boats”. I took this photo one evening without a tripod so it is not perfect, but it has a few things going for it. At the very least it captures a little bit of the long-tail’s romance, I hope.

IMG_6633

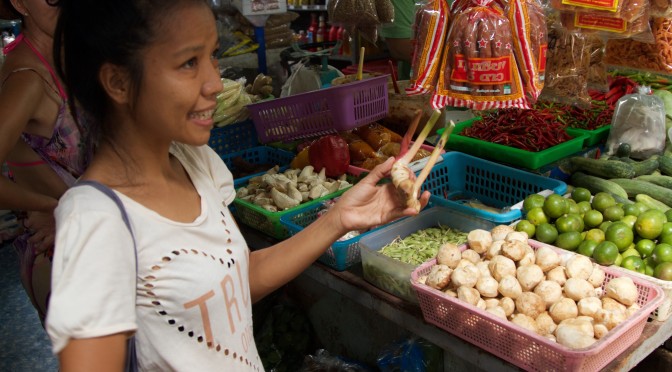
I think it is now time to plunge into the main reason for writing this post. We attended a full day cooking class with a true artisan by the name of Ying. She first took us to the local market. We bought all we needed for the day’s cooking and was able to ask all those questions a westerner might harbour regarding some fairly challenging produce.

IMG_6647IMG_6648IMG_6653

Such as frogs …

IMG_6659

… and chicken feet, which are actually both on the milder end of the (weird) scale as far as my palate goes.

IMG_6686

Here you can see how the wife is sweating like the proverbial “Gypsy with a mortgage” If you venture outside the comfort of your airconditioned hotel room in 35º celsius with > 80% humidity this is bound to happen. Now add to that a sizzling Panang curry and that Gypsy needs psychotherapy.

IMG_6683

Ying explained how one should open up a Coconut.

IMG_6697IMG_6698IMG_6701IMG_6702

We did the final bit of “shopping” in Ying’s back garden.

IMG_6714

During the perambulations around her beautiful garden, we came across this pile of coconut shells. Ying’s father turns these into charcoal for cooking food. The soft fibrous outer layer is used in upholstery.

IMG_6706IMG_6707

The best shells are turned into these beautiful small bowls, which got me thinking …

IMG_6721

Our festive cooking stations.

IMG_6716IMG_6728

Here we are preparing curry paste from scratch. With all this effort in the mentioned weather conditions, that proverbial “Gypsy” is now needing chemical restraint.

IMG_6790IMG_6791IMG_6792

While the girls continued to pound away at the paste I was summoned to harvest coconut meat from the shells. Ying’s Dad built this delightful coconut shredding stool, for lack of a better term.

IMG_6793IMG_6796IMG_6794IMG_6795

Our ingredients.

IMG_6764

The food we cooked.

IMG_6773IMG_6780IMG_6788IMG_6804

Two days after our cooking class we nipped back to Ying’s place to ask if we could buy a few of those coconut shells destined to become charcoal. Ying would have nothing of it and said we could have as many as we want. In the picture below you can see the fruits of our shell smuggling efforts back in my shop in Windhoek. I want to turn these into a set of 18 lights for our beach house. You will have to wait to see the final product. I am pretty sure my friend Jonathan White (The Bench Blog) will need anxiolytics (having heard about my intentions), given my trackrecord with electricity and how he feels about it. Jonathan, you know whom to call. Special price, only for you!!

IMG_6928IMG_6929

In the meantime I made this spoon out of a shell that did not survive the journey intact. It has a Witpeer handle and seems to be a very respectable cooking utensil.

IMG_6930IMG_6931IMG_6932IMG_6933IMG_6934

I plan to also do a slotted spoon and a soup spoon with the shells below.

IMG_6935IMG_6937

In conclusion, I would like to thank Ying for her incredible hospitality and the wealth of knowledge she imparted during our day together. She also inspired several new projects that I cannot wait to get stuck into. Relax Jonathan relax!!

Mother-in-law’s chopping board

2/11/2015

You might remember that I started building an end grain chopping board towards the end of 2014, which was completed early in 2015. Well, my mother-in-law liked it so much that she requested her own version. Here are the two boards I chose for the project. Kershout and Witpeer are both extremely hard and provides the ideal contrast in colour.

IMG_5358

In order to get the most out of this Witpeer board, I had to first chop it into two pieces before ripping it into appropriate strips. You can relax, I did not do the ripping by hand, only this crosscut.

IMG_5361

I then chose the best strips for the first glue-up. These feral boards always have some wood borer art, but that is part of it’s charm.

IMG_5377

Each glue surface was prepared carefully by hand to ensure the best possible bond. I used my no. 606 Bedrock fore plane and a sanding plane for this task.

IMG_5378

The first glue-up was quite stressful given the amount of joints and how quickly the PVA glue sets in our heat and low ambient humidity.

IMG_5379IMG_5380

My shop made flush plane removed the excess glue before the planer got stuck into it.

IMG_5381IMG_5382IMG_5383

After ripping the stock crossgrain into 45 mm wide strips, each strip were turned by 90º in order to expose the end grain. Every second strip were then flip end-to-end to create the chest board appearance.

IMG_5422

9/11/20115

I decided to do the next glue-up in two separate stages as a result of the speed at which the PVA sets. Once again each glue surface were prepared carefully by hand.

IMG_5424IMG_5425

Second glue-up: stage one.

IMG_5423IMG_5426IMG_5428

Second glue-up: stage two.

IMG_5429IMG_5430

Removing excess glue.

IMG_5431IMG_5432

30/11/2015

The most laborious part of this project is without a doubt the hand planing of this large end grain surface. I first sharpened the toothed blade of my Lie-Nielsen low angle (or sometimes referred to as a “bevel-up”) Jack plane as best as my current sharpening skills will let me. Even with a freshly sharpened blade it is extremely hard work, especially in a shop that is averaging between 30 and 35°C during the day in the past month. For that reason I planed in short bursts between other tasks over a 10 day period.

IMG_5490IMG_5491IMG_5492IMG_5493IMG_5501

I removed the bulk of the “toothed” texture left behind by the Jack plane using a Lie-Nielsen scraping plane.

IMG_5519IMG_5520

That was followed by a sanding plane.

IMG_5521

Marked out the final shape.


IMG_5522IMG_5523IMG_5525

The waste was removed with the bandsaw.

IMG_5526

All of the rest of the shaping was done by hand. The Shaw’s Patent (Sargent) Jack plane pictured in the background is set-up as my most aggressive metal plane. I used it to do the bulk of the shaping.

IMG_5527IMG_5528IMG_5529IMG_5530IMG_5531IMG_5532IMG_5533

That was followed by this Stanley no 9½ block plane and finally the sanding plane.

IMG_5534IMG_5535

7/12/2015

The wood borer art I mentioned earlier got filled in with slow setting epoxy to stop water from getting in. To those of you who are going to bring up the issue of epoxy causing cancer in California (or something to that effect), I will refer back to the title of this post. Only joking of course, but here in Africa we have bigger problems than ingesting minute amounts of epoxy. Problems such as corruption, racism, tribalism, nepotism, affirmative action (sometimes referred to as reverse racism), incompetence, to name a few.

IMG_5571IMG_5572IMG_5573IMG_5577IMG_5578IMG_5579

According to my research, liquid paraffin is one of the best oils (for lack of a better term) to apply to wooden surfaces that will come in contact with food, but who knows what it might do in California?

IMG_5583IMG_5580IMG_5581IMG_5582

Japanese toolbox inspired knife and fork carrier – part three

30/11/2015

This will be the final post in this epic series. I am currently experimenting with Japanese joinery and find it very refreshing. I think that it is growing on me and might therefore become an important element in how I design future pieces.

In the picture below you can see how I chopped the through mortises in the handle, which will accommodate two wedges.

IMG_5480IMG_5482

The only parts that were glued were the centre divider into a very shallow dado in the base (as pictured below) and the small wedges that the through tenons received (see later in the post). The two end pieces in the picture below is simply keeping the centre divider in position while the glue cures.

IMG_5481

I used this small Sargent smoother (their equivalent of a no. 2) for the final finishing of the surfaces.

IMG_5483

This was my first time using shellac and it was a real pleasure. In our climate these flakes dissolved in about 20 minutes!! I saw craftsmen from colder parts of the world suggest that you leave it over night. A guy I met in a tool shop in Johannesburg told me that one can dissolve the shellac in “Blou Trein” (or methylated spirits) as I could not find “denatured alcohol” in Namibia or RSA. For some reason the the blue colour has no effect on the finish?? I do not understand how this works, but it does.

IMG_5484IMG_5485IMG_5486IMG_5487IMG_5489

Custom made wedges.

IMG_5504IMG_5505

Wedge slots.

IMG_5506IMG_5507

I used a feeler gauge to work the Titebond into the wedge slots before driving the wedges home with my shop built plane hammer.

IMG_5517IMG_5508IMG_5510IMG_5511

As so.

IMG_5512IMG_5513IMG_5514IMG_5515IMG_5516IMG_5518

So there you go, Bob’s your uncle and Ted’s your aunty! I still have to do a little bit of finishing work on the protruding-wedged-through-tenons, but that essentially concludes this little project.

IMG_5542IMG_5543IMG_5544IMG_5545IMG_5546

I hope you enjoyed the series.

11/1/2016

At the beach house during the 2015 December holidays.

IMG_5776IMG_5777IMG_5778

Japanese toolbox inspired knife and fork carrier – part 2

2/11/2015

The toolbox is coming along quite nicely and I have to say that it is a pleasure to build something small after all that bench wrestling. You can read part one of this saga here. In the picture below I am digging the last shallow dado in the end pieces to accept the central partition.

IMG_5384

Since starting to use the actual work to mark out the dimensions of related parts, the accuracy of my work has improved significantly. Here I am using the assembled parts to mark out the location of the shoulders of the handle.

IMG_5385

The curve of the Without handle echoes the Cape Dutch inspired lines of the rest of the toolbox. I specifically chose Without as it is also quite light in weight (similar to the Dolfhout) and picks up on the colour of the Dolfhout’s sapwood.

IMG_5387IMG_5388IMG_5389

Marking out the through tenons of the handle.

IMG_5390IMG_5391IMG_5392

Lie-Nielsen tenon saw in action.

IMG_5393IMG_5394IMG_5395

Tenon faces cleaned up with a Stanley no.10 rabbit plane. Once again the proliferation of dog/holdfast holes in this part of my bench allows for so many different work holding options, especially for irregularly shaped objects such as this.

IMG_5396IMG_5397IMG_5398

I used my finger as a fence to roughly mark out guiding lines before doing the shaping of the handle.

IMG_5399IMG_5400

A hand screw clamp together with the twin-screw vise allowed me to work downhill (in terms of the grain direction) on the inside of these curves. The top end of the handle rested on my shoulder while I addressed the curve with a small Buck Brothers drawknife, followed by a Veritas round-bottom spokeshave and finally with a card scraper.

IMG_5401IMG_5402IMG_5404

For the outside curves I used this work holding setup. Notice that the bottom end of the handle hooks on the dog in the leg. This allows for much less pressure needed from the twin-screw vise. While working with softer wood like this, it can be a real bonus.

IMG_5405IMG_5406

So there you go, so far so good. Hopefully the final post on this project will look at finishing and assembly. I plan to use shellac for the first time. Any tips will be appreciated.

IMG_5416IMG_5417IMG_5418

Witpeer rolling pin

2/11/2015

The end of year holiday season is approaching fast, but not fast enough for my liking. For that reason I am doing lots of small projects for the beach house. It almost feels like I am already there, if I am engaged in these projects.

With that in mind I turned a rolling pin this weekend. As you already know, I am the family chef during the holidays so it will come in handy. In order to get to the desired dimensions I laminate three bits of Witpeer. A common problem I tend to encounter with my prehistoric lathe is that it sounds and feels like the whole shop is about to be sent into orbit while the stock is unbalanced. To limit this harrowing experience, I do as much of the rounding work as possible before loading the canon.

In the picture below you can see how one can use a twin screw vise, two dogs and a bit of scrap wood to hold the stock for this type of operation.  I then removed the waste with a very aggressively set Shaw’s Patent no. 5 Jack Plane.

IMG_5408IMG_5409IMG_5410IMG_5412

I usually design stuff like this while turning it.

IMG_5413IMG_5414

Done. Come on summer!!

IMG_5419IMG_5420IMG_5421

Japanese toolbox inspired knife and fork carrier – part 1

12/10/2015

During December holidays at our beach house we spend almost all our time outside on the deck. Every meal is therefore an al fresco affair. I usually do 95% of the cooking over the holiday period, to give the wife a break. Over the past few years it used to irritate me endlessly not having something to carry all the usual utensils, olive oil, salt, pepper etc etc to the table. We cannot leave anything outside, as the monkeys would carry it off in no time. They are real pests and are known as Blou Apies in Afrikaans (Chlorocebus). In the picture below you can see one showing off the blue part of it’s anatomy were it got it’s name from.

blou apie

For that reason mentioned above, I decided to build something that can make this chore less frustrating. In the end I settled on the idea of an open toolbox. The joinery was inspired by a Japanese toolbox I saw on the net and the curves and other aesthetic elements probably come from Cape Dutch architecture, which I love dearly.

I found a Dolfhout (Pterocarpus angolensis) board in my collection for the job. As you can see, it has stunning grain patterns with a marked contrast between heartwood and sapwood. The only problem with this particular board is the dramatic changes in grain direction, but I thought it should be fine for a fairly small toolbox which will do very light duty.

IMG_5223

I used the setup below to chop the board into appropriately sized pieces. It should be clear from these pictures how my “overkill” of holdfast holes in this bench continues to be extremely handy for all sort of hand tool operations.

IMG_5224IMG_5225IMG_5226IMG_5227

Here I am ripping one of the pieces with a Disston no. 12.

IMG_5228IMG_5229

This is the design I came up with for the end boards of the tool box.

IMG_5233

The floor/base board has two through tenons on each side that will be wedged.

IMG_5235IMG_5236IMG_5237IMG_5241IMG_5242

Here I am creating the mortises in the end board.

IMG_5243IMG_5244IMG_5245IMG_5246IMG_5247

After the two pieces were fitted I marked out the location of a very shallow dado to accept about 3 mm worth of floor/base board. I used a chisel and no. 71 Lie-Nielsen router plane to remove the waste.

IMG_5248IMG_5344

26/10/2015

Pretty much the same joinery and idea was used for the sides of the toolbox.

IMG_5342IMG_5343IMG_5354IMG_5355IMG_5356IMG_5357

All the joinery fits nicely together at this stage. The tenons will be wedged and left to protrude once the toolbox is assembled.

IMG_5366IMG_5368IMG_5369

I used my reconditioned (pre 1900) no. 66 beader to put beads at the bottom of the sides and the side of the base (where these two parts meet).

IMG_5370IMG_5371

I found this ghastly Stanley plough plane amongst the tools my father never used. It was given to him as a present from work, but he was a power tool woodworker so it never saw any action. Having restored several old Stanley planes, I have to say that this is an embarrassment to the Stanley legacy. The crappy plastic handle defines this tool shaped object. Anyway, it did manage to cut a dado for the divider that slots into the base, but I cannot wait for Lie-Nielsen’s new plough plane that is supposed to be out soon.

IMG_5373IMG_5374IMG_5375IMG_5376IMG_5372

By the way, the featured image is an African sunset on the Mighty Okavango.

Two more sun ovens

28/4/2015

In November 2011 I built a sun oven for our holiday house. It  became a real gem with regards to my holiday cuisine. I do almost all the cooking while we are at the beach house and there is few things better than chucking a North African tagine in a black cast iron pot, stick it in the sun oven at 09h30 and sit around reading until sunset for a perfect meal. Seeing that the beach house is probably 1500 km south of Windhoek I though it should work even better in the vicious Namibian sun.

While engaging in sun oven building activities, it made sense to build two. One for Jacana Junction and one for our Windhoek house. It is not rocket science so I will leave it up to the pictures to tell the story.

IMG_4148IMG_4149IMG_4151IMG_4154IMG_4159IMG_4158IMG_4161


At Jacana Junction we built this stand for it where it catches all day sun every day of the year. As you can see it has a glass lit and foil to reflect the sun onto the cast iron pots. You will be surprised how effective this oven is. I once cooked a leg of lamb that went into the pot frozen (because I forgot to take it out of the freezer the previous night) to perfection in 6 hours. It works even better than a commercial slow cooker and needs no electrons.


IMG_4295IMG_4296


End grain chopping board

December 2014

Shortly before embarking on our usual end of year holiday I decided to take the incumbent chopping board in our kitchen along to the beach house. This meant that I needed to replace it in a timely fashion for fear of life threatening marital discord. Therefore I started on this improved version even before we left the tropics.

As you can see from the pictures below, I went for contrasting colours in choosing Witpeer (left) and Kershout (right).

IMG_2709IMG_2710

Here you can see both boards ripped on the table saw and the resultant strips cut to length by hand.

IMG_2711IMG_2712IMG_2713

The first glue-up.

IMG_2714IMG_2715IMG_2716

I removed the excess glue with my shop made flush plane …

IMG_2717IMG_2718

… and fed it to the planer.

IMG_2719IMG_2720

The board was then chopped in halve and glued again. The reason for this way of doing it was to make it possible to feed the first glue-up (250mm or 10″ wide) through the planer as the second glue-up (500 mm x 500 mm) would have to be done by hand. One of the end grain edges were then flatened by hand in order to have a perfect reference surface for the table saw.

IMG_2721IMG_2722IMG_2723

I then ripped the second glue-up, turned each strip by 90º (end grain thus facing up and down) and flipped every second strip head over tail in order to end up with a chess board appearance. The third glue-up followed the mentioned procedure. You can see that I used shop made cauls to cut down on the amount of end grain planing post glue-up.

IMG_2724IMG_2725

I used my Lie-Nielsen bevel-up Jack plane with a toothed blade for the bulk of the end grain leveling. With such incredibly hard wood it took quite some time to get it flat.

IMG_2726IMG_2729

6/1/2014

Once back from holiday I dug out a piece of Oregon pine I nicked out of someones rubbish skip. It looks like it might have been a roof beam of some description in a previous life.  It worked perfect as a jig (for lack of a better word) to draw a particular curve on each side of the chopping board.

IMG_2951IMG_2952IMG_2953IMG_2954IMG_2955IMG_2956IMG_2957IMG_2958 IMG_2959

I then prepared some thin strips of Witpeer and Kershout. The bandsaw got rid of the unwanted side of the curve, after which I used a block plane and my shop made sanding planes to smooth it out.

IMG_2960IMG_2961

My Oregon jig was then used to bend the strip around the curve while gluing it into place. The same process were followed for each of the other edges.

IMG_2962IMG_2963IMG_2964IMG_2976

Some more flattening work followed. You can see the tools used, as well as the specific order in which they were used in the pictures below.

IMG_2978IMG_2979IMG_2981IMG_2982IMG_2983IMG_2984IMG_2985

A couple of block planes and a few sanding planes were then employed to shape the four edges.

IMG_2988IMG_2986IMG_2987

I use liquid paraffin (also known as paraffinum liquidum) a highly refined mineral oil on chopping boards as it is apparently safe for this purpose. Please do not quote me on that and do not try this at home kids.

IMG_2989IMG_2991

These Kershout strips are supposed to keep the board flat and off a potentially wet surface. The final product made all the effort worth while (I felt).

IMG_2992IMG_2993IMG_2994IMG_2995IMG_2996IMG_2997

Sustainable cuisine

11/2012

A few months ago we bought a holiday house in Groot Brak Rivier and I decided to build a sun oven to use while sitting in the sun with a beer. In the pictures below you can see how I bent and riveted aluminum to create the business end of the oven. The idea is to reflect all the sun rays on to a black casserole type dish to create a truly eco-friendly slow cooker.

100_0703


100_0802100_0803100_0801100_0804100_0805


100_0811100_0812100_0813


100_0818100_0819100_0820100_0822

Before building the base I tested the contraption my cooking a curry amongst the herbs and chillies in our herb garden. Even this red le Creuset casserole absorbed enough energy to cook a beautiful Madras.

100_0828100_0831

I then built a base for it from bits of scrap plywood.

100_0855100_0856100_0857100_0858100_0860100_0861100_0862100_0865100_0864100_0866100_0867100_0868100_0870100_0871100_0872100_0873100_0874100_0875100_0884100_0885100_0886100_0888100_0889100_0890100_0892100_0892100_0930-2

In the pictures below you can see it in action at our beach house. The oven is closed with a sheet of glass or transparent perspex to limit air movement.

IMG_4031IMG_4032IMG_4033IMG_4042


Over this past December (2013) holiday, I cooked a leg of lam from scratch in it.

Spice rack February 2013

I made this spice rack for our pantry in late February 2013. I used plywood and scrap pieces of Dolfhout. In the pictures below you can see how useful the jigs for routing dados can be. It should also be obvious how my assembly table assists with holding the jigs and stock while routing the dados. It is a bit difficult to see in these pictures but I am routing the back and two sides all at the same time to ensure that the dados line up perfectly in the assembled rack.

100_1233100_1234100_1235


Here I am using my Festool Domino to mortise slots for the dominos to strengthen the joinery. Again you can see how the t-track on the side of my assembly table helps to hold the stock for this task.

100_1237100_1239100_1238

I used screws together with dominos and glue to assemble the pieces.

100_1240100_1241


The shelves were made up of 6 mm plywood that slotted perfectly into the dados cut earlier.

100_1242100_1243

Each shelve were covered up with a fairly thin strip of Dolfhout that also acts as an edge to stop spice containers from falling out.

100_1244


100_1247100_1248

Here you can see it finished on the wall in the pantry. Most of our spice come from our own garden.

100_1253100_1254100_1256100_1258