All posts by Gerhard Marx

Psychiatrist and Woodworker

Bench review by Monsieur Schwarz (I wish)

18/3/2014

Last year I had some e-mail contact with Mr. Workbench himself, Christopher Schwarz. I asked about the angles involved in the sliding dovetail mortise and tenon joints on Roubo benches. True to form, he answered promptly as if we know each other for yonks. We chatted a bit and I promised that I would send him some pictures once the bench is finished. A week ago I finally sent the pictures only to get the automatic reply that he has cancelled his public e-mail account. I clearly missed the post he wrote in January to inform us all.

That was a bit of a disappointment, but I can understand his position completely. So I thought of another way to get him to review my labour of the past 14 months. I found a post he wrote on his Popular Woodworking Blog entitled “The Mistakes of First-time Bench-builders” (March 3, 2014) and used it to critique my bench. Here goes:

In the post he highlights 10 common mistakes of novice bench-builders and they are:

1. Too many woodworking vises.

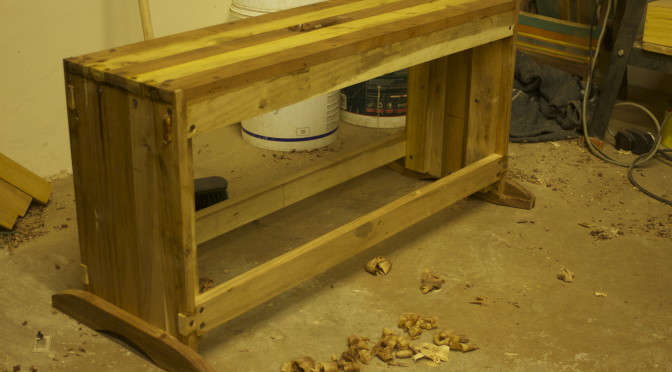
Yep, I tick this box. As you can see, my bench has a twin screw vise, quick-release vise (in the end vise position), a legvise and a sliding-leg-vise-cum-deadman. So definitely too many vises in Mr. Schwarz’s assessment. In my defense I would say that it is mainly because I decided to utilise all four sides of my bench by placing it in the middle of the floor area, rather than shoved up against a wall.

Score so far: 0/1

IMG_3494IMG_3517IMG_3501IMG_3325IMG_3027

2.  Too many dog/holdfast holes

Oops!, yet another slip-up. The picture speaks for itself. I decided to go with too many holes for holdfasts around my chisel/chopping area (near leg in the picture) for obvious reasons.

Score so far: 0/2

IMG_3500

3. Over-agonizing the wood types used

Here I was lucky as I would certainly be vulnerable to make this mistake if I had access to a plethora of different types of timber. My own supply of indigenous wood are dimensioned such that it would take 5 years of lamination to generate stock of appropriate size. Therefore the bench was built from European Beech, which I could access in slightly bigger dimensions. I added Witpeer for je ne sais quoi, but that does not count.

Score so far: 1/3

4. Over agonizing the standard workbench height

I did agonise about it a bit, but it took about a day. In the end I used the “pinky rule” (a Schwarzism which came to 34″ given my Vitruvianisms) and subtracted 2 ” as I want to use my shop built wooden planes quite a bit. I guess this would actually qualify as “over agonising”

Score so far: 1/4

5. Making the bench do crazy tricks or store an arsenal of tools

I stuck to the golden rule not to try and incorporate lots of storage cabinets underneath the bench. I did however utilise the space between my split top to accommodate 5 sliding tool trays. They slide up and down this space to open up gaps for F-style clamps when you need to use them through the gap (last three pictures). So far they work very well for me. Again, I guess that sliding tool trays would amount to “crazy tricks” in the mind of an Anarchist.

Score so far: 1/5

IMG_3490IMG_3107IMG_3075IMG_3082IMG_3085IMG_3090IMG_3517IMG_3519IMG_3485

6. Building the DIY workbench too deep

My bench is a smidgen over 25″ (640 mm) deep. It is ever so slightly more than the recommended maximum of 24″. Again (in my defense) (not that I feel particularly defensive) this was a choice I made with consideration of the fact that I want to work from all sides of the bench which means that it does not have the added support/stability of a bench that is shoved against a wall.

Score so far: 1/6

7. Choosing the wrong tools to build a workbench you designed

Once again I am saved by the fact that I had no choice in this matter. I had to laminate all the stock. I had to create reference surfaces (that is perfectly flat and wind free) by means of hand planing before milling the laminated stock with my electrical planer (I do not have a electrical jointer). Chris calls this “masochistic”, but as I said, I had no choice. In fact, one of several reasons why I chose a split-top design was so that I could at least mill one side (the non-reference side) of the top using my electrical planer (300 mm wide). Therefore I will award myself this point.

Score so far: 2/7

IMG_9951IMG_9953IMG_9954IMG_9958IMG_9957IMG_9961IMG_9964IMG_9966IMG_9972

8. Worrying too much about wood movement and benchtop flatness

This one I got completely sucked into. I went to excessive lengths to negate wood-movement related issues. We have massive swings in ambient humidity between winter and the rainy season in Namibia. This is another reason why I went with the split-top design. The way my top is fixed to the leg/aprons allow it to move into the gap without any restriction or pressure on joints. Each of the gargantuan tenons in the rest of the bench were split into three fingers with kerfs between them to allow for wood movement.

It was however with the design of the two aprons that I lost the plot completely. To start with, I went to great lengths to make sure that the stock that made up the aprons were all perfectly quarter sawn. The rest of the apron design I will leave up to the pictures to tell the story.

Score so far: 2/8

IMG_3488IMG_1487IMG_2230IMG_2374IMG_2001IMG_1481

9. Trying to re-invent the wheel with new workbench designs

I would like to disagree respectfully with the great man on this one. Although I do agree that the basic form of a bench that is the result of 3000 years worth of experience should be fairly close to perfect, I also feel a perfect bench should reflect the type of work and way in which it’s owner work. Therefore I would argue that the ideal bench for me (stuck in the sticks in Africa in 2015) would quite obviously differ somewhat to that of Monsieur Roubo in 18th century France. For that reason I am not too worried about a bit of experimentation in design.

Having said that, this is after all a bench assessment by Monsieur Schwarz (granted that it is in absentia) so we should use his criteria and my guess is that my bench departs too much from the 18th century form.

Score so far: 2/9

10. They make it too nice

Need I say more.

Score so far: 2/10

IMG_3495

Final score: 2/10

I therefore fail miserably, given these criteria. If it was possible (in terms of access and tools) I would have made mistake no. 3 and no. 7 too, but luck was on my side.

I have one last thought though. It might be a tad harsh to think about the above as “mistakes”. One would not generally consider someone who is learning to ride a bike to be making a mistake when they fall off. It is a necessary part of the process to learn the skill, isn’t it?

Monsieur Schwarz ends his article like this:

“If it’s worth something, I have made every one of the mistakes listed above”

I rest my case.

Another tool ensemble from Jim Bode

20/3/2015

Last week I received a package from Jim Bode. This one only took 3 weeks to reach me as apposed to the previous (and first) one that took three months. If you are keen to find out what happened to that package read this post http://wp.me/p5S0Ig-1W3

You can check out Jim’s website, there is a link on my home page. I have only good things to say about their service. He usually hangs on to the stuff I buy until we have enough to justify a shipment across the Atlantic.

From right to left:

Yankee no. 135 quick-return screwdriver with 5 bits, I. Sorby pigsticker mortice chisel, Japanese carving axe, and a Yankee no. 41 push drill with 8 bits.

IMG_3465

A perfect user ensemble of hollows and round by Sims (ca 1816-1834). These are incredibly well made and as good today as 200 years ago.

IMG_3462IMG_3463IMG_3464

The hovering skeleton chest

16/3/2015

You’ve heard of the Anarchist’s tool chest and the Dutch tool chest, which seems to be very much part of the prevailing woodworking vernacular. I would like to introduce the so called hovering skeleton chest. It is especially useful to woodworkers who decides to approach their bench from all sides, rather than the more popular custom of shoving it up against a wall. This is not a new idea as you can see from this close-up of plate 11 (AJ Roubo’s L’Art du Menuisier). Neither is the hovering skeleton chest (though possibly under a different name) a new idea, as a similar device is often employed in a kitchen to hang pots and pans from.

Plate 11_close

Here you can see the wife helping me to hang the contraption …

IMG_3471IMG_3472


… after which I stocked it with essential tools needed at the bench.


IMG_3473IMG_3475IMG_3474IMG_3482IMG_3484IMG_3496

18th Century inspired workbench denouement

15/3/2015

Yes, it is finally over. It took one year and six weeks. I can finally tick that box that says “workbench inspired by tradition, but tweaked to my needs and peculiarities”. I would like to thank Christopher Schwarz for the wealth of information in his two brilliant books on workbenches. It was my main source of inspiration and a guiding light for a relatively inexperience woodworker to design and build this bench.

So thank you Chris, you are a legend.

Two weeks ago I finished and fitted the second sliding deadman.

IMG_3452IMG_3453IMG_3454IMG_3455IMG_3451

The final task was to flatten the top.

IMG_3447IMG_3448IMG_3483IMG_3488


Please excuse me for going mental with all the photos, but after such a protracted building phase I cannot help myself. I am planning to write a post to explain and justify the design decisions I took. After a year or two of working on the bench I will be able to report on what works well and what could be better. For now I would prefer to think that it is perfect. Please allow me this temporary loss of reason.

Finally, I would like to thank the people who shared this journey with me by reading these posts.

IMG_3489IMG_3490IMG_3491IMG_3492IMG_3493IMG_3495IMG_3494IMG_3497IMG_3499IMG_3500IMG_3501IMG_3503IMG_3504IMG_3505IMG_3506IMG_3507IMG_3508IMG_3509IMG_3510

Shop made saw benches – 2

9/3/2015

My first version of Ron Herman’s saw bench were assembled this weekend. I decided to finish one (of the two) in order to hopefully learn something and use that knowledge to make small improvements to the second.

IMG_3432IMG_3433

This is the tenon on the end of the apron. It is a through tenon that will be wedged.

IMG_3436IMG_3434

The stretchers has a type of halve-lap dovetail (for lack of a better term) design as you can see. You will also notice that I decided to reinforce all the joints with slotted wood screws.

IMG_3443IMG_3444

I added these strips of beech to the bottom of the top for two reasons: 1) to add strength, 2) to improve the grip of a holdfast due to the increased thickness of the top.

IMG_3445IMG_3446

The same goes for the strips added to the end boards. You can also appreciate how I shaped the feet, which is one of the slight tweaks I made to the design.

IMG_3437IMG_3439IMG_3438IMG_3440

Another one of those (tweaks) was to add an elongated hole in the middle of the top to act as a handle then one wants to move the bench using one hand only. The plan is to add two similar holes to the end boards to grip while moving it with both hands. I used slow setting epoxy as my adhesive of choice given that the bench was assembled in one go (that took me 1 hour). The extended open time is essential for this purpose. One of the advantages of adding the screws was that I needed no clamps at all.

IMG_3449IMG_3450IMG_3456

Hopefully the bench will be finished in the next few days.

Springbok and Seal leather sleeping bags

9/3/2015

In the pictures below you will see the collection of planes that reside on the shelve of my shop built workbench. There are quite a few shop made wooden planes, two Lie-Nielsen’s and the rest are all reconditioned old Stanley’s (nope, actually there is a Sargent too). In order to keep these planes from collecting too much debris, I am in the process of hand stitching comfy Springbok and Seal leather sleeping bags! Yes, I know this will probably mean that I (and my website) will be banned from any proper woodworking fraternity for the rest of my miserable life. On the upside I could become the Errol Arendz (South African reference) of woodworking couture. Yeah Baby!

IMG_3143IMG_3137IMG_3461

On the catwalk you may admire a beautiful shop made scrub plane dress in one of my exquisite creations. For some reason the phrase “je ne sais quoi” comes to mind.

IMG_3457

The silky Springbok leather keeps the plane from freezing to death in a shop that averages between 25 – 35°C (77 – 95 ºF). This is not called the Tropics for nothing. The virile Seal leather sole adds even more panache to the garment.

IMG_3458IMG_3459IMG_3460

Now wait for the eruption in the volatile world of du jour plane apparel …


Contentious Menuisier

5/3/2015

I have been thinking about this issue for a while now. Since getting stuck into all the wonderfully useful information and experience being shared by so many (mostly) amateur/hobbyist woodworkers that forms part of the online woodworking community, I have noticed a trend where there seems to be a stigma attached to the guys and gals who works more on their shop than what they spend building furniture. I have an issue with this (probably unintended) marginalization of an important (and most certainly just as passionate) subculture within our ranks.

It might be a question of being over sensitive (I am a psychiatrist after all) given that I am a member of this congregation over the past 3 years or so. Since October 2011 I have been setting up shop focussing on building my own tools, restoring vintage tools and constructing custom shop structures to make working there a pleasure. Very few bits of furniture and useful stuff for the house emerged from the shop so far. Only a few spice racks, chopping boards, a knife rack and a sun oven to be precise.

I see this phase as an apprenticeship were I hone my skills, learn about the tools (how they work, how to fix them, how to set them up etc etc), try to understand the principles of proportion and design better, and get to know the properties of the various species of wood in my collection in order to make better decisions in choosing wood for particular purposes once I start building furniture. If one considers that the time tested apprenticeship model was based on a seven year full-time program, it would take a hobbyist woodworker like me more than 20 years to get even close to the same amount of shop time completed. I would rather make my mistakes while building a sawhorse (for example) than a Windsor chair. To add to that it is probably also more likely that one would do a descent job if you have the correct tools and shop structures available by the time you take on the fancy stuff.

Another angle on this topic would be to compare it with other leisure pastimes. How about something like shooting for example. In my experience, most gun-nuts (I used to be one) spend most of their time loading ammunition, and testing the loads at the riffle range etc etc. A relatively small amount of time is spent killing things, either while hunting or going to war. One could probably argue that a riffle is designed to kill stuff and if your are not using it for that purpose you are (similar to the poor sod that works on his shop rather than building furniture) wasting your time.

I would like to challenge the perceived discrimination against these members of our phalanx. As far I am concerned, most of us do this as a leisure pastime. Therefore it seems as if the craft serves it’s purpose as long as it yields pleasure. Whether it also yields furniture or tools or whatever is immaterial. The sole point of it is the creation of joy. As long as everyone in the tribe enjoy what they are doing, learn a few new tricks and skills along the way which is shared around and passed on to the next generation, we should embrace each one of them. It really does not make any sense to try and make certain people at different stages in their journey (compared to your’s) feel inferior, however subtle it might be communicated.

The Land of the Brave

2/3/2015

Having said that, you do not have to be a hero to live in Namibia. In fact, no courage is needed at all. Come to think of it, “we don’t need another hero”. It might be better to call it “The Land of the Patient” (as in a person who has patience rather than in need of medical treatment). You will get an idea of what I mean from a post I wrote in January entitled “Protracted tool perambulations through Sub-Sahara Africa”. Here is the link:

http://www.jenesaisquoiwoodworking.com/?p=7443

Anyway, for once I did not work in the shop this weekend. We went away with the kids as it was mid-term break. I took a few photos to give you an idea of what Namibia is all about. It is however very much an appetizer as Namibia is a vast expanse of African real estate. I tried to illustrate how the vegetation change as one travels from the Capital Windhoek to the so called Skeleton Coast.

These were taken near a town by the name of Omaruru.

IMG_3351IMG_3398

Fire and cooking on a fire is very much part of our heritage. The owners of this property reports spotting leopard tracks coming past this fire place (right next to our tent) on the way to the waterhole (maybe 100 meters away) on a regular basis. What a joy!

IMG_3370IMG_3374IMG_3387

This is a fairly typical road-side view. The only non-typical thing about the first picture is the sealed nature of the road. Most roads in this part of the world are unsealed.

IMG_3403IMG_3408


Here we are getting a bit closer to the coast and into the Namib Desert. With some imagination you could even see the Atlantic ocean roughly 30 km away on the horizon (2nd and 3rd picture).


IMG_3414IMG_3418IMG_3422


This picture show the Swakop River Mouth and Namib Desert sand dunes stretching into the freezing waters of the Benquela sea current.

IMG_3429


So there you have it, no woodwork, only the terroir in which I work wood.

Shop made saw benches – 1

19/1/2015

While my monster workbench is getting quite close to being finished, I want to start building two saw benches. I need to start preparing the stock as it inevitably takes a lot of time, seeing that I need to laminate bits of crappy wood to make up the boards I need. It pains me to see how those American woodworkers can rock up to a lumberyard and buy perfect boards (of almost any species) in any imaginable dimension, go home and start working on their project. I work for weeks to cobble together strips of wood to make up boards that will be appropriate for the task. I decided to use Tasmanian Blackwood in this particular case, as I have quite a bit of it and I do not like using it for anything else than shop structures.

I looked at heaps of different designs (in the past 6 months or so) to work out what would suite me best. The design I settled on is based on a saw bench in an article entitled “If the tool fits …” by Ron Herman, in the August 2011 issue of Popular Woodworking Magazine.

In the pictures below you can see the rough stock I picked. It is not the best stock at all, but I would rather use the good stuff for other purposes.

IMG_3000IMG_3001IMG_3002IMG_3014

Here I tried to work out what the ideal height should be given my personal Vitruvianisms (I think this might be a new word). It seems that 18½” (47cm) fits my Vitruvian lower leg.

IMG_3044IMG_3045IMG_3046

Arranging the strips for the first two glue-ups.

IMG_3047IMG_3048

As per usual, I used my Festool Domino to ensure that the edges stay flush. The Domino is the only power tool I still enjoy using. It is fairly quiet and generally a joy to use.

IMG_3049


9/2/2015

The second batch of stock that was processed.

IMG_3108IMG_3109IMG_3110IMG_3111

This is my woodworking buddy. Her name is Pipsqueack.

IMG_3112

From these pictures you can appreciate the wide range of different colours one can find in Tasmanian Blackwood. These strips were the first to be hand planed on my new bench. The two planes I used feature in the last picture.

IMG_3189IMG_3190IMG_3191

Another round of glue-ups.

IMG_3192

Removing the dried excess glue with my shop made flush plane.

IMG_3195IMG_3196


16/2/2015

IMG_3232


23/2/2015

Lamination done.

IMG_3306IMG_3307


I started preparing the laminated stock this weekend. The first and most arduous task was to get rid of the slight twist in the boards. Once one face was flat I used the electrical planer to flatten the opposite face.

IMG_3317IMG_3318

After flattening one edge, …

IMG_3324IMG_3325

… my shop made panel gauge came in handy to mark out the opposite edge. While doing this, I realised that by flipping round the lids of my sliding tool trays it creates an ideal stop (in conjunction with my planing stop) to do this task. Just another nifty feature of my bench design.

IMG_3319IMG_3321IMG_3322IMG_3323IMG_3326IMG_3327IMG_3328

Yep, I am a “tails first” type of guy … for now anyway. This is my first attempt at multiple dovetails, so my approach might change depending on how it pans out.

IMG_3329IMG_3330IMG_3331IMG_3333IMG_3332IMG_3334

Cleaning out the waste.

IMG_3335IMG_3336IMG_3337IMG_3338

Transferring the tails to mark out the pins. Here you can appreciate how my shop made assembly table assists with this delicate task.

IMG_3339IMG_3340IMG_3341IMG_3342IMG_3343IMG_3344

A first careful fit.

IMG_3345IMG_3346IMG_3347

Also see Part 2 and 3 of this riveting series.

My 18th Century Workbench in progress 29

23/2/2015

Since being part of the Woodspotting family I started reading Joshua A. Klein’s blog, The Workbench Diary. It is highly recommended, by the way. A while ago he wrote a series of posts with advice for woodworking bloggers. I realised that I tick almost none of the points he mentioned.

The point which is relevant to this post is that he recommended that one should post photos of yourself on a fairly frequent basis. I realised that I have posted almost no (such) picture at all. Apart from the Freudian look on my home page of course. My daughter Aoife (6 yoa) took to the camera this weekend, thus providing me with some material to scare off potential readers. I recently heard someone say about another person: “He has a face for radio and a voice for the printed media!”. I wonder whether Joshua considered this issue in writing his blog guidance? Maybe some of us should rather stick to pictures of old Stanley’s and dovetails.

Anyway, into the fray!

IMG_3284IMG_3285

By now you might want to pray (just to make it today!) …

IMG_3292IMG_3293IMG_3289

… fair enough, let’s get back to woodwork. Here you can see the first fit of the Roubo-esque sliding-deadman-cum-eggbeater-leg-vise.

IMG_3299IMG_3300IMG_3301IMG_3302IMG_3304IMG_3305

… and the same beast after some oil. You might notice the candle wax I applied as a lubricant. It works like a charm. As you can see, it is quite easy to remove the jaw and it becomes a conventional sliding deadman when necessary.

IMG_3312IMG_3313IMG_3314IMG_3315IMG_3316

It did not take too long for it to start paying rent.

IMG_3324IMG_3325


Cheers

Gerhard Marx