One day in May while sitting in my shop at the end of a long day sipping usquebaugh I found myself staring at this so-called Shaw’s Patent no. 5 Jack plane of mine. It is the Jack plane that I use for heavy stock removal, which means it ends up on the receiving end of some significant elbow grease. As a result, the plane tends to reciprocate the well intended elbow grease with fervent vesication of that part of my hand that flirts with the ribbed edge of the main casting. It got me thinking that the plane could possibly be modified to amend this particular quirk.
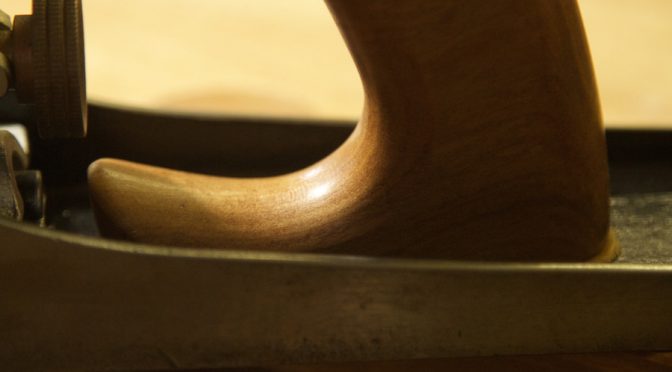
As you can see here, the slight design glitch with this Sargent plane is twofold. There is a lot of wasted space between the top of the tote and the lateral adjuster. Also the bottom end of the tote slopes downwards, which has the effect that the side of one’s hand tends to end up on the rib of the main casting. Thus a combinations of these two inadequacies coerce the hand of the user into a position much lower than what is needed.
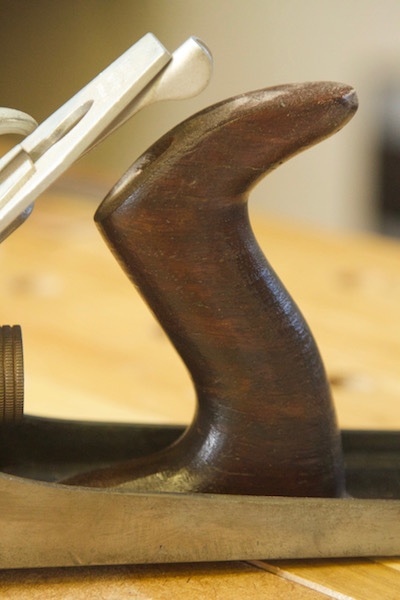
As you can see in the example below, the bottom part of the tote on this Lie-Nielsen low angle Jack plane does not slope down, but runs parallel to the sole of the plane. This design element stops the hand from sliding down too far. I thought that the Shaw’s Patent could benefit from a tote that employs the same strategy. Together with that I could utilize the dead space between the top of the tote and the lateral adjuster by lengthening the tote, which would also aid the user’s hand to ride higher.
I found a piece of Kaapse Swarthout, that would not suffice for any other purpose. This is by far my favourite indigenous species for producing totes.
It was quite a mission to fashion a tote that would fit the plane and at the same time tick the desired design tweaks. I used a combination of the original tote, the Lie-Nielsen tote, and documents on Stanley totes to accomplish the task.
The final product looks like this. You can see how the top of the tote is now much closer to the lateral lever and the bottom of it has a parallel section to hold the user’s hand up. Another neat little trick I discovered is to cut a leather washer to sit between the sole of the tote and the main casting. It makes a huge difference to the feel of the plane when using it. The difference is hard to explain, but try it and you will know what I mean.
The changes to the tote also necessitated a tweak to the length of the tote bolt. Unfortunately it is a change in the more challenging direction i.e. making it longer.
While I was at it I also changed the knob. I prefer a flat section at the top of the knob for my thumb when gripping the front end of the plane with the rest of my fingers on the sole acting as a fence.
The final adjustment I made was to file down the part of the rib in question by about 1 mm and rounded it. After all that the Shaw’s (re)Patent works like a dream. If you prefer woodworking rather than tool tweaking, I suggest that it might be better to buy a Lie-Nielsen plane from the start.
No, this is not the title of a cheap porn movie aimed at the well known niche market for this particular genre of cinematic gems amongst serial tool collectors. The whole family should thus be able to digest this post, however JNSQ Woodworkings refuse to be held responsible for any unforeseen ailments that might result from indiscriminate consumption of the material. Parental guidance is therefore advised.
On a more serious note, I would like to apologise to my great friend, fellow blogger and tool historian par excellence Robert “Bob’s your Uncle” Demers for not posting this much earlier in the year. After all he found me a freakin legendary example of 20th century American tool manufacturing.
After using a couple of different examples of eggbeater drills it became apparent that my stockpile of African hardwoods necessitates contrivances with either massive drive wheels or a favourably geared two speed setup or ideally both. To give you an example, my first eggbeater was a Wiktor Kuc restored 1938 edition Miller’s Falls no. 2. It is supposed to be an ideal allrounder for the frugal (more recently known as “anarchical” in the prevailing Schwarzian vernacular) woodworker, but it really struggles to drive anything larger than a ¼” bit in lumber from the Dark Continent.
Initially I thought this is simply how it is with these eccentric drilling apparatuses, until by sheer chance I happened to stumble upon a two speed no. 5½ B Goodell-Pratt with a positively massive drive wheel. These babies know how to roll, innit. The GP has more torque than my 8 year old daughter, except in her case it is spelled slightly different.
Given this revelation I set out to procure another torque-ative eggbeater to torment my hardwoods with. Bob was of course my first port of call and I explained my predicament in some detail. You can read his summation of the tool here, which (by the way) is a hell of a lot more informative than this post. He agreed to keep his well educated eye out for a suitable monstrosity. It did not take him long to find Utopia in the form of a two speed North Brothers no. 1545.
Bob refused that I reimburse him for the tool or the shipment cost and sent it on it’s merry southward journey at the end of 2016. Luckily it did not embark upon a protracted sub-Saharan voyage like a particular parcel several moons ago. It arrived somewhat promptly, for trans equatorial pilgrimages, in mid January 2017. I did return the favour by sending him a locally made hammer, but clearly I received more value than he did.
It is only my second true North Brothers tool (as apposed to Stanley made attempts) and completely lives up to my very high estimation of this famous tool manufacturer. The low gear munches through anything Africa can throw at it and the considerable weight lends some advantageous momentum to drive wheel as well as a general feeling of old school quality.
The no. 1545The NB no. 1545 with the GP no. 5.5BThe NB no.1545 with a 1938 edition MF no. 2The NB no. 1545 with it’s smaller cousin the no. 1530
I took the drive wheel off and cleaned everything I could reach. It presently purrs like a cat on crystal meths.
Thank you Uncle Bob I will cherish this gem as long as I have the privilege to do so and hope to pass it on to someone who will continue to do so long after both of us joined the choir invisible.
This story starts way back in May when Jonathan White (of Bench Blog fame) sent me a William Marples Hibernia Mortise Gauge as a very generous, but completely unexpected present. You can read his and my posts on the tool for background. Anyway it got me thinking how I could return the favour. At the time I already met a delightful young Namibian blacksmith by the name of Hanno Becker. He trained in Germany through the ancient apprenticeship model they have for all craftsmen. Since he finished his training he moved back to Namibia and started his own business. He is a very refreshing change from the often money orientated younger generation. Hanno is driven by excellence.
Hanno and I decided in February to try and create our own version of a Japanese Daruma hammer that I wanted to use with chisels for fine joinery work. I have adopted David Charlesworth’s techniques for this type of work and a good purpose made hammer is essential. These Japanese hammers are so well thought out (over a matter of several centuries) and made that it is not just a case of rocking up and producing a good quality hammer, even with Hanno’s considerable and well polished skills. We wanted to have one perfectly flat face and one slightly convex.
By late June Hanno had the first prototype ready. You can see what it looks like in the picture below. By that time I had ample time to ponder over the shape and choice of wood for the handle. I wanted to create a handle that sloped towards the flat face of the hammer and away from the convex face. The idea behind this is to open the convex face up to keep one’s knuckles away from the work when setting nails, hence the convex design of the face. The curve towards the flat face helps keep the face perfectly square on the butt end of your chisel while doing precision joinery work, hence the flat design of the face.
This picture illustrates one of the most challenging obstacles in producing these hammers the traditional way. As the blacksmith forms the hole for the handle it deforms the shape of the billet.This picture illustrate the ergonomic advantage of the sloped handle while doing joinery work with the hammer.
I made my first handle and used the hammer for a week before handing it as a present to my cousin the Urologist. Apparently he has been using it to chisel out prostates ever since. Apparently it works like a dream, albeit a particularly frightening one.
My apprentice Connor is helping me to shape the handle.The handle gets wedged in two directions. First a wooden wedge longitudinally, followed by purpose made metal wedges diagonally with regards to the aforementioned.
A trick I learnt from Hanno is to heat up (ever so slightly of course as not to have an effect on hardness or tempering) the head and rub on beeswax. It creates an attractive protective finish that smacks of the old artisan age.
What I learnt from this first attempt is that the handle needs to fit perfectly in the head otherwise you end up with the metal wedge splitting the handle below the head. There is a learning curve to everything in the shop I guess.
Another advantage of the handle curving towards the flat face is that it can be placed on the workbench like this while doing joinery work and it is easy to pick up immediately in the desired orientation to continue working. The curve and oval shape of the handle also informs the user immediately which face is at the business end if picked up without looking at the hammer.
After this first prototype Hanno and I collated our thought on where we could improve the design. What we notice on the positive side was that the hammer is an absolute joy to use. Clearly the age old tradition of hardening only the faces and keeping the rest of the head relatively “soft” works wonders for the feeling of superior power transfer and pretty much eliminating recoil. When I first read about this in Japanese hammer literature I thought it was just hype or marketing, but believe you me it is quite striking (pun intended) when compared to a regular commercially made hammer. I noticed that one needs to use the hammer for a little while before the mentioned effect reaches a peak. All I could think was that it has something to do with the “joint” where the wood meets the metal. It seems as if it needs to settle or mature a bit.
It might have something to do with the properties of the Assegaai (Curtisia dentata) I chose for the handle. Allegedly it was the species favoured by the Zulus for their spears, hence the common name of the species. Assegaai was also heavily favoured by colonial wagen builders, especially for the spokes of the wheels. Assegaai is extremely fine grained and hard, yet surprisingly flexible. Another prized property is the fact that it tends to be extremely stable once well seasoned. A property that is priceless to keep the spokes secured in their mortises and would probably apply to the joint with the metal head. I think it has something to do with these properties of the Assegaai which translates into a joint with the metal that needs a bit of time to settle to give a very noticeable improvement in the feel of the hammer. In conclusion we thought the first prototype was a resounding success, but wanted to see how much better it can get.
We decided to try and aim for a artisan round (as apposed to perfectly round) shape to the head, improve on the inside shape of the hole through the head to increase the grip of the handle, and I wanted to create a more flowing look to the curve of the handle. Hanno then invited me to his shop on a Sunday to witness the process firsthand. At this stage he had already made two more heads and thought he was ready to produce a winner.
This is one of the two heads Hanno made in phase two.
On the big day Hanno first made a new chisel for punching the hole through the billet. He developed a few ideas on how to improve the chisel from the first two phases. This chisel is made from a special type of steel that is ridiculously hard in order to punch a hole through the special steel that Hanno handpicked for the hammer’s head. The chisel tapers slightly to ensure that the hole first narrows over the first third and then flares out after that when approached from the end where the handle enters. This feature together with the wedges ensures a very sturdy joint with the handle.
Once the chisel was done he moved on to the billet.
The hole gets punched through the billet from both ends bit by bit. It was at this stage that I realised just how skilful this young man is.
As you can see, this process tends to deform the billet somewhat.
One perfect hole done and dusted.
At this stage it takes even more skill to regain the round shape without deforming the hole.
A week later Hanno delivered what would become my bench hammer and it looked liked this. My Jenesaisquoi Persuader (as apply named by Matthew J McGrane on Bench Blog) has become my favourite tool, it is literally the only tool that does not have a dedicated storage spot as it lives on the bench. I use it constantly to set my holdfasts (with the domed face of course) and it is a revelation in tandem with my Lie-Nielsen chisels while doing joinery work. Now I only need a Akio Tasai chisel to go with it. If there is one outstanding feature of this hammer that gives me tremendous pleasure (ala Charlesworth) each time I use it, it would be the incredibly soft efficiency of the power transfer. When hitting a holdfast there is almost no discernible recoil.
28/11/2016
By late November I received two hammer heads representing phase four of the development. By now my handle shape improved to a more pleasing curve and I picked the best cuts of Assegaai I could lay my hands on.
Below you can see my hammer’s handle. (i.e. phase three)
The following photos illustrate the improvements we identified for phase four. We wanted to increase the size of the hammer’s sweat-spot by increasing the diameter of the cylinder shaped head, while retaining the weight of approximately 375 gram. That necessitated the head to become a bit shorter.
The phase three hammer is on the right and the phase four on the left with a noticeable increase in diameter.
Again phase three on the right and phase four on the left. Roughly the same weight yet noticeably shorter.
I try not to fuss too much when making these handles as they are meant to be working hammers not museum pieces. I also used the set of tools that I imagined an old artisan from yesteryear would employ for this task. That is perhaps with the exception of the electrivorous bandsaw that was initially used to cut the curves, but was followed by drawknife, spokeshave, card scraper and finally sandpaper. As my talented friend picked up in his assessment of the hammer, it actually balance best when you choke up on the handle somewhat. This is also intentional as that is the grip one would use when doing precision chisel work (illustrated by the picture below). When setting nails or holdfasts the balance is less important.
The wooden wedge.
Followed by two (another detail we added) rather than one purposed made metal wedges.
From right to left, phase 2, phase 3, and finally phase 4.
And here they are in the opposite direction, with phase 2 on the left and 4 on the right.
Finally they received a coat of Ballistol. I prefer using only a light coat of oil as it retains a better grip and tends to be less sweaty compared to lots of coats of varnish.
Then I sent them on their merry way to Washington and Nova Scotia. They are presents for my two blogging friends Jonathan White and Robert “Bob’s your Uncle” Demers. I hope you guys get as much joy out of them as I do.
This is another post that almost got lost in the drafts section of my site’s dashboard. I was reminded of it as a result of discussing the merits of various types of breast drills (for the metal-like qualities of the wood I work with) with the famous Bob Demers (aka The Valley Woodworker). One of my all-time favourite tool manufacturers is North Brothers. Despite that I have never been able to find a true North Brothers tool, only Stanley made versions of their tools. So when I ordered my second Eggbeater from Wiktor Kuc I went for the legendary North Brothers no. 1530.
It so happened that he had one that was halve way through the restoration process already so I was in luck, because my previous order took a very long time. That is of course because Wiktor is so good at what he does that everyone wants drills restored by him, which means that you have to be patient.
Anyway while Wiktor was busy finishing the 1530, I realised that what I really need is a drill with a low gear that would work better in the hardwoods. The Miller’s Falls no. 2 (circa 1938) he restored for me previously works fine for drill bits up to maybe 5 mm in hardwood, but is difficult to turn smoothly using something bigger. As luck would have it, I happened to stumble across a Goodell Pratt no. 5½B on Jim Bode’s site at that exact time. I have never given Goodell Pratt any thought, but it seemed to fit my needs perfectly at an price I could afford (back then, before Jacob Zuma’s well documented indiscretions). So I quickly checked with Wiktor who agreed for me to get it sent to him so he can ship it together with the 1530, which saved me a fair bit of dough. Thank you Wiktor.
A few months later the duo arrived in the Land of the Brave (quite literally sometimes). The Wiktor Kuc restored no. 1530 was as expected top drawer work. It is one of my favourite tools and I am so glad I bought it when I did because I probably will never be able to afford it again. Thank you Mr. Zuma.
That said, the Goodell Pratt was a real surprise packet. It is just one of those tools you bond with immediately. Like love at first sight. It clearly does not have the pristine beauty of the 1530, but boy is it a great tool. I now do most of my work with it and Goodell Pratt has shot up in my estimation as one of the best manufacturers known to man. It works particularly well in the hard stuff in it’s low gear, so that is where I leave the setting.
Here is some information I found on the Old Tool Heaven website for those who wants to know a bit more:
No. 5 1/2B
Two-speed hand drill
1898— malleable iron frame; hardwood head and handles, head with mushroom-shaped top; detachable, elongated side handle; non-adjustable gear guide; spindle runs on hardened steel cone bearing; speeds adjusted by turning shifter knob on frame; three-jaw chuck adjustable 0 to 3/8 inch. Frame enamelled black; drive gear painted red, bright parts are nickel plated.
As mentioned before, I had another delightful exchange with Uncle Bob concerning my preferred choice for a breast drill. He had the following to say:
Now as far as the elusive breast drills are concerned, agreed with you that the GP model 6 would be a good one, but… these all enclosed switch mechanism don’t seems to come out very often. ?? You need a two speed model, Goodell Pratt, or Millers Falls, or North Bros and yes Stanley Out of these 4 you can trace their origins to either GP or North Bros before being acquired by MF or Stanley
As for using them, they can be a bit tricky for the unwary 🙂 I’ll explain later in a blog post perhaps? The second trust bearing on the wheel or a dedicated roller/slider to support the big geared wheel makes a big difference in how smooth they can operate since less chances of binding. That leaves us with the speed selection.
The one you shown me, has the selector mechanism all enclosed and used sliding pawls to switch gears. I have no experienced with these, but it cannot be as strong as the simpler mechanism where you simply move the wheel one hole over., such as on my Miller’s Falls No 12s Even there, we have a few small changes thru the years as to how to release and lock the wheel. The earliest No 12 (green) simply uses a screw that you remove and re-install on the other hole. Simple, strong, but you got potentially a loose screw to keep track of.
Later models (red) uses a captured slider that you push or pull to release/lock the spindle wheel. Nothing to loose, bonus. And then there are a myriads of variations on this theme, some No 12 uses push buttons to release/lock the wheel and etc.
Today these types of mechanisms lives on, a testament to their rugged simplicity. Once in a while I come across modern German made version (Schroeder, and etc) They sport an all enclosed mechanism, gearing and all.. They seems to operate smoothly, but again, no personal experiences.
I always learn so much from these exchanges that I thought it might be useful to a wider audience. He has given me permission to publish it, so relax.
This is a post that I almost forgot about, but since chatting to the famous Bob’s your Uncle Demers (aka The Valley Woodworker) recently it reminded me of the information he found on this saw. As you might remember, this Tyzack was part of my December 2015 tool finds in the Garden route. I asked for help to get an idea of the saw’s history.
I received the below information from Bob Demers on the 10th of March 2016:
In 1839, 30-year-old sawmaker Henry Tyzack moved from Sheffield to Shoreditch, just outside the City of London. Henry’s father Samuel was a sawmaker, as was his younger brother Joseph and his uncle, Thomas Tyzack. We do not know exactly when Henry started making saws and other tools under his own name, but 1843 is the date used by the successor firms. In 1861 or shortly afterwards, Henry transferred the business (with two employees) to his eldest son, Samuel, who in 1860 had leased a small shop of his own. By 1871 Samuel had five employees. Henry died in 1876 and Samuel died in 1903. The “& Son” in the name S. Tyzack & Son likely refers to Edgar, born in 1877, although another son, Horace, was also involved in the business. The name changed to S. Tyzack & Sons in 1905, after Edgar Tyzack inherited the business. Throughout its history, the Tyzack firm resold tools made by others and also sold tools that they made themselves. Their product line primarily consisted of hand tools for the carpentry and cabinetmaking trades. This website’s focus is machinery, and this firm is listed here because they made miter trimmers (which straddle the fuzzy line between tools and machines) and, from 1920 to 1959, metal-turning lathes. These lathes, and some of their miter trimmers and related products, used the “ZYTO” brand name. The company operated until 1987 when it was finally wound down. http://www.tyzack.net/hackney.htm Early history of the firm
So your back saw is from BEFORE 1905 (when the name changed to Tyzack & Sons) and AFTER 1860 when he transferred his business to his eldest son. So between 1861 and 1905. 6th Jan 1871 a city ordnance renumber No 8 old street to No 345 So your saw was made between 1871-1905
In all respect it is a good saw
Cheers
Bob
Clearly there is no mystery in the antique hand tool world too big for Bob to solve.
This is Frank Bartlett’s first post on Je ne sais quoi Woodworking. I hope it is the first of many as he is clearly a very talented woodworker and hand tool encyclopedia. I realise that I have an advantage in making that assessment as I have had the privilege to see some of the other projects he has done. Of course he gave me grief regarding the compliments, but I decided to leave it in the text as it is my honest assessment. So for now just trust me, you will come to enjoy his contribution to this site. Both Frank and I want to encourage other (especially African) woodworkers to become involved in this way. Feel free to contact me if you consider writing up some of your projects.
So without further ado, over to Frank Bartlett from the Cape of Storms:
Looking for an old mitre box had almost been an obsession of mine, for some time now (refer to Gerhard’s blog entry on his Langdon). But being in Africa, that is like looking for a needle in a haystack (suppose that is why Gerhard was (willingly) “forced” to turn to Jim Bode for his beautiful Langdon). I once saw a Stanley advertised up in the Free State, but it was one of those: “I know what its worth, make an offer….” ads, which is a pet hate of mine and which I’m not very good at. Needless to say, the seller didn’t bother to return my urgent emails after my offer! Anyway, that one went down the tubes although I still think my offer was fair given the condition.
So, after Gerhard’s notice that there may be one available on a 160km round trip, I had trouble sleeping that night, after reading through Bob Demers’ (The Valley Woodworker) prep of his box…. Anyway, eventually found the shop and there she was, at the entrance! Without a price…. Now, that could mean a few things, one of which of course, its not for sale. Which it turned out to be. After munchos small talk, the lady indicated she was keeping it as a rarity and furthermore, her son had told her on a previous occasion that he would like to have it. She also added that it “was very expensive anyway”. Turned out to be R900. For its condition I thought “eisch”, but presented the money (in small notes, and lots of them). The eyes lit up but nah, first wanted to contact her son to get his opinion. Fortunately for me, being in Africa, her son was somewhere out of cell phone range.
Paid up, grabbed and went for it. Must have been quite a sight walking with this (heavy) old thing merrily the odd six blocks (REALLY been looking for this shop…) because I turned not just a few heads. The photo below was taken in the antiques shop.
Back at home I was able to scrutinise it thoroughly. Appears to be circa 1912-1916 model (because the length stop was only patented in 1916). Although there were a few parts missing, it was still surprisingly complete (most importantly missing the Disston medallion, trip clamp, one stock guide, one knurled tie bar screw and saw guide stop screw). Now these screws have really weird threads. So, not really critical components that I can get in due course.
Once it was stripped and it was off to the wire wheel. I recently changed from a 1000rpm 5inch wheel to this 8 incher at 3500rpm on this 1930’s B&D. Whew! My fingers took quite a beating, not wanting to use gloves or pliers or vice grips on tiny (weird) threads… Unnerving experience, but tried to take as much care as I could (except for holding these things with my fingers)!
On larger surface areas I prefer to use wire wool and turps and then clean it afterwards with White Spirit. The screws however, went the wire wheel way and was left bright and shining. To get an artificial patina back, I applied Birchwood Casey Gun Blue paste on the wire wheeled parts. Worked wonders. Afterwards the bottle of Boeshield T-9 was utilised because living in an area (where two oceans meet, nonetheless), rust is never far away. So, I tend to use this on tools or parts that I don’t get to oil regularly. For daily use on saw plates or planes etc, before storing them, I have a can of Jojoba oil handy.
Then to the sacrificial frame board. I chose Cape Yellow wood (Podocarpus latifolius or Geelhout) because its soft. Cape Yellow wood is probably the second most famous timber from South Africa (second only to Stinkhout or Ocotea bullata or Black Stinkwood). I first flattened the board and then jointed it. The last picture in the below set is a Podocarpus latifolius growing on the slopes of Table Mountain.
Time then for sawing and pairing the rabbets for the stock guides (what is that Cape Boxwood handled Witherby doing so close to the edge, I’m asking myself now…)
Drilling and forming the cutouts
And there you go!
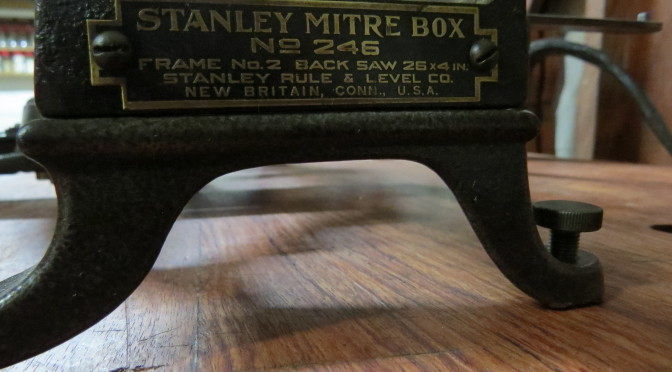
Just some last thoughts on the 11ppi Disston saw. Apologies for not posting pics on the restoration, was just too exiting! Handle is flawless, especially after I doused it with Kramers Antique Improver. Teeth still cuts good but I still want to do the sharpening deed myself, just because..! Very little etch left unfortunately, no matter how careful I removed the rust (with turps, 400grit wet and dry, wrapped around a pad). There was just nothing left (not even the gun blueing/sandpaper trick worked). Very interesting, I saw on an old catalog that the box comes with a 26×4 inch saw, yet mine measures 24,5inches along the teeth. If you extrapolate the cutaway, you measure 26inches and 4 deep. I guess thats how they define the “26×4” on the brass plate.
Just one word of advice, this is a biggy and needs storing space, although it is difficult to store when you just want to look at it all day.
This project has been on my ‘to do’ list for at least two years. Ever since reading the seminal work “By hand & eye”, I just had to build a sector. It really is a magic wand in the shop once you understand a few basics of pre-industrial design methods.
During the Easter break I aquired this broken Danish boxwood rule for R35 (US$2.24) at an antiques shop. I have been looking for something like this for a while, as these rulers have the perfect type of hinge for a shop built sector.
Seeing that one needs to mark out measurements on the sector, I decided to use a light coloured wood. I found this piece of Olienhout (Olea europaea africana or Wild olive) that would have been harvested between 1988 and 1992 on a farm in the Groot Marico district. My father was building Grandfather Clocks at the time and one of his best clients (as well as a personal friend) supplied him with Olienhout from his farm. This is a piece that was left over from that era.
I can still remember driving to Groot Marico with my father to deliver a Grandfather clock to this guy called Oom Frik. Oom Frik purchased at least four of these clocks over the years and paid for it in part by supplying my father with the most magnificent Olienhout. On the way there we stopped at the Hotel in Groot Marico to sample some of the local mampoer that the area is famous for. When the barman heard that it was my first visit to Groot Marico, he explained that it is custom for first time visitors to be served a glass of the local elixir on the house. Being a student at the time, I needed no further convincing so he proceeded to fill a tumbler with crushed ice followed by more than a sensible amount of mampoer.
That stuff knocked my socks off to say the least, despite being a fairly fit alcohol consumer at the time. As I sat there sipping the poison, I could swear Oom Schalk Lourens wispered something to me. For those of you who do not know the work of the legendary Herman Charles Bosman, do yourself a favour and read (at the very least) “Mafeking Road & other stories” (1947). It is arguably the best literature ever to come out of Southern Africa and it will make Groot Marico and the Afrikaner come alive to you. I digress, but as a last thought on the matter I will leave you with a quote from Bosman where he described Groot Marico “There is no other place I know that is so heavy with atmosphere, so strangely and darkly impregnated with that stuff of life that bears the authentic stamp of South Africa”.
Anyway this piece of wood comes from that area, has been lying around for at least 25 years since being harvested and was most definitely enjoying those beautiful Bosveld sunsets with Oom Schalk Lourence at the time Bosman was writing his epic stories.
On the table saw I ripped 6 thin strips from the side with the lightest coloured wood. Two of those were milled down to the exact thickness of the boxwood rule.
I then got rid of the broken hinges.
I planed the boxwood very carefully to expose fresh wood for the adhesive to bind to.
The strips of Olienhout were then glued up as so …
After removing excess glue and squaring up, I had two extensions with perfect slots to accommodate the rule.
The rule was then epoxied into position.
16/5/2016
At this stage I first marked out the divisions on the inside surface of the arms. I decided on 25 mm divisions which gave me 24 of them on each arm of this sector.
I then shaped the arms as shown below to make the sector lighter and enhance it’s visual appeal.
A pin was added to help keep it straight and lined up while stored.
I then marked the front faces using the inside markings as a reference. The numbers were punched in using my number set.
Once punched I added black ink.
That was followed by Woodoc finish.
23/5/2016
There you go, one Olienhout sector from the world of the late great Herman Charles Bosman.
We recently returned from a wonderful trip to Thailand and Hong Kong. Upon arrival at my practice I discovered two packages delivered from the US of A. One of them was a Peck, Stow & Wilcox slick that I bought from Jim Bode, so it was expected. The other turned out to be a present from my woodworking friend Jonathan White of the Bench Blog. Jonathan is famous for several things including the neatest shop in the history of woodworking and the so called “White milk bottle trick” (as apposed to the Charlesworth ruler trick).
It was incredibly humbling to receive such a present from a woodworking mate that I have never even met in person. It reminded me once again of the incredible camaraderie amongst the woodworking bloggers and the value of our online community. It is something that I have become increasingly aware of. My exposure to other woodworkers around the globe via their websites has inspired me to push my own boundaries.
Any way this post is not about me, it is about my first blog brother.
The parcel included this stunning marking gauge which Jonathan reconditioned himself. He wrote a post on the restoration, which is a riveting read. It is the most wonder tool you can ever imagine. The brass gives it that wonderful luxurious weight. The Ebony is absolutely flawless and shiny. Jonathan filed the pins in order for them to cut rather than scrape, which makes a world of difference then using the tool.
He also sent me this set of bench dogs he made himself. If I am not mistaken it looks like Sapele. This set of dogs is J. White signature work. It is simply perfectly made.
As you can see the face of the dog was cut at an angle, which is the type of attention to detail that one can expect from a craftsman of his statue. The face also features a perfectly cut piece of leather to improve grip and protect the your work from being marred.
As you can see here they already did duty on my bench while working on a shop made sector (post to follow in the next few weeks). They work like a charm, I can tell.
Jonathan thank you so very much, you are a legend mate. Thank you also for inspiring me and many other woodworkers to improve our work. It has been and will continue to be an absolute pleasure to correspond with you around this mutual passion of ours.
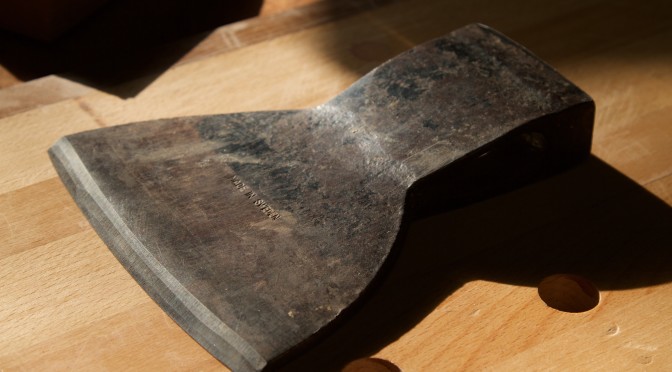
I found this single bevel axe head in a “cash converter” store in George while visiting the Garden Route in June 2015. I had to fork out the astonishing amount of R125 for it. (bottom of the first picture)
Some idiot put a bevel on the non-bevel side, but otherwise it was in top shape.
The only mark on it reads “Made in Sweden”.
29/1/2016
First I had to get rid of the unwanted bevel and then proceeded to grind a fresh bevel on the correct side of the head. This took quite a while as I was careful not to overhead the steel, which would result in a loss of temper. You can see how I clamped the axe head to a piece of timber which is shoved against a suitably place object (read foot) to ensure a constant grinding angle.
The handle was made from a piece of Assegaai (Curtisia dentata) using the bandsaw, draw knives, rasps and a card scraper.
1/2/2016
I am proud to report that I did my first bit of blacksmithing to create this cold steel wedge. It was a scrap bit of steel that received an almighty pounding. I do not have a blowtorch (yet), but can report that aggression can sometimes yield products of beauty. The steel is soft enough to be shaped without heating.
As you can see here, I used a wooden wedge and the metal wedge to secure the handle.
Of course I drove the metal wedge one blow of the hammer too far, which resulted in the timber below the axe head splitting.
As I was not in the mood to make a new handle, I simply installed a wood screw to inhibit a potential extension of the split.
15/2/2016
To complete the rehab I made a nice game leather sheath for the side axe. Now the only thing left to do is to find suitable green wood in Namibia to hew into chair stock.
The first post in this riveting series can be found here.
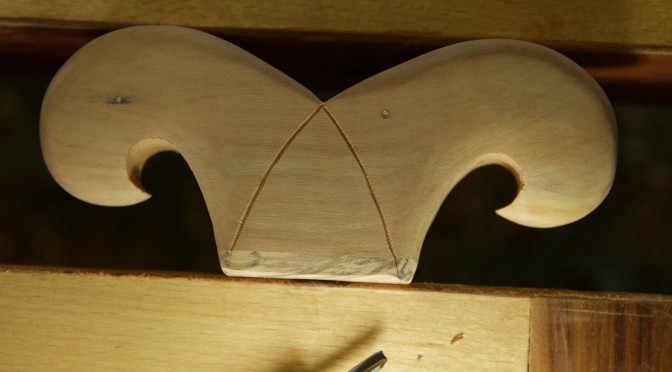
So after all the drama of the past 11 days we can get back to the usual business of documenting a slow, yet delightful woodworking journey. The jaws of my fountainhead were fixed to the arms using slow setting epoxy and an almighty Assegaai draw pin. As I mentioned in the previous post, one should be carefully not to offset the hole through the tenon by too much if working with such extremely hard wood as this. You will be able to appreciate from the pictures below, how the excessive offset I used caused an obvious deviation in entry angle on the entrance side. You will also notice the gap on the exit side. If the offset was even slightly more it would have destroyed the jaw on the exit side.
A quick test fit.
Here you can see the so called leather hinge.
Driven by my shame regarding the issue of copying some else’s design, I decided to created my own unique clamping mechanism. It all started with a laminated block of Kaapse Swarthout (Maytenus peduncularis).
Which received an Ysterhout (Olea capensis macrocarpa) footing. The tool supermodel is obviously pre-glass-door-incident. The photos should paint a fairly comprehensive picture of how I went about shaping this wing nut on steroids.
… and Bob’s (Demers) your uncle.
The final product with a Cape Brewing Company craft beer in the background. Imagine a fountain of craft beer … Sorry I got a bit distracted there.
You should be able to see the seal leather grip on the inside of the jaw in this picture.
The shape of my giant wooden wing nut was inspired by my idea of the head of a fountain.


