Shop made saw benches – 1

19/1/2015

While my monster workbench is getting quite close to being finished, I want to start building two saw benches. I need to start preparing the stock as it inevitably takes a lot of time, seeing that I need to laminate bits of crappy wood to make up the boards I need. It pains me to see how those American woodworkers can rock up to a lumberyard and buy perfect boards (of almost any species) in any imaginable dimension, go home and start working on their project. I work for weeks to cobble together strips of wood to make up boards that will be appropriate for the task. I decided to use Tasmanian Blackwood in this particular case, as I have quite a bit of it and I do not like using it for anything else than shop structures.

I looked at heaps of different designs (in the past 6 months or so) to work out what would suite me best. The design I settled on is based on a saw bench in an article entitled “If the tool fits …” by Ron Herman, in the August 2011 issue of Popular Woodworking Magazine.

In the pictures below you can see the rough stock I picked. It is not the best stock at all, but I would rather use the good stuff for other purposes.

IMG_3000IMG_3001IMG_3002IMG_3014

Here I tried to work out what the ideal height should be given my personal Vitruvianisms (I think this might be a new word). It seems that 18½” (47cm) fits my Vitruvian lower leg.

IMG_3044IMG_3045IMG_3046

Arranging the strips for the first two glue-ups.

IMG_3047IMG_3048

As per usual, I used my Festool Domino to ensure that the edges stay flush. The Domino is the only power tool I still enjoy using. It is fairly quiet and generally a joy to use.

IMG_3049


9/2/2015

The second batch of stock that was processed.

IMG_3108IMG_3109IMG_3110IMG_3111

This is my woodworking buddy. Her name is Pipsqueack.

IMG_3112

From these pictures you can appreciate the wide range of different colours one can find in Tasmanian Blackwood. These strips were the first to be hand planed on my new bench. The two planes I used feature in the last picture.

IMG_3189IMG_3190IMG_3191

Another round of glue-ups.

IMG_3192

Removing the dried excess glue with my shop made flush plane.

IMG_3195IMG_3196


16/2/2015

IMG_3232


23/2/2015

Lamination done.

IMG_3306IMG_3307


I started preparing the laminated stock this weekend. The first and most arduous task was to get rid of the slight twist in the boards. Once one face was flat I used the electrical planer to flatten the opposite face.

IMG_3317IMG_3318

After flattening one edge, …

IMG_3324IMG_3325

… my shop made panel gauge came in handy to mark out the opposite edge. While doing this, I realised that by flipping round the lids of my sliding tool trays it creates an ideal stop (in conjunction with my planing stop) to do this task. Just another nifty feature of my bench design.

IMG_3319IMG_3321IMG_3322IMG_3323IMG_3326IMG_3327IMG_3328

Yep, I am a “tails first” type of guy … for now anyway. This is my first attempt at multiple dovetails, so my approach might change depending on how it pans out.

IMG_3329IMG_3330IMG_3331IMG_3333IMG_3332IMG_3334

Cleaning out the waste.

IMG_3335IMG_3336IMG_3337IMG_3338

Transferring the tails to mark out the pins. Here you can appreciate how my shop made assembly table assists with this delicate task.

IMG_3339IMG_3340IMG_3341IMG_3342IMG_3343IMG_3344

A first careful fit.

IMG_3345IMG_3346IMG_3347

Also see Part 2 and 3 of this riveting series.

My 18th Century Workbench in progress 29

23/2/2015

Since being part of the Woodspotting family I started reading Joshua A. Klein’s blog, The Workbench Diary. It is highly recommended, by the way. A while ago he wrote a series of posts with advice for woodworking bloggers. I realised that I tick almost none of the points he mentioned.

The point which is relevant to this post is that he recommended that one should post photos of yourself on a fairly frequent basis. I realised that I have posted almost no (such) picture at all. Apart from the Freudian look on my home page of course. My daughter Aoife (6 yoa) took to the camera this weekend, thus providing me with some material to scare off potential readers. I recently heard someone say about another person: “He has a face for radio and a voice for the printed media!”. I wonder whether Joshua considered this issue in writing his blog guidance? Maybe some of us should rather stick to pictures of old Stanley’s and dovetails.

Anyway, into the fray!

IMG_3284IMG_3285

By now you might want to pray (just to make it today!) …

IMG_3292IMG_3293IMG_3289

… fair enough, let’s get back to woodwork. Here you can see the first fit of the Roubo-esque sliding-deadman-cum-eggbeater-leg-vise.

IMG_3299IMG_3300IMG_3301IMG_3302IMG_3304IMG_3305

… and the same beast after some oil. You might notice the candle wax I applied as a lubricant. It works like a charm. As you can see, it is quite easy to remove the jaw and it becomes a conventional sliding deadman when necessary.

IMG_3312IMG_3313IMG_3314IMG_3315IMG_3316

It did not take too long for it to start paying rent.

IMG_3324IMG_3325


Cheers

Gerhard Marx

Woodworking recluse

20/2/2015

IMG_2594-2

I would like to thank Siavosh Bahrami sincerely for including my site on www.woodspotting.com. I have been documenting my woodwork journey since March 2013, without knowing whether there is anyone out there benefitting from it or not. Since he included me on his blog aggregator, two things have happened. In the first place, I have found heaps of other blog sites that I learn from and enjoy. In the second place, I can see that a few woodworkers are starting to look at my posts.

Being stuck in woodworking hinterland can be quite challenging when it comes to sharing ideas and that feeling of being part of a community. Since frequenting woodspotting, I’ve realised that there are several other woodworkers in a similar position, but I think I might still take the cake (so to speak). So far I have not found any other woodwork blogger from Africa, a continent that is home to 1 166 239 000 souls. It looks like Namibia is once again leading the way on the African continent! Or have I missed someone?

It is fascinating to see pictures of the different weather conditions that prevails outside some of the blogger’s shops. It got me thinking. I should start taking pictures of the unique semi-desert/savanna terroir around my shop. Even the shots of birdlife, as per Peter Follansbee’s site, is inspiring. My son is doing a science project at present where he records all the indigenous birds we see in our garden. Once I have a decent lense for my 7D, you might see some pictures of the Shaft-Tailed Whydah, Paradice Flycatcher, African Red-Eyed Bulbul, Green-Winged Pytilia, etc etc. In the meantime, you will have to be content with the picture of Zebras taken in the Etosha Game Reserve a few years ago.

Anyway, it feels good to at least have some vague sense of being part of a woodworking community.

Siavosh, you are a legend mate.

Cheers

Gerhard Marx

My 18th Century Workbench in progress 28

16/2/2015

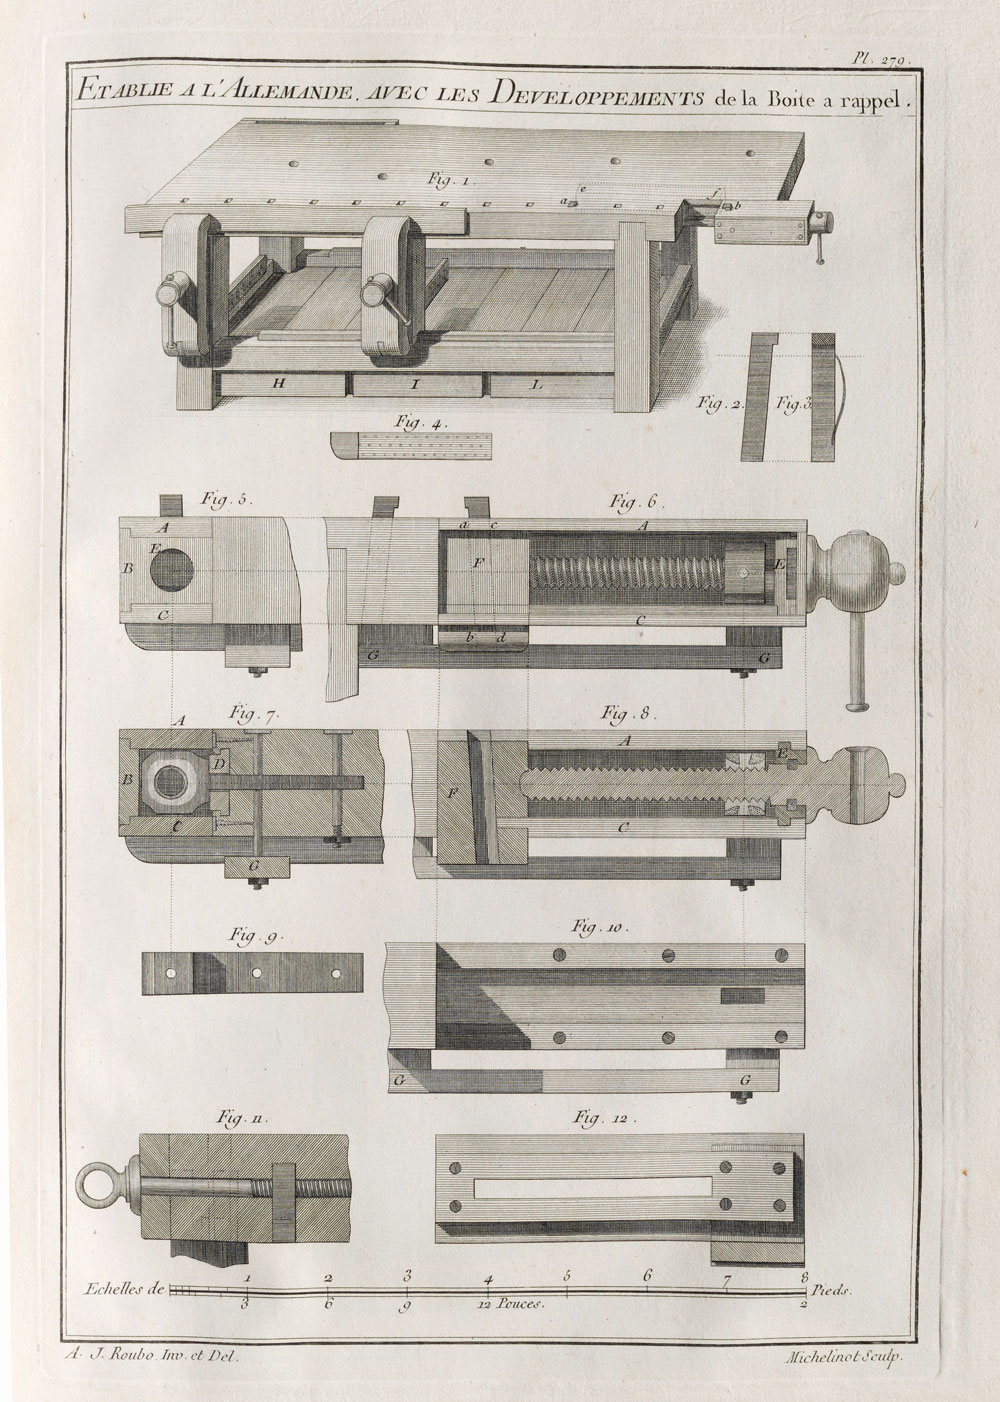
This was one of those weekends in the shop were I did not feel I got much done despite working almost 2½ days. I am still busy with the two sliding deadmen for my bench. One of them will double up as a sliding leg vise, a la plate 279 of “L’Art du Menuisier” (pictured below). Mine however, will be on a smaller scale and retains it’s deadman anatomy too. The point being, this is slow and fiddly type work.

roubo240prRouboGermanBench

Cutting the thread for the wooden screw.

IMG_3233IMG_3234

One Assegaai wooden screw being cut. This antique German screw box is frighteningly sharp. It felt like I was cutting custard.

IMG_3235IMG_3236IMG_3237IMG_3238IMG_3239IMG_3240IMG_3241

Here I started working on the leg vise’s jaw.

IMG_3242IMG_3243IMG_3244IMG_3245IMG_3246

Each deadman has a base which slides on top of the bench’s long stretchers. The joinery is a complete overkill (as per usual). It includes, through mortises that were wedged and draw bored. As you might gather from the pictures, I experimented with slow setting epoxy and normal PVA wood glue for the draw pins. The epoxy, which has a consistency similar to vaseline, certainly improves the ease of clobbering them home. I think it has to do with the fact that it acts as a lubricant and also does now lead to immediate swelling of the dowel, which is the case with the water based glue.

IMG_3253IMG_3254IMG_3255IMG_3256

The protruding tenons and wedges were worked flush by passing it over the table saw several times followed by paring. The surfaces which will be in contact with the top of the stretcher were then covered with sealskin.

IMG_3260IMG_3261IMG_3257IMG_3258IMG_3259IMG_3262IMG_3263IMG_3264IMG_3265

I simply do not have the technical vocabulary to describe what I did here. The pictures will have to tell the story.

IMG_3280IMG_3270IMG_3271IMG_3275IMG_3276

Just to be different, I decided to use an eggbeater drill as inspiration for an alternative looking sliding-deaman-leg-vise. With a bit of imagination, you will probably be able to deduct where this is heading.

IMG_3272IMG_3273IMG_3274IMG_3277IMG_3278IMG_3279

This is a very handy idea if one wants to shape and sand small round parts. This piece is destined for the eggbeater-leg-vise-deadman.

IMG_3266IMG_3267IMG_3268IMG_3269


OK, one more clue dressed in sealskin.

IMG_3281IMG_3282IMG_3283

Dog maker

9/2/2015

My nearly finished workbench needs a profusion of dogs. In order to speed up the production and have some degree of consistency, I made this dog maker out of a scrap piece of beech. It has a multitude of “high-tech features” such as:

IMG_3151

1) Self-tapping screw to hold the stock in position.

IMG_3152

2) A hole for drilling the bullet catch hardware hole.

IMG_3156IMG_3161


3) A kerf to saw a flat face (leaning 2º forward from the vertical position, ensuring that the upper most tip would touch stock first)

IMG_3153IMG_3162IMG_3163

4) A kerf to cut each dog to the exact same length.

IMG_3154IMG_3155

That is followed by a few more steps, once the dog is liberated from it’s maker. The pictures tells the story.

IMG_3157IMG_3159


IMG_3160IMG_3164


IMG_3165IMG_3166IMG_3176IMG_3227