As promised I will now write a post on how a sliding deadman could look like that toils in tandem with my “legvise with a twist”, while they are both attached to my “alternative workbench/assembly table”. There are posts on both these projects under the categories of “Bench accessories” and “Bench” respectively.
I built this deadman at the same time as the legvise, but concentrated more on the legvise towards the end of the project, finished it and went back to the deadman. I again used Assegaai predominantly with small pieces of Ysterhout, Witpeer and Kershout to make up the rest. In the picture below you can see the feral nature of the wood I work with. In order to make up stout chucks of lumber I always have to laminate petite pieces that are carefully liberated from the crude boards of wild wood. You can see the rough boards these pieces came from in the post on the legvise.

In the next picture you can see how a tidied up version of the laminated piece in the previous picture receives a face of Assegaai. The reason for gluing the bigger piece together like this is in the first place to have a front that looks solid (rather than laminated), but also to created strength/stability (by means of glue lines) in different directions. Whether it actuals works like this I am not too sure, but it makes some sense to me. I guess only time will tell. Anyway, you should be able to see the piece of Ysterhout in the centre of the original laminated part flanked by Assegaai. The Ysterhout was available it the size needed (reason number one for inclusion) but was also included to enhance the strenghts of the beam.


The blank that emerged after the clamps were removed was quite a bit more irregular in shape than what is apparent in the picture below.

I managed to flatten and square it up by means of stoical hand planing over a few days of doing tolerable sessions at a time. This approach (despite not being the motivating reason for doing it this way) is probably the best one can hope for in terms of the result as the blank are allowed to settle after each minor release of tension.


The sqaured-up product was quite pleasing to the eye and supplied a heartening sense of achievement.


The next step was to router out a fairly large stopped dado that would accept the mechanism designed to easily adjust the height of the deadman.


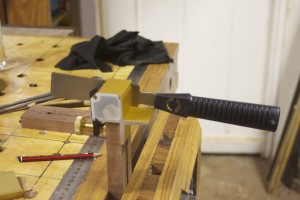
In the pictures below you can see how I simply used the F-style clamps hooked into the conveniently located T-channels along the side of my assembly table to fix the evolving deadman in order to locate the guiding jig (resembling a woodworking square) firmly on the table as well as the substrate. The advantage of using these jigs is that it shows you exactly where the dado will be cut in relation to the guiding edge.


I made a further upgrade to the jig for the purpose of this particular assignment. You should be able to see the panel pin that I tapped into the stock of the guiding square located in the previous dado. This setup allows you to cut dados at exactly the same distance from each other without the need for any cumbersome measuring.

Despite my clever jig-adaptations this process took ages as each dado had to be cut twice to reach the decided depth. The dados are 6 mm wide (the width of the threaded rod meant to frequent it in the future of this contraption) and 12 mm deep. There is this rule of thumb that one should only cut to a maximum depth equivalent to the diameter of the straight router bit being used in a particular pass, hence the double pass strategy.


After such an endeavor it is usually advisable to take a moment to savour what you have accomplished before moving onwards and upwards.


As if the above effort was not enough I decided that the edges of these dados are in need of a chamfer that would promote facile access for the piece of threaded rod intended to hook into these dados once our deadman enter into operational mode. For this purpose I used a V-groove router bit sized to allow me to chamfer both edges of each dado in a single cut. The modification of my guiding jig came in handy once again in lining up the cuts perfectly without much fuss. The results are apparent in the pictures below. Incidentally, you can also see the Ysterhout running down the middle of the deadman in the second picture.


Now we move on to the construction of the moving parts of the deadman. First, we will look at the block of wood meant to support stock much like a peg on a regular deadman. This block of wood is meant to be height adjustable by means of hooking into the dados at the back of the main beam and (as always) another elaboration I simply could not resist.
In the pictures below you will observe a collect of the petite pieces of wood chosen to make up the moving parts of the deadman. The second picture depicts the laminated blank earmarked to become the adjustable block. Please note that this block consisted of two equally sized parts clamped together in a face vice for the purpose of marking out the next cut. The cut was made on the table saw as illustrated in the next two pictures. It will become clear what I was aiming for as we progress.


I drilled a 8.5 mm hole with the drill press in the valley of one of the v-grooves created by the previous cut. I then widened the hole from the v-groove side only deep enough to accept an insert nut for an 8 mm bolt. The insert nut was seated using the drill press and manpower. Next I chiseled out an area that would house the wooden brake. In the last two pictures you can see the wooden brake in it’s place.


With the inside work done the block was glued together creating a diamond shaped channel (in actual fact it is square but positioned like a diamond) meant to accept an adjustable shaft. The orientation of the square channel was aimed at combatting the effects of wood movement, much like some of the better marking gauges. With this design the shaft will always sit tight when jammed into the 90° v-groove. If orientated differently it would rattle from side to side when the channel gets bigger and get stuck when the humidity swings the other way.


The block was then shaped on the band saw to assume an elegant sloping appearance. The rough marks of the band saw were tidied up using a handplane. In pictures 3 and 4 you can see the threaded rod screwed and epoxied into place. These holes were drilled before the block was sloped in order to drill them parallel to the ends. I drilled 7.5 mm holes and screwed the 8 mm threaded rods in after lubricating it with epoxy. You can also see the knob turning the 8 mm threaded rod onto the wooden brake we seated earlier. I will write a brief post in the near future on how to make these knobs.


In the next few pictures you can finally get an idea of how the support block function with the brake we made earlier. We already discussed the reasons behind the shape of the shaft, but here you can see want I meant. I slowly hand planed the shaft until it fitted perfectly. You will note the flat area on one of the corners of the diamond shape, which is where the brake asserts it pressure.


We will leave the the block’s evolution for the moment and shift our attention to the adjustable lower section meant to anchor the deadman to the floor. You can see how I used a Festool router to cut slots in a piece of Kershout. The choice of wood was driven by aesthetics. Kershout has a very deep colour once finished, which contrasts nicely with the light orange of the Assegaai. It also helps the deadman fit in with it’s brother the legvise. Yes I know, it sounds a wee bit girlish, but remember my goal is to bring into being workshop paraphernalia with a certain je ne sais quoi.


The two bits of Kershout were separated and clamped in my face-vise. I then used this newly acquired gadget from Veritas to cut one single dovetail pin in each. The gadget is called a Veritas Dovetail Saw Guide System. You will find it in the Veritas catalogue downloadable from their website (find the link in the library page on this site) which makes superb reading for tool aficionados.

In the pictures below you can see how I glued the Kershout parts into position after cutting the corresponding tails in a piece of Assegaai. I used the actual stoped dados in the bottom of the main beam, where the Kershout will slide up and down to keep the setup in the exact position while drying.


In the next few pictures you can see how I made a quick test of how my design works. I clearly need to improve on my dovetail technique, but in my defense this was the first dovetail I did since a woodworking examination in 1987. I think it is pertinent to digress from my story-line at this point in time.
On that particular day I made two first class dovetails in the time the rest of the class were supposed to make one. My best mate Gerdie Smook used to share a workbench with me, as per usual I guess in most school woodworking classes around the world when it still existed. The problem was that Gerdie tends to be a danger to himself (and others in his immediate surroundings for that matter) in the shop environment. In this particular exam we were issued with a three dimensional drawing of a doveltail joint and given a bit of wood to whittle into something resembling the mentioned drawing.
The game plan was formulated several days in advance, as Gerdie were on the brink of failing woodwork as a subject and it would not go down well as son of the Headmaster. I made one copy of the joint in the speed of light and handed it over to Gerdie with the idea that he would not alter it at all, yet try to look busy sanding it lightly. I then grabbed his chunk of wood and and made his joint. Obviously being warm-up at this stage, his turned out better than mine. To add to the discrepancy, Gerdie managed to mutilate mine sufficiently (with the mentioned “light sanding activity”), to ensure that he got a much better mark than me. Despite that, I still regard what I did that day as the finest achievement of my non-existent woodworking career.


I made some of my usual crude Sketchup drawings to show what is happening in the engine room of this part of the design that is a bit difficult to see from the pictures above. As you can see I drilled two 7 mm holes lined up with the slots in the Kershout that slides up and down the stopped dados. Then I widened these holes on opposite ends to accept insert nuts for a 6 mm bolt. The bolt was sunk into a wooden knob and epoxied. The knob of each bolt obviously sits on the opposite end to the insert nut that it engages with.


Here I added the caster meant to make it easy to slide the deadman along the side of the assembly table, hence “sliding” deadman.


Since finishing the legvise (with a twist) I acquired thread cutting tools, which you can see in action below. I am in the process of cutting 8 mm thread in a piece of steel left over from another job, to act as the anchor in the T-channel on the side of the assembly table. You will remember how I had to weld bolts to a piece of steel to accomplish the same while creating the anchor for the legvise.


Finally you can get an idea of what we were aiming for with regards to this unique deadman. In the pictures below you can see the first “dry fit” to the assembly table. In the second picture you can see the two bits of scrap 6 mm plywood attached the inside of the face board were it nestles up against the side of the assembly table. These were added to bring the face of the deadman perfectly in line (flush) with the inside jaw of the legvise. In the third picture you can get an idea of how the height adjustable mechanism operate.


After all that fanfaronade, let’s get back to the adjustable support block. I made the arms in the pictures below to wrap around the main beam of the deadman while being attached to the support block and the 6 mm threaded rod that hooks into the profusion of dados at the back of it. The wood is meant to created a soft wood-on-wood feel when adjusting the support block, but also considers the matter of wear.


In then next few pictures you can see how the support block works. It hooks into the appropriate dado depending on the hight needed for the job and has the ability to make fine adjustments with the “marking gauge mechanism” for lack of a better term. You will note the use of two lock nuts on either side of each steel/wood-arm, allowing precise adjustment for a custom fit.


Every deadman deserves a good manicure before being flung into another samsara. In this case a facial treatment with Tung oil diluted vigorously with mineral turpentine. After only one layer of this I rubbed some (you’ve guessed it) Ballistol on for good measure.


In these pictures you can see how the deadman and the legivise function together for the first time. At the time I was working on t-brackets to hang from the rafters in order to keep a few boards out of the way while it acclimatizes to the shop.