Tag Archives: Shop made wooden planes

Building a wooden Shoulder Plane

13/8/2013

The third plane I prioritised to build was a shoulder plane. As per usual I decided to use a Lie-Nielsen blade in the form of their Large Shoulder Plane replacement blade. As you can see in the pictures below it is a blade that is designed to be used bevel up, given the bevels on the sides of the top of the bit end. I did not really grasp this until it was pointed out to me by Deneb Puchalski from Lie-Nielsen. I actually planed to bed the blade at 50-55º and use it bevel down. He advised me to consider a much lower bedding angle while using the blade bevel up.

I then started thinking of a way to change the design quite radically from the examples I found in my research. You will have to wait and see how it turns out as I myself still does not know exactly what the final design will look like. I will again (similar to what I did with the Scrub Plane) write this post as I progress with the project.

In the pictures below you can see the beech I used for the project and the Lie-Nielsen blade.

IMG_7476IMG_7477

As with the other planes I have built so far I had to laminate in order to get the size stock required. I laminated it in this particular orientation to ensure that I have the grain running in the direction recommended by the guys from Old Street Tools. I can really recommend their articles (which is available for free download from their site) on plane building. You will find the the link to their site on the library page of this site.

IMG_7478IMG_7479

The lamination process. You will notice the use of my glue roller. I wrote a separate post on how I made this tool, which you will find under the category “Hand tools”

IMG_7480IMG_7481IMG_7482

The beech blank.

IMG_7484IMG_7485IMG_7486

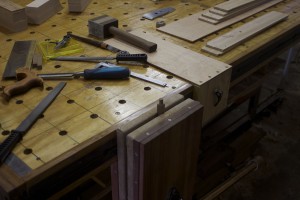
I used the actual blade to mark out the next step of cutting away the sides …

IMG_7487

… as so. In the last of the three pictures you can see the strips I ripped off the sides, which were then glued back on the centre piece.

IMG_7489IMG_7490IMG_7491

Before glueing the strips back I first fed the inside to the thicknesser to get it down to about 2 mm wider than the tang of the blade.

IMG_7492IMG_7493

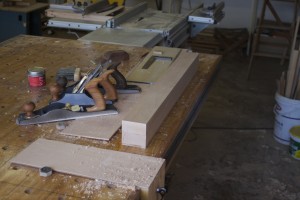
The strips were then hand planed to improve the contact during glueing.

IMG_7494IMG_7495

Dry-fit and glue.

IMG_7496IMG_7497IMG_7498IMG_7499


Here you can see how I removed the hardened glue with my shop-made flush plane before hand planing the sole in preparation for the glueing on of the ysterhout sole.

IMG_7503IMG_7504IMG_7505IMG_7506IMG_7507IMG_7507IMG_7508IMG_7509IMG_7510IMG_7511

Glueing on the ysterhout sole.

IMG_7513IMG_7514IMG_7516

I then used my bandsaw Mitre-sled to cut a 20 º bedding angle for the blade and 12º space for the wedge.

IMG_7562IMG_7563IMG_7574IMG_7576IMG_7577IMG_7578IMG_7575

Up until this stage the design I was aiming for looked like the one below …

Shoulder plane design

… but I realised that the small triangular area on the “bedding piece” available as a glueing surface for the kershout sides (still to be made), would not be adequate. I therefore dropped the project and continued with the four other planes (Jack, Fore, Smoothing planes and a jointer) I started working on.

IMG_7579

1/10/2013

During a trip to Cape Town recently to go and what the Springboks butcher the Ozzies, I had some time to think on the plane (that is thinking on the airplane about the shoulder plane) and came up with an idea of how to hopefully make this plane work. As I am writing this I still have no idea if it would work as it entails quite a few tasks that I have never attempted before.

Anyway, I got back on the horse and took some beautiful kershout from this massive board. A Kershout tree of this size would have been between 700 – 1000 years old if my friend who studied these things knows anything.

IMG_7564IMG_7565IMG_7566IMG_7567IMG_7568

I re-sawed the piece on the bandsaw and tidied it up with the thicknesser and hand planes.

IMG_7569IMG_7570IMG_7571

Here you can see my delightful petite smoothing plane in action. I wrote an entire post on how I built it a few months ago (http://www.jenesaisquoiwoodworking.com/petite-wooden-smoothing-plane/)

IMG_7572IMG_7573

The plane was then glued together. In the first picture below you can see an unpolished piece of stainless steel, which is integral to the success (hopefully at this stage) of my new idea.

IMG_8068IMG_8069IMG_8070IMG_8071


7/10/2013 – I released the plane from the clamps on Friday afternoon and spent an hour playing around with various shapes and designs based on an idea I had. Finally I came up with the design as drawn on the blank before heading down to our Barbie area to light a fire and drink a few cold beverages.

IMG_8072

On Saturday morning I started to shape the plane in order to be able to epoxy these strips of stainless steel in place so that it could set well overnight.

IMG_8073IMG_8074

You can see how I made a few test cuts in a scrap piece of plywood to ensure the absolute correct depth of cut for the dado meant to accept the stainless steel. I used my removable pipe-clamp-end-vise to keep the plane in position for cutting the dado.

IMG_8078IMG_8079IMG_8080IMG_8081IMG_8082

The two dados meant to accept the two stales steel bars is clearly visible in the first two pictures. I then proceeded to shape the rest of the plane by drilling out certain areas an using the bandsaw for the rest.

IMG_8085IMG_8086IMG_8087IMG_8089IMG_8088

The next step was to epoxy the stainless steel into place.

IMG_8091IMG_8092IMG_8094IMG_8096IMG_8095IMG_8097IMG_8098IMG_8099

The next day I drilled out six holes through the stainless steel from side to side. These holes were 6 mm in diameter with the entrance chamfered slightly, as you can see. I made six pins out of 6 mm brass rod that was about 5 mm longer than the width of the plane and whacked it through the holes with equal amounts protruding at each end.

IMG_8110IMG_8112IMG_8113IMG_8114IMG_8117IMG_8118

I used the setup below to rest one of the protruding ends on while whacking the other with a hammer until the brass moved into the chamfered area and fixing the stainless steel into this position for ever.

IMG_8119IMG_8120

As you can see in the pictures below, I then removed the untidy excess metal and polished it as best as I can given my lack of metal working tools and skills.

IMG_8121IMG_8122IMG_8123IMG_8124

Then came the long hard slog of shaping the edges of the plane using a block plane, a spokeshave, and several files.

IMG_8126IMG_8127IMG_8128IMG_8129IMG_8130

Sides were tidied up with my shop made proletarian sanding contrivances.

IMG_8131IMG_8132

At present the plane looks like this. Next I have to make the wedge and am considering to try some decorative coloured epoxy inlays, but let’s see what happens.

IMG_8133IMG_8134IMG_8135


13/10/13 – On Friday afternoon I quickly fashioned this wedge out of beech.

IMG_8136-2

On Saturday I changed the shape ever so slightly as you can see here. The blade will be set by a special plane hammer with a delicate neck, which I still have to build.

IMG_8137-2IMG_8138-2IMG_8139-2IMG_8141-2IMG_8142


IMG_8143-2

The next step was to ensure that the sole of the plane is 100% square with the left cheek. As a right-hander I would use the plane predominantly with the left cheek as reference surface. I used the setup as shown to sand the sole square.

IMG_8145-2IMG_8146-2IMG_8147-2IMG_8148-2IMG_8149-2IMG_8150-2IMG_8151-2IMG_8152-2IMG_8153-2IMG_8154-2

As discussed in one of the “My journey” posts, I am using this tool building phase to try out and practice techniques that might come in handy when I start building furniture. Here I thought of trying-out coloured epoxy inlaying to add some je ne sais quoi to the shoulder plane. I used the drill bit pictured to create the grooves and tidied it up with a carving tool.

IMG_8155-2IMG_8156-2IMG_8157-2

As you can see, I mixed some epoxy with acrylic paint …

IMG_8158-2IMG_8161-2

… and used small scrap bits of wood as spatulas to work the mixture into the grooves. After a few hours I used my shop made flush plane to cut most of the excess away before the epoxy became too hard. It is a shlep to sand it away once it becomes rocklike.

IMG_8160IMG_8162IMG_8163-2IMG_8164-2IMG_8165-2IMG_8166-2

I then used my proletarian sanding contrivances to sand away the last little bit of epoxy and started the finishing process as shown.

IMG_8167-2IMG_8173-2

Here are a few pictures of the finished shoulder plane. Now I only have to sharpen the blade and Bob’s your uncle. The blade is bedded at 20º with a 25º primary bevel. I am planning to hone and polish a small secondary bevel at 28º, producing a 48º effective angle of attack.

IMG_8193-2IMG_8194-2IMG_8195-2IMG_8196-2IMG_8268IMG_8332IMG_8301IMG_8353

Building a wooden Fore Plane


19/8/2013 – I am in the process of building 4 different wooden planes as you might have seen under the post entitled “Shooting Plane Pregnancy”. They are a Jack Plane (aiming at 17″), a Fore Plane (probably 22″), a Shooting Plane and a Jointer (aiming for 30″).

This post will document the process of how I build the Fore Plane. The plan is to add new photos and text as I progress over the next few weeks. You will find that there will be a lot of overlap in terms of the text and pictures between these various posts. While this will be annoying to those who read all the posts, I am trying to keep each post fairly comprehensive for those who only read one.

The stock for all of these planes were cut from the two beech boards pictured.

IMG_7620

The ysterhout sole of the plane came from this piece of ysterhout, which was re-sawn on the bandsaw and then tidied up by means of the thicknesser.

IMG_7625IMG_7626IMG_7627

The Fore Plane is the one on the right with the green end grain accompanied by it’s ysterhout sole prior to gluing.

IMG_7637

In the clamps and immediately after the liberation.

IMG_7651IMG_7648

I used the array of planes pictured below to establish one flat surface on the side of each of the plane blanks, as I do not have a Jointer. In the last two pictures you can see the difference between a jointed side and an untouched one.

IMG_7641IMG_7642IMG_7659IMG_7656IMG_7658

The blanks were then fed to the thicknesser flat face down, to created another flat face parallel to the first.

IMG_7663

After that I first squared the future top of the plane with regards to these flat and parallel sides. That enabled me to slice the strips off the sides on the bandsaw with the ysterhout sole facing upwards in order to prevent blowout.

IMG_7676IMG_7674

I removed the saw marks from the sides with the thicknesser.

IMG_7681IMG_7682IMG_7683

The next step was to mill the centre down to the exact width, which was 3 mm wider than the 2″ Lie-Nielsen blades I am planning to use.

IMG_7684IMG_7685IMG_7665IMG_7675

At this point I was able to utilise my bandsaw mitre-sled to cut the ramp and curved toe section. I wrote an entire post on how I built the bandsaw mitre-sled, which you will find under the category “jigs” on this site. It is important to keep the wedge created by these two cuts. It comes in handy later on as I will illustrate. I decided on a 50° degree bedding angle (also known as York Pitch) for all of these planes. It is the best all-round angle for my purposes working predominantly with very hard woods.

IMG_7693IMG_7692IMG_7706IMG_7707

The curved cut on the toe section was tidied up by means of the Green Monster (shop made spindle sander built by my Dad many moons ago).

IMG_7710IMG_7711

The first place where the wedge-offcut comes in handy is when you need to square up and flatten the ramp on the heel section. In order to prevent blowout of the ysterhout sole one can clamp the wedge together with the heel section as shown. Then you can go ahead and plane the ramp with confidence.

IMG_7712IMG_7713IMG_7714

After planing the three ramps I scribbled on them with a 2B pencil and did the last of the flattening on glass with 3M adhesive-backed sandpaper on it. It seems to me that one should not overdo this step as it is easy to round off the edges if not very careful. As soon as all the pencil marks disappear you have done enough.

IMG_7715IMG_7717IMG_7719

I chose 2″ wide Lie-Nielsen blades with their accompanying chip breakers for each of these three planes. Lie-Nielsen produce blades of absolutely tantalising quality. In the pictures below you can see how I measured the the screw that clamps the business end of the plane together, in order to set the router up to cut a custom slot for it in the ramp.

IMG_7720IMG_7721IMG_7722


Here you can appreciate the second reason why it is useful to retain the wedge produced by the two cuts made earlier in the centre section. It helps to created enough of a flat section as a reference surface for your router in order to cut the mentioned slot in the ramp. 

IMG_7724IMG_7725IMG_7723IMG_7726IMG_7727IMG_7728IMG_7730


I thought I should quickly show you these delightful Kershout beams I made many moons ago. They are kept quite handy in the location as shown below my bench. You will notice that they have their length indicated to help me find the exact contrivance needed in a particular situation. In this case I used the Godfather of the beams (at around 1.7 meters in length) as a fence to align the plane parts as shown. This process entails the marking out of the centre-heel piece relative to the centre-toe piece and pinpointing the location of where to drill the first hole for the cross-pin.

IMG_7739IMG_7738IMG_7735IMG_7740IMG_7741IMG_7742IMG_7744IMG_7745IMG_7746

This unfortunately represented the first major blunder in my hitherto Utopian-plane-building-activities. I somehow marked out the location of the cross-pin without taking into account the thickness of the Iron-chipbreaker-combo as is clearly indicated in my extensive notes on the topic. Please see my post entitled “Wooden plane building tip” for information on the measurements I use. If you follow them correctly (as a posed to me in this instance) it works like a charm. We will discuss my fix for the my blunder a little bit later on as at this point in time I still did not realise that I made a mistake.

IMG_7747

In order to drill the opposing hole for the cross-pin, I assembled the plane using small Bessey f-style clamps to keep the various pieces in place, while fixing it with very small panel pins as shown. I first drill a 1 mm hole and then tap the panel pin home, in order to be able to take the plane apart easily afterwards. These same panel pins stay in the side strips to enable me to reassemble the plane in this exact way during the final dry-fit and ultimate glue-up. You will notice that the panel pins go in the area at each end of the plane that will be cut away after gluing.

IMG_7749IMG_7750IMG_7751IMG_7752IMG_7753IMG_7754

Here you can see how the initial cross-pin whole acts as a guide for locating the opposing hole on the drill press.

IMG_7759IMG_7760

Next step was to prepare a ½” square length of Assegaai for the cross-pins. I tend to make them 3 mm longer than needed each side and only trim them down after the plane is glued up. The inside is only about 1 mm shorter than the width of the centre pieces (toe and heel sections). I used a Lie-Nielsen carcass saw and a bench hook I made that keeps the saw at precisely 90° to cut the cross-pins to length.

IMG_7762IMG_7763IMG_7766

In order to create the rounded ends of the pins I use, a Veritas centre-finder (by lack of a better term), a Tamboti marking knife, a compass, a chisel and a selection of files.

IMG_7768IMG_7767IMG_7777


After a final dry-fit I usually go ahead and glue the plane together, but not in this case as it was at this point where I luckily (although it did not feel that way at the time) realised my mistake in measuring out the location of the cross-pin holes. There were no space for a wedge and a blade as I did not include the thickness of the blade in my measurements!!!!! This is one of those horrible feelings in woodwork when it hits you like a ton of bricks that you made a stuff-up that might mean all the effort so far was in vain. I usually start sweating and develop acute palpitations, as I did in this case as well.

After I managed to calm down I realised that I could simply move the heel section back by the thickness of the blade-chipbreaker combo to fix the problem. The only real side-effect of my indiscretion after the fix was that I now had a much wider mouth/throat opening than initially intended. On these planes I was not too concerned about that so it worked out fine in the end. You can see the glue-up process in the pictures below.

IMG_7778IMG_7779IMG_7780IMG_7782

Here you can see the two sets used for the initial flattening of the sole. I used a hand plane to do the lions share of the work and followed that up with 3M adhesive-backed sandpaper on glass. This is the first of two flattening processes. The final flattening happens with the blade retracted and the wedge tapped in at about the tention used while the plane is operational. This distorts the area immediately behind the mouth/throat so the plane needs to be flattened in this state.

IMG_7886IMG_7887


In the pictures below you can see how I marked out the guiding lines for the final shaping of the nose of the plane. I first used this design on the scrub plane I built. You will find an entire post on this project under the category “Hand tools” on this site. I find it an absolute gem of a design and it certainly attains my goal of building objects that are functional and beautiful at the same time. Otherwise known as a certain je ne sais quoi. I would therefore like to call this … wait for it …  “The Marx Nose”.


dr.evil


Yes I know …


In the pictures below you can see how I shaped “The Marx Nose” using a Forstner bit and the bandsaw. Please feel free to use it, as long as you also call it “The Marx Nose”. Feel free to contact me and I will give you an idea of the proportions I used. It really feels extremely comfortable and natural while using the plane. Your left palm (if you are right-handed) rests on the top of the toe section, enabling easy and controlled downward pressure and your fingers curl into the rounded slot of the nose to improve the ability to pick the plane up for the back-stroke. It really feels so much better than a cast-iron and normal square-nosed 18th century wooden plane.

IMG_7895IMG_7896

IMG_7897IMG_7898IMG_7899IMG_7900


I thought I should add these pictures of how my legvise and sliding deadman work in tandem to hold the Fore Plane while cutting the chamfers on the sides.

IMG_7901IMG_7903

IMG_7904

The chamfers on the sides were done with this Lie-Nielsen low angle block plane. I used my beautiful little smoother to do the final finishing. The top edge of this chamfer runs along the glue line where the sides were glued to the centre sections, in order to hide it. This works very well. You will notice that it is not a 45° chamfer as it extends further down the plane than across the top. I find that this adds a certain je ne sais quoi.

Where the chamfer extends across the front of the nose I used files as this is a curved surface with end grain.

For the stopped chamfers at the heel end, I follow the procedure as illustrated stepwise in the pictures below. I first use a round file to do the end of the chamfer and then clamp a bit of scrap wood over the end to protect it. Next I used a selection of flat files to remove the rest of the wood. 


IMG_7905IMG_7906IMG_7907IMG_7871IMG_7873IMG_7909IMG_7910


I found the template below for a closed tote at http://www.oocities.org/plybench/handle.html. As you can see I tweaked it slightly to suite my purpose and sense of je ne sais quoi.

Old street 16th century closed tote paternIMG_7804IMG_7808IMG_7807


The template I created from the original was then used with consideration of grain orientation to dram the outlines on a piece of Assegaai.

IMG_7802IMG_7810IMG_7812


I first drilled out the tight corners on the drill press using Forstner bits of various sizes and then used the bandsaw to finish the job.

IMG_7815IMG_7816IMG_7819


I then did the initial shaping with the Green Monster (pictured), after which I used the setup as shown to do the final more delicate work with files.

IMG_7821IMG_7836IMG_7837IMG_7843IMG_7844IMG_7845


In these pictures you can see how I fitted the closed tote that we modified and made a bit earlier.

IMG_7911IMG_7912IMG_7879IMG_7913IMG_7914IMG_7915

4/9/2013 – Currently I am applying various layers of oil and finish to this plane and aim to create the Tamboti wedge on the weekend. Then it will be simply a case of shaping and sharpening the blade and Bob’s your Uncle.
Here are some pictures of the Fore Plane midway through the different layers of Tung Oil and something called Wooddock. You can probably appreciate the slight elaboration of the closed tote I introduced as discussed earlier in the post. The beautiful dark orange colour of this piece of Assegaai is also evident.
IMG_7926IMG_7927
9/9/2013 – In these pictures you can see the the piece of Tamboti I used for the wedges. They were initially cut with the bandsaw and tidied up with my very special spindle sander known as the “Green Monster”.
IMG_7936IMG_7937IMG_7938IMG_7939
IMG_7941IMG_7942
IMG_8001
The blades were then shaped and sharpened using the setup as shown. I like writing the angles used on the blades for future reference. Both of these blades were honed with a slight camber, but the Jack Plane with the more pronounced curve. You will notice that I use the terms Honing Angle (HA) and Polishing Angle (PA). These blades come with a primary bevel of 25º and I added secondary bevels with a HA of 33º and PA of 35°. You will find and entire post on how I built this sharpening jig under the category “Jigs” on this site. You will notice the small ruler on the water stone indicating that I use David Charlesworth’s “ruler trick” to created a mirror polish on the back of the blades.
IMG_8002IMG_8004IMG_8005IMG_8003
Next step was to set the blades under normal tension, but retracted in order to do the final flattening of the soles.
IMG_8009IMG_8008
IMG_8018IMG_8019
The most rewarding part of this process is the first few shavings taken with your new plane. Here you can see the beautiful assegaai shavings taken from a scrap piece.
IMG_8024IMG_8029
Here you can see how I used the Fore Plane to flatten the sole of the Jointer I am also working on.
IMG_8030
I moved some stuff to create this space right next to my usual planing area as a home for the three planes. The Jointer will be finished next.
IMG_8025IMG_8026
IMG_8266IMG_8225IMG_8229IMG_8234IMG_8231

Building a wooden Jointer

28/8/2013 – As described ad infinitum in posts with similar titles, I am building several wooden planes at the same time. This one is a Jointer and will have several photos that co-occur in the other mentioned posts. For the sake of the mortals who only read this particular post I will endeavour to try and keep each post fairly comprehensive at the risk of boring those who peruse all of the plane-building-musings.

I did start building this plane together with the others, so the date above refers more specifically to when I stated documenting this plane’s progress.

I took the wood needed to laminate the blank for this plane from the two beech boards below.

IMG_7619IMG_7620

The ysterhout sole of the plane came from this piece of ysterhout, which was re-sawn on the bandsaw and then tidied up by means of the thicknesser.

IMG_7625IMG_7626IMG_7627

Here you can see the beech and ysterhout stock prior to lamination.

IMG_7628

A quick picture of the stock of the other planes that were built in conjunction with this Jointer.

IMG_7636


The gluing process to laminate the above parts.

IMG_7638IMG_7639IMG_7640

IMG_7648


I used the array of planes pictured below to establish one flat surface on the side of each of the plane blanks, as I do not have a Jointer. In the last two pictures you can see the difference between a jointed side and an untouched side. Please note the use of my home made Flush Plane to remove the hardened glue from the glue lines before employing the other planes. I wrote an entire post on how I made this plane which you will find under the category of “Hand tools” on this site.


IMG_7641IMG_7642IMG_7666IMG_7660IMG_7656IMG_7658
The blanks were then fed to the thicknesser to created another flat surface parallel to the planed one.

IMG_7663


After that I first squared the future top of the plane with regards to these flat and parallel sides. That enabled me to slice the strips off the sides on the bandsaw with the ysterhout sole facing upwards in order to prevent blowout.

IMG_7676IMG_7678


I removed the saw marks from the sides with the thicknesser.IMG_7683IMG_7682


The next step was to mill the centre down to the exact width, which was 3 mm wider than the 2″ Lie-Nielsen blades I am planning to use

IMG_7684IMG_7664IMG_7665

At this point I was able to utilise my bandsaw mitre-sled to cut the ramp and curved toe section. I wrote an entire post on how I built the bandsaw mitre-sled, which you will find under the category “jigs” on this site. It is important to keep the wedge created by these two cuts. It comes in handy later on as I will illustrate. I decided on a 50° degree bedding angle (also known as York Pitch) for all of these planes. It is the best all-round angle for my purposes working predominantly with very hard woods.

IMG_7692IMG_7693

IMG_7698IMG_7707

IMG_7709IMG_7708

The curved cut on the toe section was tidied up by means of the Green Monster.

IMG_7710IMG_7711

The first place where the wedge-offcut comes in handy is when you need to square up and flatten the ramp on the heel section. In order to prevent blowout of the ysterhout sole one can clamp the wedge together with the heel section as shown. Then you can go ahead and plane the ramp with confidence.

IMG_7712IMG_7713

The ramp after planing.

IMG_7714

After planing the three ramps I scribbled on them with a 2B pencil and did the last of the flattening on glass with 3M adhesive-backed sandpaper on it. It seems to me that one should not overdo this step as it is easy to round off the edges if not very careful. As soon as all the pencil marks disappear you have done enough.

IMG_7715IMG_7717IMG_7719


I chose 2″ wide Lie-Nielsen blades with their accompanying chip breakers for each of these three planes. Lie-Nielsen produce blades of absolutely tantalising quality. In the pictures below you can see how I measured the the screw that clamps the business end of the plane together, in order to set the router up to cut a custom slot for it in the ramp.

IMG_7721IMG_7722


Here you can appreciate the second reason why it is useful to retain the wedge produced by the two cuts made earlier in the centre section. It help to created enough of a flat section as a reference surface for your router in order to cut the mentioned slot in the ramp.

IMG_7724IMG_7725IMG_7723IMG_7726IMG_7727IMG_7728IMG_7729IMG_7734

I thought I should quickly show you these delightful Kershout beams I made many moons ago. They are kept quite handy in the location as shown below my bench. You will notice that their have their length indicated to help me find the exact contrivance needed in a particular situation. In this case I used the Godfather of the beams (at around 1.7 meters in length) as a fence to align the plane parts as shown. This process entails the marking out of the centre-heel piece relative to the centre-toe piece and pinpointing the location of where to drill the first hole for the cross-pin.

IMG_7736IMG_7740IMG_7741IMG_7744IMG_7742


This unfortunately represented the first major blunder in my hitherto Utopian-plane-building-activities. I somehow marked out the location of the cross-pin without taking into account the thickness of the Iron-chipbreaker-combo as is clearly indicated in my extensive notes on the topic. Please see my post entitled “Wooden plane building tip” for information on the measurements I use. If you follow them correctly (as a posed to me in this instance) it works like a charm. We will discuss my fix for the my blunder a little bit later on as at this point in time I still did not realise that I made a mistake.

IMG_7746IMG_7745

IMG_7747


In order to drill the opposing hole for the cross-pin, I assembled the plane using small Bessey f-style clamps to keep the various pieces in place, while fixing it with very small panel pins as shown. I first drill a 1 mm hole and then tap the panel pin home, in order to be able to take the plane apart easily afterwards. These same panel pins stay in the side strips to enable me to reassemble the plane in this exact way during the final dry-fit and ultimate glue-up. I you will notice that the panel pins go in the area at each end of the plane that will be cut away after gluing.

IMG_7758IMG_7757IMG_7751IMG_7752

IMG_7756


Here you can see how the initial cross-pin whole acts as a guide for locating the opposing hole on the drill press.

IMG_7759IMG_7760IMG_7761


Next step was to prepare a ½” square length of Assegaai for the cross-pins. I tend to make them 3 mm longer than needed each side and only trim them down after the plane is glued up. The inside is only about 1 mm shorter than the width of the centre pieces (toe and heel sections). I used a Lie-Nielsen carcass saw and a bench hook I made that keeps the saw at precisely 90° to cut the cross-pins to length.

IMG_7732IMG_7762IMG_7763IMG_7766


In order to create the rounded ends of the pins I use, a Veritas centre-finder (by lack of a better term), a Tamboti marking knife, a compass, a chisel and a selection of files.

IMG_7768IMG_7777


After a final dry-fit I usually go ahead and glue the plane together, but not in this case as it was at this point where I luckily (although it did not feel that way at the time) realised my mistake in measuring out the location of the cross-pin holes. There were no space for a wedge and a blade as I did not include the thickness of the blade in my measurements!!!!! This is one of those horrible feelings in woodwork when it hits you like a ton of bricks that you made a stuff-up that might mean all the effort so far was in vain. I usually start sweating and develop acute palpitations, as I did in this case as well.


After I managed to calm down I realised that I could simply move the heel section back by the thickness of the blade-chipbreaker combo to fix the problem. The only real side-effect of my indiscretion after the fix was that I now had a much wider mouth/throat opening than initially intended. On these planes I was not too concerned about that so it worked out fine in the end. You can see the glue-up process in the pictures below.

IMG_7831IMG_7832IMG_7833


The Jointer after it was liberated from the clamps.

IMG_7834

I found the template below for a closed tote at http://www.oocities.org/plybench/handle.html. As you can see I tweaked it slightly to suite my purpose and sense of je ne sais quoi.

Old street 16th century closed tote paternIMG_7803IMG_7804IMG_7806IMG_7807IMG_7808


The template I created from the original was then used with consideration of grain orientation to draw the outlines on a piece of Assegaai.

IMG_7810IMG_7811IMG_7812


I first drilled out the tight corners on the drill press using Forstner bits of various sizes and then used the bandsaw to finish the job.

IMG_7815IMG_7819

I then did the initial shaping with the Green Monster (pictured), after which I used the setup as shown to do the final more delicate work with files.

IMG_7821IMG_7836IMG_7837IMG_7842IMG_7843IMG_7844IMG_7845


9/9/2013 – You will not believe how satisfying it was to use my wooden Fore Plane to flatten the sole of the jointer. I used a Lie-Nielsen Low Angle Jack Plane with a toothed blade (bedding angle 12º and secondary polished bevel at 45º resulting in a 57º angle of attack) and the Fore Plane with it’s 50º angle of attack and smooth cambered edge in tandem for this job. At 24″ in length the Fore Plane really helped to do a good job of flattening the 35″ (at this stage) Jointer.

IMG_8028IMG_8029IMG_8030

The next step as per usual was to finish off the first flattening on 3M adhesive-backed sandpaper on glass.

IMG_8031IMG_8032


22/9/2013 – Then I moved on to establishing the final dimensions of the plane by chopping of the waste at the toe and heel.

In the pictures below you can see how I marked out the guiding lines for the final shaping of the nose of the plane. I first used this design on the scrub plane I built. You will find an entire post on this project under the category “Hand tools” on this site. I find it an absolute gem of a design and it certainly attains my goal of building objects that are functional and beautiful at the same time. Otherwise known as a certain je ne sais quoi. I would therefore like to call this … wait for it …  “The Marx Nose”.

dr.evil

Yes I know …


In the pictures below you can see how I shaped “The Marx Nose” using a Forstner bit and the bandsaw. Please feel free to use it, as long as you also call it “The Marx Nose”. Feel free to contact me and I will give you an idea of the proportions I used. It really feels extremely comfortable and natural while using the plane. Your left palm (if you are right-handed) rests on the top of the toe section, enabling easy and controlled downward pressure and your fingers curl into the rounded slot of the nose to improve the ability to pick the plane up for the back-stroke. It really feels so much better than a cast-iron and normal square-nosed 18th century wooden plane.

IMG_8056IMG_8057IMG_8059IMG_8058


2/10/2013 –

The chamfers on the sides were done with this Lie-Nielsen low angle block plane. I used my beautiful little smoother to do the final finishing. The top edge of this chamfer runs along the glue line where the sides were glued to the centre sections, in order to hide it. This works very well. You will notice that it is not a 45° chamfer as it extends further down the plane than across the top. I find that this adds a certain je ne sais quoi.

Where the chamfer extends across the front of the nose I used files as this is a curved surface with end grain.

For the stopped chamfers at the heel end, I follow the procedure as illustrated stepwise in the pictures below. I first use a round file to do the end of the chamfer and then clamp a bit of scrap wood over the end to protect it. Next I used a selection of flat files to remove the rest of the wood.

The pictures below show how I shaped the Fore Plane I built but as you can see in the next set of pictures it is exactly what I did with the Jointer.

IMG_7905IMG_7904IMG_7869IMG_7870IMG_7872IMG_7871IMG_7873IMG_7874IMG_7875

In these pictures you can see how I fitted the closed tote that we modified and made a bit earlier.

IMG_7911IMG_7912IMG_7913IMG_7914IMG_7915

Finally the jointer is starting to resemble what I was aiming for. Here you can see it after a few treatments of tung oil initially followed by something called Wooddock. I am not too sure what it is made up of but it is very similar to Shellac.

IMG_8061IMG_8065IMG_8066IMG_8067


7/10/2013 – This past weekend I managed to finish this beautiful Jointer. I made a wedge out of Tamboti to match the other two similar looking planes. The blade was sharpened with a flat edge apart from clipping the corners to prevent it from cutting tracks. You can see the waver thin shavings it took on it’s first cut.

IMG_8100IMG_8101IMG_8102IMG_8103


Here you can see it with it’s brothers on the shelve next to the area dedicated to planing on my assembly table.

IMG_8104IMG_8105IMG_8106IMG_8107


IMG_8248IMG_8247IMG_8245-2IMG_8249-2IMG_8237-2

Building a Wooden Jack Plane

19/8/2013 – I am in the process of building 4 different wooden planes as you might have seen under the post entitled “Shooting Plane Pregnancy”. They are a Jack Plane (aiming at 17″), a Fore Plane (probably 22″), a Shooting Plane and a Jointer (aiming for 30″).

This post will document the process of how I build the Jack Plane. The plan is to add new photos and text as I progress over the next few weeks.

The stock for all of these planes were cut from the two beech boards pictured.

IMG_7619IMG_7620

The Jack Plane is the furthest from the camera accompanied by it’s ysterhout sole prior to gluing.

IMG_7637

Another photo of the Jack Plane’s stock together with that of the Shooting Plane.

IMG_7631

A closeup of the beech and ysterhout prior to gluing.

IMG_7629

The gluing process.

IMG_7638IMG_7639IMG_7640


I found this closed tote pattern as a free pdf download at http://www.oocities.org/plybench/handle.html. I am still considering whether I will use an open or closed tote for the Jack Plane but am pretty sure I will use this closed version for the Fore Plane and the Jointer.


Old street 16th century closed tote patern


29/8/2013 – With regards to the above conundrum, I decided to rather use an open tote on the Jack Plane, which I will discuss a bit later.

I used the array of planes pictured below to establish one flat surface on the side of each of the plane blanks, as I do not have a Jointer. In the last two pictures you can see the difference between a jointed side and an untouched side.

IMG_7641IMG_7642IMG_7653IMG_7654IMG_7658IMG_7662


The blanks were then fed to the thicknesser to created another flat surface parallel to the planed one.

IMG_7663


After that I first squared the future top of the plane with regards to these flat and parallel sides. That enabled me to slice the strips off the sides on the bandsaw with the ysterhout sole facing upwards in order to prevent blowout.

IMG_7671IMG_7672IMG_7673


I removed the saw marks from the sides with the thicknesser.

IMG_7683IMG_7681IMG_7682


The next step was to mill the centre down to the exact width, which was 3 mm wider than the 2″ Lie-Nielsen blades I am planning to use.

IMG_7674IMG_7684IMG_7664IMG_7665


At this point I was able to utilise my bandsaw mitre-sled to cut the ramp and curved toe section. I wrote an entire post on how I built the bandsaw mitre-sled, which you will find under the category “jigs” on this site. It is important to keep the wedge created by these two cuts. It comes in handy later on as I will illustrate. I decided on a 50° degree bedding angle (also known as York Pitch) for all of these planes. It is the best all-round angle for my purposes working predominantly with very hard woods.

IMG_7692IMG_7693IMG_7698IMG_7707IMG_7708IMG_7709


The curved cut on the toe section was tidied up by means of the Green Monster.

IMG_7710IMG_7711

The first place where the wedge-offcut comes in handy is when you need to square up and flatten the ramp on the heel section. In order to prevent blowout of the ysterhout sole one can clamp the wedge together with the heel section as shown. Then you can go ahead and plane the ramp with confidence.

IMG_7712IMG_7713IMG_7714

After planing the three ramps I scribbled on them with a 2B pencil and did the last of the flattening on glass with 3M adhesive-backed sandpaper on it. It seems to me that one should not overdo this step as it is easy to round off the edges if not very careful. As soon as all the pencil marks disappear you have done enough.

IMG_7715IMG_7716IMG_7717IMG_7718IMG_7719


I chose 2″ wide Lie-Nielsen blades with their accompanying chip breakers for each of these three planes. Lie-Nielsen produce blades of absolutely tantalising quality. In the pictures below you can see how I measured the the screw that clamps the business end of the plane together, in order to set the router up to cut a custom slot for it in the ramp.

IMG_7720IMG_7721IMG_7722


Here you can appreciate the second reason why it is useful to retain the wedge produced by the two cuts made earlier in the centre section. It help to created enough of a flat section as a reference surface for your router in order to cut the mentioned slot in the ramp.

IMG_7724IMG_7725IMG_7723IMG_7726IMG_7728IMG_7729

I thought I should quickly show you these delightful Kershout beams I made many moons ago. They are kept quite handy in the location as shown below my bench. You will notice that their have their length indicated to help me find the exact contrivance needed in a particular situation. In this case I used the Godfather of the beams (at around 1.7 meters in length) as a fence to align the plane parts as shown. This process entails the marking out of the centre-heel piece relative to the centre-toe piece and pinpointing the location of where to drill the first hole for the cross-pin.

IMG_7739IMG_7738IMG_7735IMG_7740IMG_7741IMG_7742IMG_7744IMG_7745IMG_7746

This unfortunately represented the first major blunder in my hitherto Utopian-plane-building-activities. I somehow marked out the location of the cross-pin without taking into account the thickness of the Iron-chipbreaker-combo as is clearly indicated in my extensive notes on the topic. Please see my post entitled “Wooden plane building tip” for information on the measurements I use. If you follow them correctly (as a posed to me in this instance) it works like a charm. We will discuss my fix for the my blunder a little bit later on as at this point in time I still did not realise that I made a mistake.

IMG_7747

In order to drill the opposing hole for the cross-pin, I assembled the plane using small Bessey f-style clamps to keep the various pieces in place, while fixing it with very small panel pins as shown. I first drill a 1 mm hole and then tap the panel pin home, in order to be able to take the plane apart easily afterwards. These same panel pins stay in the side strips to enable me to reassemble the plane in this exact way during the final dry-fit and ultimate glue-up. I you will notice that the panel pins go in the area at each end of the plane that will be cut away after gluing.

IMG_7749IMG_7750IMG_7751IMG_7752IMG_7753IMG_7754

Here you can see how the initial cross-pin whole acts as a guide for locating the opposing hole on the drill press.

IMG_7759IMG_7760

Next step was to prepare a ½” square length of Assegaai for the cross-pins. I tend to make them 3 mm longer than needed each side and only trim them down after the plane is glued up. The inside is only about 1 mm shorter than the width of the centre pieces (toe and heel sections). I used a Lie-Nielsen carcass saw and a bench hook I made that keeps the saw at precisely 90° to cut the cross-pins to length.

IMG_7762IMG_7763IMG_7766

In order to create the rounded ends of the pins I use, a Veritas centre-finder (by lack of a better term), a Tamboti marking knife, a compass, a chisel and a selection of files.

IMG_7768IMG_7767IMG_7777


After a final dry-fit I usually go ahead and glue the plane together, but not in this case as it was at this point where I luckily (although it did not feel that way at the time) realised my mistake in measuring out the location of the cross-pin holes. There were no space for a wedge and a blade as I did not include the thickness of the blade in my measurements!!!!! This is one of those horrible feelings in woodwork when it hits you like a ton of bricks that you made a stuff-up that might mean all the effort so far was in vain. I usually start sweating and develop acute palpitations, as I did in this case as well.

After I managed to calm down I realised that I could simply move the heel section back by the thickness of the blade-chipbreaker combo to fix the problem. The only real side-effect of my indiscretion after the fix was that I now had a much wider mouth/throat opening than initially intended. On these planes I was not too concerned about that so it worked out fine in the end. You can see the glue-up process in the pictures below.

IMG_7778IMG_7779IMG_7780IMG_7782


The Jack Plane after it was liberated from the clamps.

IMG_7784


Then I went searching for a nice orange piece of Assegaai for the totes. In the first picture you can see the rough boards and in the second how it looked after some attention for the thicknesser. In the end I decided to use an open tote for the Jack Plane and again used the tote of my Lie-Nielsen Low Angle Jack Plane as a template as you can see. I did however modify it slightly for this particular job giving it a significant base section (by lack of a better term). You will also see the template for the closed tote I used for the other two planes but we will discuss that in the posts on the Jointer and Fore Plane respectively. On the Lee Valley website one can find free pdf documents with tote templates of various old Stanley planes. The accompanying text and pictures is very helpful when trying to make your own totes for the first time. I used them when I made my “Proletarian Sanding Contrivances” and therefore I now feel very comfortable doing it without help. You will be able to find an entire post dedicated to these sanding planes under the category “Hand tools” on this site.

IMG_7801IMG_7802IMG_7814IMG_7813


After drilling out the tight corners with appropriately sized Forstner bits on the Drill Press I used the bandsaw to do the rest.

IMG_7818IMG_7820


I then did the initial shaping with the Green Monster (pictured), after which I used the setup as shown to do the final more delicate work with files.

IMG_7821IMG_7836IMG_7837IMG_7837IMG_7839IMG_7840

1/9/2013 – I am very pleased to add the following pictures of my progress over the past week. My family took advantage of the school holidays and disappeared off to Henties Baai during the latter stages of last week, which gave me some time in the shop after work during the week. Unfortunately I spent all of my Saturday at the Medical Council examining, which left only Sunday to push ahead with this project, but here are the results of my efforts.

I use this handy flush saw from Veritas to remove those extra millimeters at each end of the cross-pin.

IMG_7846-2


Then I did the first stage of flattening the sole using of the two planes pictured. A Lie-Nielsen no. 4½ Smoother (with a York pitch frog) and a Stanley Bailey pattern no. 5 Jack Plane. After that I did the final flattening using 3M adhesive-backed sandpaper on glass.

IMG_7847-2IMG_7848-2IMG_7849-2


In the pictures below you can see how I marked out the guiding lines for the final shaping of the nose of the plane. I first used this design on the scrub plane I built. You will find an entire post on this project under the category “Hand tools” on this site. I find it an absolute gem of a design and certainly attains my goal of building objects that is functional and beautiful at the same time. Otherwise known as a certain je ne sais quoi. I would therefore like to call this … wait for it …  “The Marx Nose”.

dr.evil


Yes I know …

In the pictures below you can see how I shaped “The Marx Nose” using a Forstner bit and the bandsaw. Please feel free to use it, as long as you also call it “The Marx Nose”. Feel free to contact me and I will give you an idea of the proportions I used. It really feels extremely comfortable and natural while using the plane. Your left palm (if you are right-handed) rests on the top of the toe section, enabling easy and controlled downward pressure and your fingers curl into the rounded slot of the nose to improve the ability to pick the plane up for the back-stroke. It really feels so much better than a cast-iron and normal square-nosed 18th century wooden plane.

IMG_7851-2IMG_7850IMG_7852-2IMG_7853-2IMG_7854IMG_7855IMG_7856-2IMG_7857-2IMG_7858-2


I usually mark the pencil lines for the chamfers by hand, using a finger as a fence.

IMG_7860-2IMG_7861-2


The chamfers on the side were done with this Lie-Nielsen low angle block plane. The top edge of this chamfer runs along the glue line where the sides were glued to the centre sections, in order to hide it. This works very well. I will notice that it is not a 45° chamfer as it extends further down the plane than across the top. I find that this add a certain je ne sais quoi.

IMG_7862-2IMG_7864


Where the chamfer extends across the front of the nose I used files as this is a curved surface with end grain.

IMG_7869IMG_7870


For the stopped chamfers at the heel end, I follow the procedure as illustrated stepwise in the pictures below. I first use a round file to do the end of the chamfer …

IMG_7871IMG_7872


… and then clamp a bit of scrap wood over the end that will stay to protect it. Next I used a selection of flat files to remove the rest of the wood.

IMG_7873IMG_7874IMG_7875


For the the tote of this Jack Plane I decided on an open tote in the end. In the pictures below you can see how it was attached to the plane body utilising three different strategies to ensure strength: mortise, glue and two screws.

IMG_7876IMG_7877IMG_7878IMG_7879IMG_7880IMG_7881IMG_7882IMG_7883


4/9/2013 – I am currently busy applying various layers of oil etc to this plane and aim to create the Tamboti wedge on the weekend. Then I only need to shape and sharpen the blade and Bob’s your Uncle.

In these pictures the two planes are kicking it in the Finishing Spa.

IMG_7917IMG_7920


I took this picture tonight after it received it’s final treatment with liquid wax. By early next week I should be able to add pictures of the completed plane if all goes well.


IMG_7922


9/9/2013 – In these pictures you can see the the piece of Tamboti I used for the wedges. They were initially cut with the bandsaw and tidied up with my very special spindle sander known as the “Green Monster”.

IMG_7936IMG_7937IMG_7938IMG_7939IMG_7940IMG_7942IMG_8001

The blades were then shaped and sharpened using the setup as shown. I like writing the angles used on the blades for future reference. Both of these blades were honed with a slight camber, but the Jack Plane with the more pronounced curve. You will notice that I use the terms Honing Angle (HA) and Polishing Angle (PA). These blades come with a primary bevel of 25º and I added secondary bevels with a HA of 33º and PA of 35°. You will find and entire post on how I built this sharpening jig under the category “Jigs” on this site. You will notice the small ruler on the water stone indicating that I use David Charlesworth’s “ruler trick” to created a mirror polish on the back of the blades.

IMG_8003IMG_8002IMG_8004IMG_8005

Next step was to set the blades under normal tension, but retracted in order to do the final flattening of the soles.

IMG_8007IMG_8010

You will notice that I have a new piece of glass that takes three different grids of sandpaper.

IMG_8018IMG_8019


The most rewarding part of this process is the first few shavings taken with your new plane. Here you can see the beautiful assegaai shavings taken from a scrap piece.

IMG_8021IMG_8023IMG_8022

I moved some stuff to create this space right next to my usual planing area as a home for the three planes.

IMG_8025IMG_8026


Now I can move on to finishing the Jointer and then the Shooting Plane.

IMG_8265IMG_8215IMG_8216-2IMG_8217IMG_8220-2IMG_8224-2IMG_8222IMG_8221-2IMG_8235IMG_8291

Shooting plane pregnancy

15/08/2013

This will be the first of a new type of post I am planning to do. I will post updates on each project as I progress. In other words, writing the post while I build the object.

The plan is to start building a dedicated shooting plane and shooting board. Below you can see the rough sketches I made while on the airplane this past weekend. The wife and I flew down south to attend the 90th birthday celebrations of the best rugby school in the history of the game. Outeniqua of course.

The idea with this plane is to slope the sides of the plane in order to skew the cutting edge of the blade just enough to create a slight sheering cut. The plane will slope down to allow the angled cutting edge to jam the stock that is being cut down into the corner created by the floor and the rail of the shooting board, rather than potentially lifting it. I am also playing around with ideas to potentially have a way to use the plane on both sides of the shooting board while still ensuring a comfortable grip. You can join me as I design and build the plane over the few weeks/months.

Shooting plane design

19/8/2013 – I started off with the shooting plane this weekend. I prepared the stock of the Shooting Plane together with that of a 30″ Jointer, a 22″ Fore Plane and a 17″ Jack Plane from the two boards seen below. In these pictures they are fresh out of the Planer.

IMG_7619IMG_7620

Here you can see the parts of the Jack Plane (left) and the Shooting Plane (right).

IMG_7631


I used my bandsaw to re-saw some ysterhout for the sides of the Shooting Plane and the soles of the other planes. I then processed it further in the planer.

IMG_7625IMG_7626IMG_7627

I made a few drawings on the stock to test the ideas I had as seen in the rough sketches in the first picture.

IMG_7633IMG_7634

Here you can see the ysterhout sides of the Shooting Plane posing with the yet-to-be laminated beech stock.

IMG_7635

The same ingredients with their cousins-to-be as mentioned.

IMG_7636

I utilised most of my current arsenal of planes to prepare the beech stock for lamination.

IMG_7641IMG_7642


As I already used up most of my clamps for the Jack Plane’s lamination, I employed my face vise in tandem with a few random C and F-style clamps to laminate the Shooting Plane on the same day.

IMG_7643

3/9/2013 – Please be patient as I am currently working on the three planes that look similar apart from their length. I will get back to the shooting plane once these are finished.

14/10/2013 – Finally I managed to do some work on this project over the weekend. You can see how I sliced the beech blank creating a triangular centre piece, it’s two sides and the two triangular bits of waste. The plane has this odd shape to skew the cutting edge by about 7º creating a slight sheering cut.

IMG_8168-2IMG_8169-2


The rough-sawn sides of the centre piece were flattened by alternating use of the Lie-Nielsen low angle Jack Plane with a toothed blade and my own shop made Jack Plane. The final touches were done with the longer Fore Plane (also pictured).

IMG_8170-2IMG_8171-2IMG_8172-2IMG_8174-2IMG_8175


In order to cut the ramp in the centre piece, I had to come up with the setup below in addition to using my shop made bandsaw mitre-sled. I wrote an entire post on how the sled was built, which you will find under the category “Jigs”.

IMG_8176-2IMG_8177-2IMG_8178-2IMG_8179-2IMG_8180


IMG_8181-2IMG_8182-2IMG_8183-2

IMG_8184-2IMG_8185-2IMG_8186-2

IMG_8187-2IMG_8188-2IMG_8190-2IMG_8191-2

Shop made Idiosyncratic Wooden Scrub Plane

June/July 2013

The second plane I decided to build was a scrub plane. Actually I built it alongside the Petite Wooden Smoother as described in exhaustive detail in the post with the same name, but finished off it’s wee cousin first and then moved back to the pugnacious old-timer.

This was the only piece of beech I could find at the time.

IMG_6908IMG_6907IMG_6906

I decided to use ysterhout for the sole of this plane. In future I plan to try to cut these 8 mm “veneer” on my band saw, but in this particular case I had to plane it down with the thicknesser and lost heaps of wood, electricity and time in the process. Since this wasteful experience I have managed to rehabilitate the mentioned bandsaw, so my wish should be possible in future. You can see how I am cutting the actual sole from the strip of ysterhout.

IMG_6932IMG_6933

In the first picture you can see both of the initial planes prior to lamination. In the second picture you can appreciate the grain orientation of the scrub plane.

IMG_6934IMG_6936

I did not take any pictures of the lamination process of the scrub plane but it looked similar to how I did the smoother in the picture below.

IMG_6937


The clamps exerted some serious pressure, which is what one wants in this particular instance.

IMG_6941IMG_6942

Then I used a handplane to square up the sides relative to the sole.

IMG_7005IMG_7006


In the next picture you can appreciate the grain orientation. In the second picture the square that guides this process is evident.

IMG_7007IMG_7008IMG_7009


Here you can see the beautiful shavings taken by my rehabilitated Stanley Jack Plane.

IMG_7010IMG_7012


My newly rehabilitated Bandsaw did a stirling job of cutting the sides off this plane blank. Please note that I deliberately chose to have the ysterhout at the top to prevent blow-out.

IMG_7023IMG_7024IMG_7025IMG_7026


The result an absolute joy.

IMG_7027IMG_7028IMG_7030


I then removed the saw marks with a hand plane.

IMG_7137IMG_7138


In order to reduce the centre section to the correct width I used the thicknesser. I aimed for 3 mm wider than the blade. This blade is a replacement blade for the Lie-Nielsen scrub plane at 1½” wide with a 3″ radius to take a mega chunk of timber with every pass.

IMG_7139IMG_7140IMG_7141


Below You can see how I glued another piece on to the centre section in order to produce the handle. I decided to used my own adaptation of a saw handle for this plane.

IMG_7164IMG_7165IMG_7166


I used one of the saw handle templates from the TGIAG (Two guys in a garage) website as a starting point to shape the handle of this plane. I can really recommend this website if you are looking for a saw handle templates. They have heaps which are downloadable for free in pdf format. I decided to tweak the S Biggins backsaw handle into a scrub plane handle. In the pictures below you can follow the process.

IMG_7358IMG_7359IMG_7360IMG_7361IMG_7362IMG_7363IMG_7364IMG_7365


I then traced the outlines on to the plane blank and elaborated a few extra curves to get it to the top of the ramp. Next step was to take to it with the drill press after marking out the exact location and size of the holes that would form the curves that are too tight to navigate with the bandsaw.

IMG_7367IMG_7366IMG_7373IMG_7375


The central hole was removed with a jigsaw …

IMG_7378IMG_7380IMG_7379


… and the rest with the bandsaw. At this stage I took quite a bit of time to come up with a idea and method to shape the sides to fit in with the handle design.

IMG_7383IMG_7384IMG_7385IMG_7387IMG_7388


In the end I came up with this idea. I traced the outlines of the centre piece on to one of the sides, drew a type of halo following the handle lines in some parts and taking it’s own route in others. I removed the waste with the bandsaw and then used it as a template to trace it onto the other side.

IMG_7389IMG_7390IMG_7391


In the pictures below you can get an initial idea of what I was aiming for.

IMG_7392IMG_7393IMG_7394


The arduous task of rounding and smoothing out the rough sawn curves were completed using hand tools predominantly.

IMG_7395IMG_7396IMG_7397IMG_7398IMG_7399


I marked out guiding lines with a pencil using my fingers as a fence. The idea was to cut these before glueing the plane together as it would be difficult to access the area next to the handle once glued. I used a small Lie-Nielsen block plane to cut the chamfers.

IMG_7400IMG_7401IMG_7403IMG_7404IMG_7405


The rest of the curves were smoothed out with a variety of files.

IMG_7408IMG_7409


Once all of this was done I used my Bandsaw Mitre-sled to cut the ramp. You can find an entire post on how I have built the sled on this website.

IMG_7410IMG_7411IMG_7412


The curve cut into the toe section was designed that way to allow more space for the accumulation of heavy shavings as this is a scrub plane that does not require a tight mouth.

IMG_7413IMG_7414IMG_7415IMG_7416IMG_7417IMG_7418


I used the off-cut wedge to support the ysterhout fibers of the ramp in order to prevent blowout, as you can see below. I then planed it flat and square with a freshly sharpened Lie-Nielsen no. 4½ Smoother. The result is clear from the pictures.

IMG_7420IMG_7421IMG_7422IMG_7423IMG_7424


To ensure it is absolutely perfect I used the setup with two different grids of 3M adhesive-backed sandpaper on float glass. It is worth while to take a bit of time to get this surface perfect as it is the most important part of the whole project in terms of the functionality of the plane. If it is off by a few thousands of an inch, the blade is likely to chatter with a vengeance.

IMG_7425IMG_7426IMG_7427IMG_7428IMG_7429


In these pictures you can see the setup I use to mark out the positions of the toe and heel sections relative to each other and the sides. As this is a scrub plane that will eventually have a fairly wide throat. I positioned the heel section, marked it’s position, clamped it in place, got the blade in position, slid it down all the way to the guide, slid the toe section to gently touch it and marked it in that position. The throat will be opened up further at a later stage.

IMG_7430IMG_7431IMG_7432IMG_7433IMG_7434


As I explained in my post on the Petite Wooden Smoothing Plane, I use dimensions/measurements from an article entitled “Wood planes made easy” by David Finck in Fine Woodworking Magazine to mark out the location of the cross-pin. Once you have drilled one, you can get the other into the exact place by clamping the plane together and using the first hole as a guide to drill the second on a drill press. Also note the small panel pins I use to ensure that I can fit the plane back to exactly the same alignment after drilling the second cross-pin hole and the compulsory dry fit.

IMG_7435IMG_7436IMG_7438IMG_7439IMG_7437IMG_7441IMG_7441


From this scrub plane I used my Lie-Nielsen carcass saw to cut the cross-pin made of Assegaai for it’s renowned elasticity, flexibility and stability. I rounded the ends with a file.

IMG_7443IMG_7444IMG_7445


The compulsory dry fit.

IMG_7446IMG_7447IMG_7451IMG_7450IMG_7449IMG_7448IMG_7452IMG_7453


The glue-up.

IMG_7454IMG_7455IMG_7456IMG_7457IMG_7461IMG_7462IMG_7463IMG_7464


Fresh out of the clamps, with quite a bit of finishing left to do.

IMG_7471IMG_7472IMG_7473


I used my Lie-Nielsen no. 4½ Smoother (not pictured) to flatten the sole initially. The final flattening would take place once the cap iron/chip-breaker combination is made and holding the blade tight against the ramp.

IMG_7474


I found this piece of scrap angle iron with which I planed to make the cap iron/chip breaker combination. The stainless steel thumb screw was also a discovery amongst all my carefully hoarded jewels (which is frequently being referred to as junk by others).

IMG_7501IMG_7502


To start with I epoxied a short piece of stainless steel threaded rod to the thumbscrew, because I do not know how to weld stainless steel.

IMG_7517


I then attacked the steel with my grinder.

IMG_7518IMG_7519IMG_7520


It took more than an hour of elbow grease to cut the 45° bevel using the grinder and various grids of wet-and-dry sandpaper on glass together with a honing guide.

IMG_7521IMG_7522IMG_7525


The slight indentation you see is where the cross-pin would get into contact with the iron cap. In the pictures below you can see the hole for the thumbscrew being drilled and tapped.

IMG_7526IMG_7527IMG_7528IMG_7529IMG_7530IMG_7531


The final touches were done on a 1000 grid Ohishi waterstone using the so called “ruler trick” made famous by David Charlesworth. This is to ensure that the back of the cap iron/chip breaker combination sits absolutely flat on the blade.

IMG_7532


As this is a scrub plane I opened up the throat/mouth generously.

IMG_7536IMG_7537


In these pictures you can see how once again I drew the guiding lines for shaping the nose of the plane on the sole to prevent blowout of the ysterhout fibers when chewing the waste away with the bandsaw.

IMG_7543IMG_7544


Prior to cutting away the above curve I drilled out an area as shown using a Forstner bit. This is a unique (as far as I am aware as I have not see any other planes looking like this during my extensive internet research) design feature aimed at getting the best of both worlds in terms of having the big flat area at the front of the plane to press down and hold, yet have a nice grip to lift the plane during the back stroke. I find that with a longer and therefore heavier plane like this it is definitely a bonus to be able to curl your fingers into the nicely rounded slot. An added benefit as you will see later is that it adds some je ne sais quoi to the appearance of the plane.

IMG_7545IMG_7546IMG_7547IMG_7548IMG_7549

Here you can see what I was aiming for.

IMG_7550IMG_7551

I then extended the chamfer of the top edge of the sides to joint up round the actual nose of the plane using a file.

IMG_7552IMG_7553

After some TLC it is starting to look quite sexy.

IMG_7556IMG_7557

Here are heaps of photos from umpteen different angles with the cap iron/chip breaker and thumb screw in place.

IMG_7559IMG_7560IMG_7561IMG_7558IMG_7581IMG_7582IMG_7583IMG_7586IMG_7587


Finally, (just to show off) a few photos posing on a beautiful Rhodesian Teak log.

IMG_7603IMG_7605IMG_7600


4/9/2013 – In the picture below you can see it with it’s Fore Plane cousin at the Finishing Spa.

IMG_7930


Another step closer to finished. Now it only needs a coat of liquid wax tomorrow night.


IMG_7928


14/7/2014

I finally got round to cover the steel parts (lever and lever screw) with wood. I used a small piece of Kaapse Swarthout that fell off when I turned something else for the lever screw and Tamboti for the lever. Both bits of wood were epoxied to the steel.

IMG_1664IMG_1666IMG_1667

I really think it adds some je ne sais quoi to my favourite shop made plane’s appearance.

IMG_1713IMG_1714IMG_1715IMG_1716IMG_1717IMG_1718

Petite Wooden Smoothing Plane


I have been reading about and planing to make my own wooden planes for about a year now. I first thought of the idea when I realised how expensive it is to order good quality planes from the USA. For every two Lie-Nielsen planes I pay for an extra one in shipment fees. Make no mistake, the people at Lie-Nielsen have the best customer service I have ever come across and as everyone knows their planes are superb. Yet, sending it half way around the globe costs money.

The more I read about the wooden versions, the more it sounded like they might almost be better than their heftier cousins. Being a bit of a traditionalist, the idea of building my own wooden planes started to gain some momentum. I then had discussions with Deneb Puchalski of Lie-Nielsen around which blades might be best for the types of planes I wanted to build. He was very helpful and in the end I decided on:

1) Three x 2″ wide standard blades with chipbreakers (25 degree primary bevel)


2) One 1¾” wide standard blade with chipbreakers (25 degree primary bevel)


3) One Scrub plane replacement blade 1½” x 3/16 (thick)


4) One large shoulder plane replacement blade 1¼” x 8¼” x 0.140″ (thick)
The blades arrived on the 11th of June 2013 at which time I started to hunt down beech. Surprisingly, I found some in the Land of the Brave. I decided to first build a smoother and a scrub plane to warmup.
In the pictures below you can see the first chunk of beech after it received attention from the planer.

IMG_6906IMG_6907

At this point in time I still did not rehabilitate my bandsaw (thus not able to re-saw at all and definitely not ysterhout in any dimension approaching what was needed), so I had to plane a fairly small piece of ysterhout down to about 8 mm thickness (from about 24 mm). I wanted to use this incredibly hard wood for the soles of my planes. In the pictures below you can see how I used the bandsaw to cut the sole of the smoother.

IMG_6932IMG_6933

After studying the grain of the beech I decided to laminate it as you can see in the pictures below. It is impossible to find beech in bigger dimensions (around these parts) so lamination was my only option. Speeaking of which, I can really recommend the documents on building wooden planes written by Larry Williams and his partner at Old Street Tools. You will find the link on the library page of this site. There are articles on grain orientation, best woods to use etc etc.

IMG_6935

Here you can see how I laminated the parts.

IMG_6937IMG_6938IMG_6939IMG_6940

For some or other reason I decided to stick it in the face vise, which is not the best as the two jaws are not completely parallel, and I have made this mistake before. Anyway, it came out OK, but I really need to stop doing this.

IMG_6943IMG_6944

Next step was to hand plane the sides dead flat and square to the sole. You can appreciate the beautiful soft shavings generated by my newly rehabilitated Stanley no.5 Jack Plane. I wrote a complete post on this project which you can find in the category by the name of “Rehabilitation of old tools”.

IMG_7010IMG_7007IMG_7012

In order to make the next cut I was forced to spend most of the next week trying to fix and tuneup my old crappy bandsaw. The results however made it well worth my while. After the tune-up it sliced such perfect strips off the side that it only took a few strokes with the plane to get them as smooth as a baby’s bottom …

IMG_7031IMG_7024IMG_7032

… as you can see here.

IMG_7133IMG_7134IMG_7135IMG_7136

I then used the planer/thicknesser to get the inside close to the correct width. Maybe a bit less than 3 mm wider than the width of the blade. For this Petite Smoother I chose the 1¾” blade.

IMG_7142


Here you can see how I marked out the bedding angle at 51º (just to be different of course).

IMG_7144IMG_7145

In order to make this next cut I had to build a jig for my bandsaw. I call it a “Bandsaw Mitre-sled”. You can find and read an entire post on this project under the above name …

IMG_7146IMG_7147IMG_7148IMG_7149

… here you can see the actual cut.

IMG_7150IMG_7151IMG_7152IMG_7153

In the first picture you can see the toe and heel section after the first cut. In the next pictures you can appreciate the curve that was cut in the toe section.

IMG_7154IMG_7156IMG_7157

I used the Green Monster to smooth the curved surface of the toe section.

IMG_7158IMG_7159

In order to prevent blowout of the Ysterhout sole while planing the so called ramp, I used the wedge (off-cut) that was created by the two cuts made earlier. You can see how I clamped it in the legvise to support the fibers on the delicate edge of the sole.

IMG_7167IMG_7168IMG_7169IMG_7170IMG_7169IMG_7171


After getting rid of the saw marks left by the bandsaw by means of the old Stanley Jack Plane I used the 3M Adhesive-backed sandpaper on a sheet of float glass to get it 100% flat. You will note the technique I use frequently in scribbling on the area with a 2B pencil before sanding to identify the areas that needs more attention. Once all the pencil marks disappear you know the job is done.

IMG_7172IMG_7173IMG_7174IMG_7175IMG_7177


The next step is to start marking out the position of the toe and heel sections relative to each other. I started by marking out the position of the toe piece and clamping it into this position.

IMG_7181IMG_7182


For the next step it is useful to have the blade in it’s position on the heel section, also known as the ramp. In the second picture you might just be able to see the line I marked at 1.5 mm parallel to the sole on the toe section. The idea is to line the cutting edge of the blade up with this line as demonstrated in the second picture. This tells you were the heel section should be relative to the toe section. You then remove the blade and mark the position with a pencil.

IMG_7183IMG_7184


In the first two pictures below you can see where I marked out the perimeters of the cap-screw slot. The off-cut wedge is again priceless to create a big enough surface in order to cut the slot with a router as shown. Please note the makeshift stop I’ve setup on the left hand side.

IMG_7185IMG_7186IMG_7187IMG_7188IMG_7189IMG_7190IMG_7191IMG_7192IMG_7193


Just a quick test to see whether the slot functions as planed.

IMG_7196IMG_7197IMG_7198


In order to drill the second of the cross-pin holes you need to clamp the whole shebang together after drilling the one side in the correct spot. You will find a host of different ways to identify this point on the internet. I used the measurements provided in an article titled “Wood Planes made easy” by David Finck in Fine Woodworking Magazine. Once I clamped it all into position I tapped some minute panel pins into each corner to ensure that I could put it all back together exactly in the same way during the glueing phase.

IMG_7199IMG_7200IMG_7207IMG_7210IMG_7208IMG_7212IMG_7215


The idea is then to stick the drill bit through the existing hole to drill the opposing hole exactly in the correct place using a perfectly square drill press setup as shown.

IMG_7204IMG_7206


The cross-pin was created by milling a scrap piece of Assegaai down to a ½” square strip that was much longer than needed. In the pictures you can see how I removed some stock by means of the table saw to start shaping the pins on either side. In future I would rather do this with my Lie-Nielsen carcass saw. In the next few picture you can see how I shaped the pins with a file.

IMG_7202IMG_7203IMG_7216IMG_7217IMG_7220IMG_7221IMG_7222IMG_7223


To make sure that everything fitted perfectly I did a dry fit as shown.

IMG_7224IMG_7225IMG_7226IMG_7228

Then I shaped the cross-pin further by using this setup.

IMG_7230

The glue-up is fairly straightforward due to the panel pins that ensures that it all comes together precisely how it was previously decided. Please note the caul clamped to the sole area to ensure that it ends up perfectly aligned.

IMG_7231IMG_7232IMG_7234IMG_7236

The cross-pins were then trimmed flush.

IMG_7273IMG_7274

Next step was to shape the plane and I started by cutting the ends containing the panel pins away.

IMG_7275IMG_7277

Then I marked out this funky curvy configuration on the ysterhout sole. The reason for doing this on the sole was that I wanted to have the sole at the top while cutting the curves on the bandsaw to prevent blowout of the rocklike yet brittle ysterhout. In the second picture you can see the result of the bandsaw’s caress.

IMG_7278IMG_7279

The bandsaw marks were removed by a series of steps including the use of a float, a smoothing plane and finally various grids of sandpaper on float glass. The result was staggeringly beautiful to say the least.

IMG_7280IMG_7282IMG_7284IMG_7285

The piece of Tamboti you see in the pictures below is the only one I have left and a board I know as long as I can remember. I thought that this was the ideal place to use such a priceless piece of timber. I decided to produce the wedge of this sexy petite plane using Tamboti.

IMG_7316IMG_7317

Here you can see the wedge in it’s early stages.

IMG_7318IMG_7319

The next step was to decorate the plane further with some sexy stopped chamfers. I marked it out by hand using a pencil and my finger as a fence. You can probably see that I deliberately did not do a 45º chamfer, but rather one that further complements the elegant elongated shape of the plane.

IMG_7320IMG_7321IMG_7322IMG_7323

Using the pencil lines as guides I used a small Lie-Nielsen block plane, a file and my Proletarian Sanding Contrivance to create the chamfers.

IMG_7324IMG_7325IMG_7326

Then I moved on to flattening the sole. It is important to tap the wedge into position at about the same tension as it would be while being used, before attempting to flatten the sole. The pressure from the wedge deforms the sole ever so slightly so the idea is to flatten it in the shape it will assume while the wedge is tapped into place. You can see that I once again scribbled on the sole prior to flattening in order to identify when it is completely flat.

IMG_7329IMG_7330IMG_7331IMG_7332IMG_7336

In order to custom-fit the wedge I dialed in the width by planing down the sides with my rehabilitated old Stanley no.4 Smoother. Apparently one should be careful not to make the wedge too tight-fitting as far as the wedge goes as it can damage the plane if it expands during humid months. I therefore made it about 3 mm narrower than the ramp. In the last of these three pictures you can see the plane hammer I built to set the plane. You will find an entire post devoted to this project under the category “Handtools”.

IMG_7333IMG_7334IMG_7335

I sharpened the Lie-Nielsen blade to have a cambered edge.

IMG_7337

I took to a small piece of swarthout to test the little beauty and the results were incredible. It gave the best finish I have ever seen and the shavings were extremely thin and soft. There were not even a hint of chatter. What also surprised me was how easy it is to set the blade with the small plane hammer. It almost felt easier than setting a cast iron plane.

IMG_7338IMG_7339IMG_7340IMG_7341IMG_7353IMG_7351IMG_7349

Here are two photos to show off the beautiful Lie-Nielsen iron-chipbreaker set.

IMG_7344IMG_7343

Part of the success of this little plane must be the tight mouth. In these pictures you can also appreciate the je ne sais quoi of the ysterhout sole.

IMG_7345IMG_7346IMG_7347

Finally a few pictures of the plane in the late afternoon sun after a light coat of Ballistol. I plan to treat the sole with wax once I find a suitable product.

IMG_7465IMG_7469IMG_7466IMG_7467IMG_7468


4/9/2013 – I finally got round to treating this little beauty after using it for a few weeks. You can see how it joined it’s bigger cousin at the Finishing Spa.

IMG_7916IMG_7917IMG_7920


Here are a few final photos of a little plane that has already become a go-to tool in my shop within the space a month.


IMG_7931IMG_7933IMG_7934IMG_7923IMG_7924