Tag Archives: Ballistol

Brace Bit Birdcage Awl (also known as BBBA)

7/4/2014

Once again on Saturday morning I curtailed my current bench building activities briefly in order to produce a so called Birdcage Awl. I found an old Marples & Sons brace bit that had most of it’s business end missing in action. The square tang of the bit that fits in the brace made me think that it could masquerade successfully as a Birdcage Awl without too much fuss. The steel is obviously top notch as the bit is probably more than a hundred years old.

IMG_0112

The bit comes from my father’s collection. I tried to take a photo showing the Marples & sons stamp, but I probably need a macro lens for that. The small block of Witpeer was left over from another project and had the ideal dimensions for me to turn the handle from.

IMG_0113IMG_0115IMG_0114

… as so.

IMG_0116IMG_0117IMG_0118


I first did the bulk of the shaping with the bench grinder and then run through 80, 100, 120, 180, 240, 360, 400, 600 and finally 1200 grit wet-and-dry sandpaper on glass.

IMG_0119IMG_0120IMG_0121IMG_0122IMG_0123


The handle received a copper ferrule …

IMG_0124IMG_0125IMG_0126

… before I drilled a tapering hole with several different diameter drill bits to accept the shank of the brace bit. It was only tapped home (much like the way one would seat a rasp), as one would need to be able to remove the bit for future sharpening.

IMG_0127IMG_0128IMG_0129IMG_0131IMG_0130IMG_0132

Finally, it received the usual treatment with successive layers of Tung oil/Ballistol and Wooddock. This is an excellent awl for making holes to accept wood screws in softer wood where pilot holes are not needed. The square edges cuts the wood fibers to open up the hole as apposed to a round point awl that only separates the fibers.

IMG_0177IMG_0178IMG_0182IMG_0180


IMG_0306IMG_0307IMG_0309IMG_0308

Plane Hammer

In this post we will briefly return to a state of “Mallet Mania”. As you might remember I wrote one of my first posts on the first four mallets I made and called it “Mallet Mania”. This past weekend I made the fifth in the form of a specialised plane hammer. It was necessitated by the fact that my first wooden plane was getting close to being finished.

I therefore squeezed in some time dedicated to the hammer necessary to set the blade of my Petite Smoothing Plane (post to follow in the near future). As per usual, even the bits and pieces that are available to use for such tools is quite limited in Namibia. In the pictures below you can see what I started with. It is one of those copper rings that plumbers use to join copper water pipes.

IMG_7238IMG_7248

I chamfered the inside edge of the one side with a medium sized file.

IMG_7245IMG_7246IMG_7247

Then I took a piece of Kershout and Witpeer I laminated for the handle of my legvise, that was left over and turned the head of the hammer (far right) together with three file handles while I was at it. It was turned in such a way that one side was similar in diameter to the outside of the copper ring and the opposite side slightly smaller than the inside diameter tapering up to sightly bigger than that. The idea being that one could tap the ring over to fit tightly.

IMG_7261IMG_7262

Here you can see how far the ring slid over the wood without any force. I applied epoxy to act as a lubricant and adhesive before tapping it into place.

IMG_7265IMG_7266

To ensure that the ring had nowhere to go I cut a thin curve to accept a very slight wedge, which was taped in after applying Gorilla PVA wood glue.

IMG_7269IMG_7288IMG_7271IMG_7272

The sides of this wedge were trimmed flush …

IMG_7287IMG_7290

… and cut to length as shown below.

IMG_7291IMG_7292IMG_7294


The next step was to mark out were to drill the hole for the handle. I used a compass to scribe a circle 2 mm bigger than the hole drilled for the pin of the handle in order to have a reference of how much I should enlarge the hole on this side to accept another wedge.

IMG_7295IMG_7296


In order to drill the hole accurately I made this quick jig out of scrap plywood. The hammer’s head sits steady in the groove and held in place by the drill press vise.

IMG_7297IMG_7298IMG_7299IMG_7300

IMG_7301IMG_7302


I used Kershout for the handle. Below you can see how I shaped the pin.

IMG_7303IMG_7304IMG_7305


Then I used a spoke shave, a rasp and a card scraper to shape the handle. It makes easy work of such a job.

IMG_7311IMG_7312


I then glued a small piece of sealskin to the one striking surface to give the option of a softer blow, when striking the wooden parts of the plane (as opposed to the plane iron).

IMG_7327IMG_7328


The final product prior to the usual Ballistol treatment.

IMG_7313IMG_7314IMG_7315


Reprobate Sealskin Strop

This is a straight forward hand tool that some might argue to have become obsolete, especially since the advent of devilishly fine waterstones used in conjuction with Nagura stones. However, to me it reminds of the days gone by, which creates a sense of being part of the traditions of the craft.

That is why I fashioned this sealskin strop. Before all the whiny greenies get on my back, I did not kill any seals for this purpose. I simply bought the skins at Nakara. As far as I know, Namibia has been involved in a sustained seal genocide to which more liberal societies have developed an aversion of note. As I see it, these seals were well and truly dead by the time I bought the skins, so I might as well honour their expired existence by creating a timeless heirloom tool with it. Come to think of it, in the light of the above I should probably warn sensitive readers that this post might contain disturbing images, if you are that way inclined.

As per usual I found a small piece of Assegaai for the job. The bandsaw was responsible for the rough shaping, before I took to it with a few files to round the areas forming the handle.

IMG_6930IMG_6931

I then used a card scraper to remove the file marks, which I can really recommend. It works like a charm for this purpose, as you can see from the pictures below.

IMG_6989IMG_6990

The area that would end up covered with sealskin, were then planed flat with a rehabilitated old Stanley Jack Plane. I wrote a comprehensive post on this particular endeavor, which you will find under the category of “Rehabilitation of old tools”.

IMG_7091IMG_7092

To make absolutely sure it was flat, I used 3M adhesive-backed sandpaper on glass to get it as close to perfect as possible. I used the technique of scribbling on the wood with a 2B pencil before sanding to identify the low spots. The job is done once all the pencil marks has disappeared as you can see in the last picture. I advise those sensitive types to stop reading at this point.

IMG_7093IMG_7095IMG_7097

Two sealskins as bought from Nakara. In the closeup picture you can appreciate that the leather is quite rough, which is probably wicked for this purpose.

IMG_7098IMG_7099

A magic marker was used to trace out the strips needed.

IMG_7100

I first glued the narrow strips to the sides …

IMG_7101

… then the wider strips.

IMG_7118IMG_7119IMG_7120

I used a very sharp chisel to remove a few untidy strips of leather and …

IMG_7125IMG_7126

… finally the usual treatment with Ballistol gave the Assegaai a beautiful sheen.

IMG_7128IMG_7127

Old Stanley Bailey handplane rehabilitation

My father gave me most of his tools some years ago when he decided to downscale and pursue other interests. He was very much a powertool woodworker as apposed to a hybrid woodworker (someone who uses both hand tools and power tools) or a handtool woodworker. I never even knew that he was as his way was the only way I knew, until I started reading American woodworking magazines and listening to podcasts such as the one by the Modern Woodworkers Association (my favourite) and Wood Talk (highly recommended). Now I realise that there are other ways to approach woodworking conundrums.

It is not as if I am not grateful for everything I learnt from my Dad, as it certainly got me hooked to woodworking in a big way, but I am finding myself gravitating towards quality handtools with a vengeance. I guess that would make me a hybrid woodworker with fairly basic handtool skills at present.

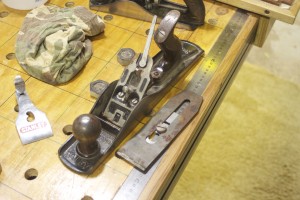
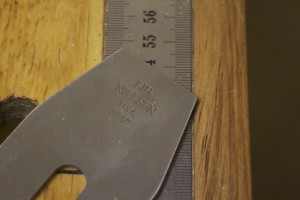
This is really a roundabout way to get onto the primary purpose of this post, which is the rehabilitation of the two old Bailey handplanes my Dad handed down to me. It is a no. 4 Smoothing Plane and no.5 Jack Plane that really needed serious attention. I never even knew that one should sharpen the plane irons as my father and I never did. Probably, in hind sight, because we never used them. For this reason they never seem to work very well, which did not encourage any further scrutiny.

That was until I watched the DVD on Plane Sharpening by David Charlesworth and using a sharp Lie-Nielsen No.4½ Smoother. It would not be too much of an exaggeration to say that it was an epiphany. A sharp handplane is poetry in motion. It is psychotherapy for a shrink … literally in my case. David also explains very clearly in his DVD what comprises a functional and well tuned (apart from a sharp iron) handplane, which is all very useful to any woodworker, but especially to plane rehabilitators.

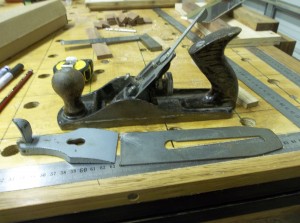
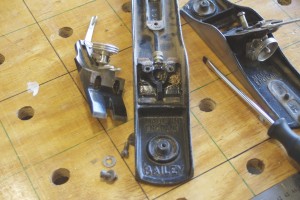
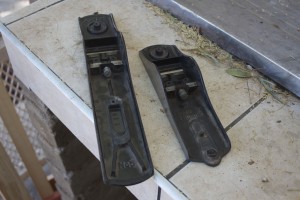
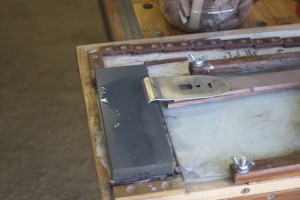
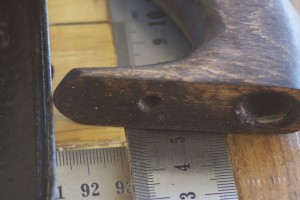
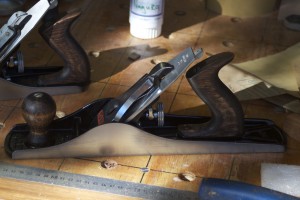
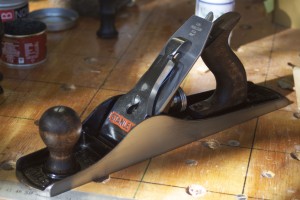
Armed with this new knowledge I set about to rehabilitate these family heirlooms. In the first few pictures you can get an idea of the state they were in. It used to be toilsome to slice Parmesan cheese with these planes, to be honest.

100_1202100_1203100_1204IMG_6814

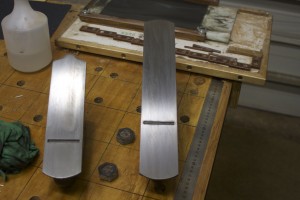
First step was to flatten the soles of these planes and it turned out that they were in some serious need of this particular ministration. An added bonus of doing this is that it makes the shiny parts of the plane body smile with a rewarding gleam. I have to warn you that this is hard work that can take time and perseverance from a woodworker. You do not have to get it 100%, but the toe, the area behind the mouth and a reasonably large area towards or at the heel all needs to be in the same plane.

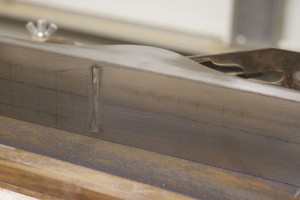
A Magic Marker is very useful to demonstrate the areas that needs attention. Drawing a grid (as shown) before taking a few swipes over wet-and-dry-sandpaper fixed to 10 mm thick float glass, would reveal the troublesome spots in no time. Please note that I left the plane irons clamped in their usual position, only making sure that they are retracted well into the plane body in order not to get damaged by the flattening activity. The reason behind this is that the clamping action of the lever cap deforms the sole ever so slightly which means that you want to flatten it while under tension.

IMG_6812IMG_6813

The remnants of gridlines clearly indicate the low lying areas as seen below.

IMG_6815IMG_6816IMG_6817

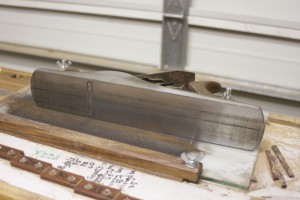
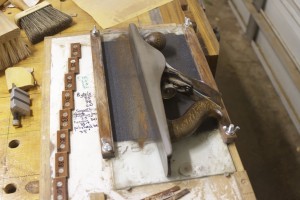
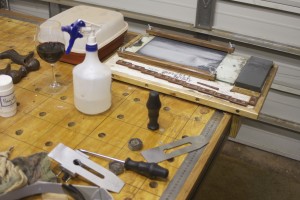
Then it becomes a question of elbow grease, burning some midnight oil or whatever it might be called. Here you can see how I used my sharpening jig to do the flattening. If you want to read the post on how I made this jig find the post called “My version of Deneb’s sharpening jig” under the category “Jigs”. This jig clamps wet-and-dry sandpaper on a piece of float glass by means of two cauls.

IMG_6818IMG_6819IMG_6820IMG_6821IMG_6822

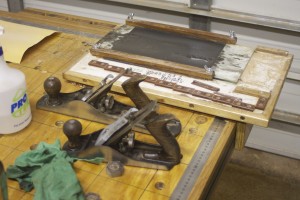
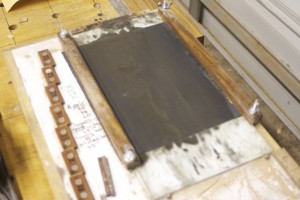
The final product is well worth the effort I thought.

IMG_6823

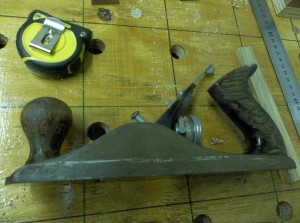
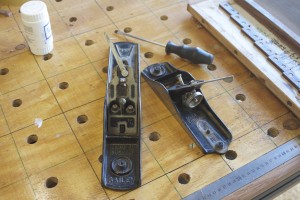
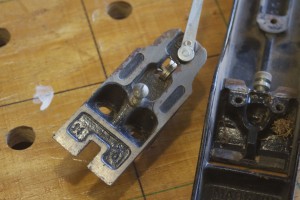
Next I took the planes apart completely, including removing the plane irons with their chipbreakers, the frogs, the totes and knobs.

IMG_6824IMG_6825IMG_6826IMG_6827IMG_6829

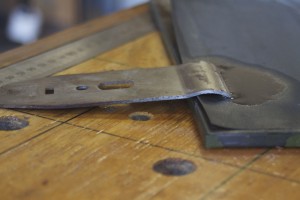
Here you can see how I sharpened the new replacement blades I bought from Lie-Nielsen. If you are interested in purchasing replacement blades for old Stanleys, check out Lie-Nielsen’s website, they have the whole range. Their blades are definitely the business. Their blades are prepared at a primary bevel angle of 25º and ground flat as … oh no just remembered this is a family website … but you really do not have to do too much work on the back at all.

I honed a 33° honing angle on my 1000 grid Ohishi waterstone and polished a 35º final cutting angle on a 10 000 grid Ohishi stone. Both blades were sharpened with a cambered edge.

Blade bevels.Blade bevels 2.IMG_6830IMG_6831IMG_6832IMG_6869IMG_6870

In the picture below you can see the Nagura stone I use with the 10 000 grid stone.

IMG_6835

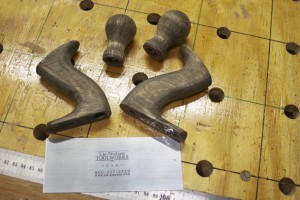
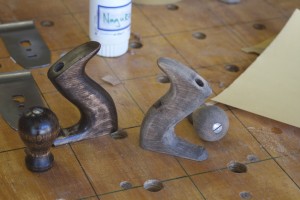
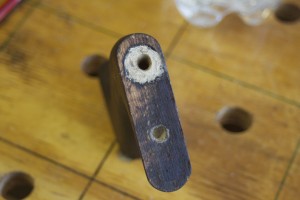
Here you can see how the totes and knobs looked like prior to rehabilitation. Clearly some type of varnish left that was starting to look seriously weathered. I removed the the varnish with a card scraper before tidying it up with sandpaper.

IMG_6836IMG_6837IMG_6838IMG_6840

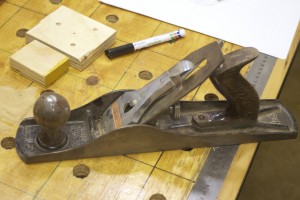
A last picture before the frogs came off.

IMG_6841

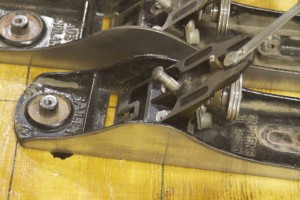
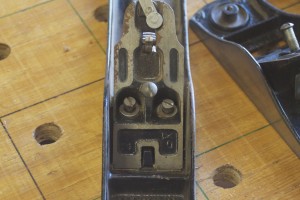
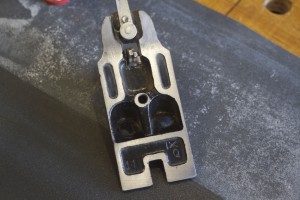
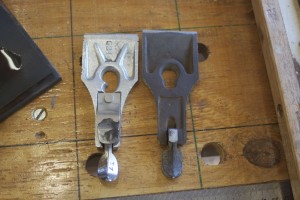
The two screws that fix the frog to the body of the plane is evident in the first picture. In the third picture you can see the screw that helps you position the frog during reassembly depending on how tight you want the throat.

IMG_6842IMG_6843IMG_6845

Next step was to carefully remove the worst of the rust from the frog’s surface that supports the blade with a fine flat file.

IMG_6846IMG_6848IMG_6849IMG_6850

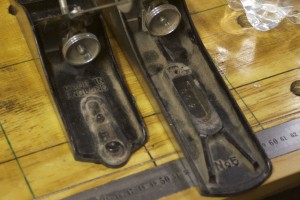
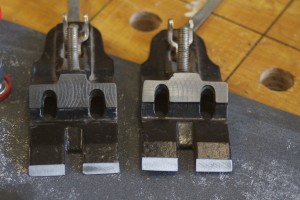
In the first picture below you can see how I then used a magic marker to blacken all the surfaces that is in contact with the back of the blade. In the next picture you can see the setup I used with 150 grid wet-and-dry sandpaper on a piece of float glass on the edge of the table in order to easily hone the most important front section of the frog. In the third picture you can see how the leftover magic marker indicates the areas that needs more attention after just a few strokes on the sandpaper. The last picture show how it is all cleaned up and flat as … yes you know what I mean.

IMG_6851IMG_6852IMG_6853IMG_6855

Here you can see how I cleaned up and flattened the areas of the frog that is in contact with the plane body.

IMG_6856

Speaking of plane bodies, here you can see how they look prior to a Ballistol treatment.

IMG_6857

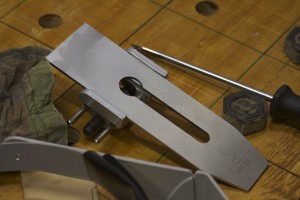
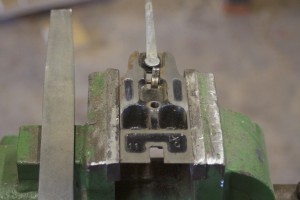
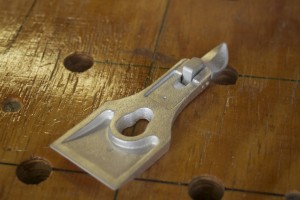
One of the most important parts of this rehabilitation operation is the work done on the chipbreakers. You want to flatten the area in contact with the blade at an angle that will ensure that the absolute tip of the chipbreaker sits flat on the back of the blade. This is accomplished by the setup as shown. You can see how the angle created will ensure that only the tip ends up flat on the blade.

IMG_6861IMG_6858IMG_6859

Here you can see how I decreased the angle slightly for honing and polishing. In the last picture you might be able to appreciate the perfectly polished and flat area that will ultimately sit on the back of the blade.

IMG_6863IMG_6864IMG_6862

The lever cap being made of cast iron is much easier to flatten, but again remember to set it up so that you only flatten the area that matters at the very tip that will be in contact with the chipbreaker. These lever caps were not even close to flat in the mentioned area.

IMG_6865IMG_6866

Here you can see the totes and knobs before and after a Ballistol treatment.

IMG_6867

Both totes were very wobbly due to very slack tolerance around the two raised cast iron areas on the base. I decided to remedy this by inserting some Epoxy putty and squeeze the tote into position, in order to create a perfect fit.

IMG_6871IMG_6872IMG_6873IMG_6874IMG_6875IMG_6877

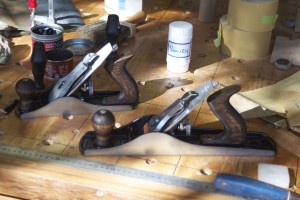
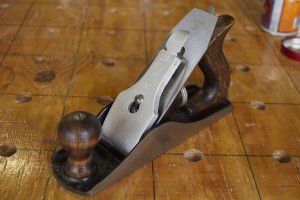
Finally all the parts were reassembled with the frogs set up to create a very tight throat on both planes. I can really recommend doing this for those of you who do not mind some elbow grease in return for a pleasing precision tool. There can be no comparison between how these planes cut post rehabilitation compared with prior to it. It is an absolute pleasure.

IMG_6878IMG_6879IMG_6880IMG_6881IMG_6882IMG_6883


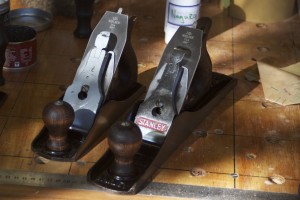
As per usual, the proof is in the pudding. Here are some of the first shavings I took. It is poetry, I tell you!

IMG_7096

I think they are ready for another few hundred years of work.

22/4/2014

IMG_0187IMG_0188IMG_0191IMG_0192IMG_0193

Proletarian sanding contrivances

Although I do own a belt sander and two orbital sanders (that were past down from my Dad to me), I still prefer sanding by hand. Unfortunately the cheap and nasty commercial sanding blocks I used to own in New Zealand were all stolen en route to Namibia. I thought making some sanding planes would be a good start towards my next goal of building some wooden hand planes. This way I get some experience in producing the plane tote (handles) and joining it to the rest of the tool. Even with sanding planes the aim is to keep it as flat as possible, so this way I can get a feel for doing just that.

One of the annoying things about using a sanding block is having to change the paper all the time as you move from one grid to the next. Therefore I decided to build 3 short (230 mm) and three long (380 mm) sanding planes, in order to load each with a different grid. It would allow me to simply grab the next plane when moving up a grid.

I had some trouble to get the pdf documents on Stanley totes (handles) from the Lee Valley website printed to the correct scale. It necessitated me to take the tote off my Lie-Nielsen Low Angle Jack Plane and use it as a template. The Lee Valley documents were very helpful nonetheless as it explains clearly what the best sequins of steps are to produce the handle. In the picture below, you can see how the Lie-Nielsen tote was used as a template, ensuring that the hole running through the tote is 90 degrees to the sides of the board.

DSC03197

Here you can see the documents, as mentioned. It is downloadable from the Lee Valley website.

DSC03198

Below you will notice that the hole that runs through the handles were drilled before drilling the large diameter holes which simplifies the actual cutting of the blanks.

IMG_6676IMG_6675

DSC03199DSC03200

Next step is to shape the blanks to resemble the perfect Lie-Nielsen tote it is based on. For this purpose I used the green monster, which is a machine my father built many years ago. In the pictures below I took it’s work surface off to enable me to maneuver the blank a bit more. Some of the shaping was done with the surface intact.

IMG_6677IMG_6678IMG_6679IMG_6680IMG_6240

Next I took some scrap Witels, which I thought would be a nice colour match with the pale fungi induced spots on the Assegaai handles and plane bodies. Yes, I know, ‘a certain je ne sais quoi’. After laminating the three pieces I turned the six knobs from it

IMG_6255IMG_6257IMG_6259IMG_6260IMG_6261

Unfortunately I did not take pictures of how I prepared the plane bodies. It was fairly gnarled bits of Assegaai to start off with. In order to flatten these bits of wood I spent quite some time working on my hand planing technique. Then I moved on to custom fitting each handle recessed about 4mm into the plane body. The totes and knobs were then glued and screwed into it’s permanent home for the next 500 years (I hope).

IMG_6271IMG_6272IMG_6773IMG_6772IMG_6273IMG_6275IMG_6289

The mechanism I chose to fix the sand paper to the plane necessitated a lot of fiddling with small bits of wood, screws and panel pins. Although probably not the fastest way of changing paper, it works like a charm and also adds a certain je ne sais quoi on the looks side of things!

IMG_6688IMG_6686IMG_6685IMG_6684IMG_6683

Seeing that these are sanding planes with which I do not want to spoil a surface that was already elbow-greased to perfection by hand planing, the next critical step was to ensure that they are as flat as glass. I used two different grids of 3M Adhesive-Backed Sandpaper on a piece of glass. You can see how I used the trick I learnt from David Charlesworth by scribbling on the sole with a pencil to see low spots. I saw him using this in a DVD on sharpening. I think if I saw this guy working in his meticulously cerebral fashion earlier in my life, I probably would have pursued woodworking as a career. His DVD’s are highly recommended. I bought mine from Lie-Nielsen.

IMG_6278IMG_6281IMG_6282IMG_6284IMG_6285

Next I mixed epoxy and added some wood dust to increase the viscosity. This concoction was then used to fill the holes left by the countersunk steel screws which fixed the knobs and handles to the plane body. It dried to an incredibly hard filler, which was again sanded perfectly flush with the rest of the sole.

IMG_6776IMG_6777IMG_6286IMG_6287

I then glued Red Dear leather (short planes) and Kudu leather (long planes) to the soles to ensure an even contact between the sandpaper and wood that is being sanded. You can see how in one case I used a piece of glass as a flat surface clamping through the assembly table. In the other case I used the two sanding planes as each other’s flat reference surface, to ensure flat and consistent adhesion of the leather.

IMG_6893IMG_6894IMG_6895IMG_6896IMG_6294IMG_6295IMG_6897IMG_6898IMG_6689IMG_6922

Finally the first test with sandpaper and it works like a dream.

IMG_6299IMG_6300

Usually my favourite part of building these tools is to rub on Ballistol. It brings out the beautiful colours of the wood and does not dry to a film at all, nor does it go yellow over time.

IMG_6302IMG_6681IMG_6682


Here you can see how I indicated on the back of each plane which grid of sandpaper it is loaded with. This makes it easy to simply grab the next plane needed during a sanding operation.


IMG_6924IMG_6923


In these final pictures you can see where the planes found their little home.


IMG_6927IMG_6928