Category Archives: Quick projects

Sustainable cuisine

11/2012

A few months ago we bought a holiday house in Groot Brak Rivier and I decided to build a sun oven to use while sitting in the sun with a beer. In the pictures below you can see how I bent and riveted aluminum to create the business end of the oven. The idea is to reflect all the sun rays on to a black casserole type dish to create a truly eco-friendly slow cooker.

100_0703


100_0802100_0803100_0801100_0804100_0805


100_0811100_0812100_0813


100_0818100_0819100_0820100_0822

Before building the base I tested the contraption my cooking a curry amongst the herbs and chillies in our herb garden. Even this red le Creuset casserole absorbed enough energy to cook a beautiful Madras.

100_0828100_0831

I then built a base for it from bits of scrap plywood.

100_0855100_0856100_0857100_0858100_0860100_0861100_0862100_0865100_0864100_0866100_0867100_0868100_0870100_0871100_0872100_0873100_0874100_0875100_0884100_0885100_0886100_0888100_0889100_0890100_0892100_0892100_0930-2

In the pictures below you can see it in action at our beach house. The oven is closed with a sheet of glass or transparent perspex to limit air movement.

IMG_4031IMG_4032IMG_4033IMG_4042


Over this past December (2013) holiday, I cooked a leg of lam from scratch in it.

Chisel storage

17/3/2014

On Saturday I briefly interrupted my bench-building-activities in order to ensure that my precious new Lie-Nielsen bevel-edge chisels receive a warm welcome and safe haven right from the start of our (hopefully) long and prosperous relationship. I ordered these chisels back in November 2013, but the tool works at Lie-Nielsen were out of stock and in the process of crafting new ones. As far as what I can gather they had a few hiccups in this process, which meant that the chisels only arrived on 10/3/2014. The guys and gals at Lie-Nielsen leave no stone unturned when it comes to their commitment to ensure the absolute highest quality, which was again quite obvious when I unpacked these heirlooms.

IMG_9974IMG_9975IMG_9976IMG_9982IMG_9983IMG_9984IMG_9985IMG_9990

An example of the attention to detail is how the backs of these chisels have been perfectly flattened by hand honing. This means that you have the absolute minimum preparation honing to do before you go mental with it on a piece of timber.

IMG_9987IMG_9988

Just look at these stunning Hornbeam handles. I plan to turn my own longer handles for when I am using the chisels for paring.

IMG_9989

Here you can see how I very quickly built a rudimentary chisel dwelling from a piece of scrap Swarthout. Swarthout (Acacia melanoxylon and known as Australian Blackwood, Sally Wattle or Tasmanian Blackwood) originates from Australia (surprisingly) as a species, but this particular piece is South African by birth as it spent many years enjoying the tranquility of the rain forests of the Garden Route.

IMG_9993IMG_9994IMG_9995IMG_9996IMG_9997IMG_9998

I decided that the quickest way to keep the chisels sitting stable and upright (as the three smallest chisels are top heavy and therefore tends to attempt acrobatics in it’s dwelling) was to whack dowels through the living room.

IMG_9999IMG_0001IMG_0002

Together with the dowels, a small notch on the inside of the side walls where each chisel’s socket rests, does a great job of keeping each chisel proud and upright.

IMG_0003IMG_0005IMG_0004


At this stage I left the dwelling as is, but might add a base once my bench is finished, because it might be useful to grab the who set and stick it on the bench next to you while doing dovetails or mortises. For now it will be supported by two storage containers on either side of it in my tool rack.


IMG_0109IMG_0110

Spice rack February 2013

I made this spice rack for our pantry in late February 2013. I used plywood and scrap pieces of Dolfhout. In the pictures below you can see how useful the jigs for routing dados can be. It should also be obvious how my assembly table assists with holding the jigs and stock while routing the dados. It is a bit difficult to see in these pictures but I am routing the back and two sides all at the same time to ensure that the dados line up perfectly in the assembled rack.

100_1233100_1234100_1235


Here I am using my Festool Domino to mortise slots for the dominos to strengthen the joinery. Again you can see how the t-track on the side of my assembly table helps to hold the stock for this task.

100_1237100_1239100_1238

I used screws together with dominos and glue to assemble the pieces.

100_1240100_1241


The shelves were made up of 6 mm plywood that slotted perfectly into the dados cut earlier.

100_1242100_1243

Each shelve were covered up with a fairly thin strip of Dolfhout that also acts as an edge to stop spice containers from falling out.

100_1244


100_1247100_1248

Here you can see it finished on the wall in the pantry. Most of our spice come from our own garden.

100_1253100_1254100_1256100_1258

Shop made winkelhaak

2/12/2013 – So what is a Winkelhaak? It is Afrikaans for trisquare.

I have been unable to buy a small trisquare in the local market, despite trying for more than 18 months. So 10 days ago I decided to make a few from wood and a couple using a combination of wood and brass. They are so straight forward to make that I will not insult your intelligence by showing the steps involved. In the picture below you can see the collection of scrap pieces of wood I chose from to make them.

IMG_8641

Here you have the all-wood set. The two smaller ones have Kershout blades and Assegaai handles. The alpha-square has a Olienhout handle and Assegaai blade.

IMG_8654IMG_8655


The brass-wood squares are still in production. I will add pictures in due course.

9/12/2013 – And here it is, the first of two, the other one will have to wait until next year. It has a Stinkhout handle and a 6 mm thick brass blade.

IMG_8684IMG_8685IMG_8686

Chipbreaker/capscrew/deadman screwdriver

11/11/2013 – I made this screwdriver to keep with my handplanes.

IMG_8543


I used a small piece of plane blade originating from a blade that used to be on one of my father’s old Stanley’s. The handle was turned from a piece of beech left over from all the wooden planes I built in 2013.

IMG_8545IMG_8546IMG_8547


The shape of the handle and the short blade combines to created a very comfortable screw driver for adjusting capscrews, chipbreakers and my sliding deadman.

IMG_8548

IMG_8643IMG_8644


Another scratch awl

11/11/2013 – Last week I took some of the beech left over from my plane building phase, laminated two bits and used it to turn some handles.

IMG_8476


The idea was to turn a handle of similar design for a second scratch awl and one for a chipbreaker/capscrew screwdriver.

IMG_8543

This is the handle that became the alternative scratch awl. I wanted an awl that is designed to make holes for accurate drilling as apposed to scratching/scribing lines at which my first shop made awl excels.

IMG_8547


The punch I used was epoxied, tapped in and then clamped in position by the tight fitting ferrule.

IMG_8521IMG_8522

I stuck the awl in the drill press to tidy up the copper with sandpaper.

IMG_8525IMG_8526

After a treatment with tung oil and Wooddock it is posing with it’s brothers and sisters. These are all shop made marking tools.

IMG_8565IMG_8566IMG_8567IMG_8568IMG_8569IMG_8570

Ruler stop

3/11/2013 – This has been one of those ridiculously small tasks that I’ve been putting off for ages. My assembly table has a steel ruler close to it’s edge and inlayed flush with the surface. If you are interested to see how I’ve built this table you will find several chapters documenting the process in detail under the category “Bench” on this site.

Anyway the idea of having the ruler there is to speed up basic layout tasks such as marking out lengths of pieces of stock. In order to really make this easy one needs a stop at the zero end of the ruler so you can simply butt the one end against it and mark the appropriate length. In the picture below you can see what I mean.

IMG_8484IMG_8485

The stop is simply a small piece of scrap Assegaai with a 6 mm hole accepting a bolt which slots into the T-channel on the side of the table’s edge, fixed with a few turns of a wing-nut. When it is necessary to remove it, it is simply flipped through 180º and it sits below the table’s surface. You will notice that the ruler was positioned so that the edge of the table is zero even though it does do run all the way to the edge.

IMG_8486IMG_8487IMG_8488

File handle mania

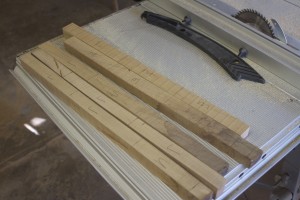
28/10/2013 – As you might have noticed, my files recently found new accommodation. Now I want to replace their handles with shop made ones. For this task I found the Witpeer board as pictured below.

IMG_8433

The board was a bit wavy so the first step was to chop it up into shorter bits. These were then ripped on my bandsaw into strips ideal for turning handles. I used the whole board for this purpose which would give me quite a few more handles than what I need at present, but I thought that I would just make heaps so all the handles look the same when I buy more files in future.

IMG_8434IMG_8435IMG_8436IMG_8439


Before turning any handles I switched lathes as the grey one developed a wobble and is therefore now ear-taged to become a disc sander.

IMG_8443IMG_8444

This is the first set of handles I turned and realised in the process that the stock is too thin to to turn such a long piece. I will turn them individually from now on.

IMG_8446IMG_8447

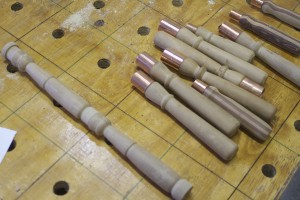
In the pictures below you can see the process of tapping the ferrule over the end of the handle. The leading edge of the copper ferrule is chamfered in order to slide without digging into the wood which was turned to be ever so slightly bigger than the inside diameter of the ferrule. I first lubricate the wood and inside of the ferrule with epoxy, then tap the ferrule over by hitting the back of the handle with my dead-blow mallet, while the ferrule is pushed firmly against the bench hook. I wrote an entire post on how I made this and a number of other mallets. The post is titled “Mallet Mania”.

The design of the handle is my interpretation of the Lie-Nielsen handles made specifically for the Auriou rasps they sell. This design feels comfortable in the hand and gives me several different grip options while doing different filing tasks.

IMG_8448IMG_8449IMG_8472IMG_8473IMG_8471IMG_8474


I hope to be able to turn the bulk of the handles this weekend and will update the post with the result of my efforts next week.

3/11/2013 – On Saturday I turned 5 more of the large handles and furnished them with ferrules.

IMG_8475

On Sunday I decided to see how many of each size handle I actually need.

IMG_8478IMG_8477

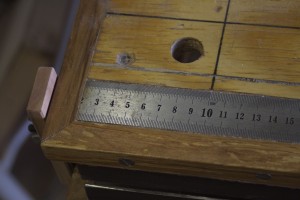
Then I took the stock that was cut for the handles and marked out the different handles to correspond to the the numbers needed of each size. For this task I used the ruler on my assembly table with the ruler stop pictured. It is as simple as butting the stock against the ruler and marking the different lengths with a pencil and square. I will write a short post on how this stop was made in the next day or so. You will find a whole series of posts on how I built the assembly table under the category “bench”.

IMG_8484IMG_8486IMG_8480


Here are the fruits of my labor ready for the next step.

IMG_8479IMG_8481

As I explained already, it became apparent that one can only turn one or at most two handles from a length of stock before it becomes wobbly. I assume this is because it is too thin. I therefore had to shorten the stock that was prepared last weekend. I took this opportunity to get plenty of hand sawing practice. As you can see, my Lie-Nielsen carcass saw and shop made mitre box came in handy.

IMG_8482IMG_8483

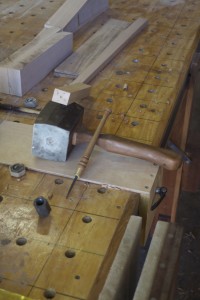
Then came the prep work for the lathe. I used my shop made Dead-blow mallet (http://www.jenesaisquoiwoodworking.com/mallet-mania/) and scratch awl (http://www.jenesaisquoiwoodworking.com/apodytes-dimidiata-scratch-awl/) together with a Lee Valley centre finder for this purpose.

IMG_8489IMG_8490

In the pictures below you can see how my medium sized handle turned out. This would become the handle for the bulk of my files. In the second picture you can compare it with the large handle and in the last one with the small handle.

IMG_8491IMG_8492IMG_8493IMG_8496IMG_8508

Then came the small handle.

IMG_8494IMG_8495IMG_8586IMG_8587IMG_8497IMG_8508

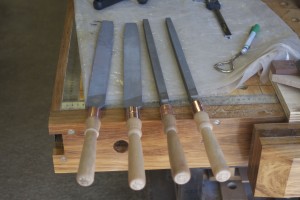
After a hour or so of turning, I needed to do something else. So I seated four large files. In order to know which file to grab devised a code which goes on the heel of the handle. In the first picture you will see the halve round shape with XL inside. This means it is a halve round extra large file. The SC-S refers to it’s double cut smooth grit. The second photo shows a square shaped extra large double cut bastard grit file. Hope you get the idea.

IMG_8498IMG_8499


Four extra large files, seated with the information on the heel of the handle.

IMG_8500IMG_8501


Here they are after a coat of tung oil.

IMG_8503IMG_8502IMG_8504IMG_8505IMG_8520IMG_8637IMG_8638IMG_8639IMG_8640


11/11/2013 – During the past week I continued to turn, seat ferrules, oil and seat these handles.

IMG_8533IMG_8534IMG_8535IMG_8536IMG_8537IMG_8538IMG_8549IMG_8550IMG_8551IMG_8564


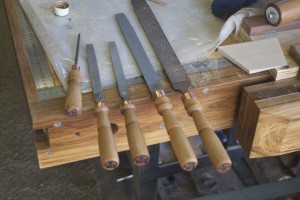
Here you can see how the Witpeer handles are slowly replacing the horrible plastic ones.

IMG_8562IMG_8563IMG_8586IMG_8587


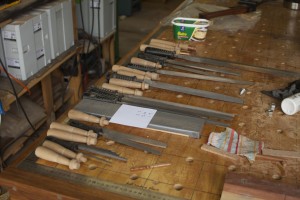
2/2/2014 – This weekend I made a concerted effort to finish the file handle project. In the pictures you can see the last crop being processed.

IMG_9594IMG_9595IMG_9596

File accommodation

28/10/2013 – Over the past year I have realised how useful a tool the file is. During my plane building phase, which took up almost all of my shop time over the past 6 months the file became a real asset. It shaped the totes and created perfect stopped chamfers.

The way my files were stored until the weekend frustrated me with a vengeance. It was a quick fix when I first started setting-up shop, but not really doing the job anymore. In the picture below you can see this first attempt at storing them. They frequently fell out of their handles and ended up banging against each other when I tried to grab one or return it.

IMG_8430

I then came up with the following plan. A small space became available when I moved my planes so I thought of building a type of beehive with PVC pipe to store each file in it’s own sheath. I bought 7 x 1 meter lengths of PVC pipe as shown below.

IMG_8425


They were then each cut into 2 x 300 mm and 1x 400 mm lengths giving me 7 x 400 mm and 14 x 300 mm pieces. I drilled 4 holes into each end of these piece to accept cable tie.


IMG_8426


The pieces were then tied together using cable tie as shown …


IMG_8429


… and voila, a filehive. The next step would be to replace these horrible plastic handles with shop made Witpeer handles. I am in the process of documenting that project, so keep an eye out for the post.

IMG_8431IMG_8432

Apodytes Dimidiata Scratch Awl

28/10/2013 – During this past weekend I decided to take a wee break from my extended plane-building-activities. I wanted to do something else on a weekend where there would be plenty of interruptions, with a 5 year old’s birthday party, the October Fest and several other social commitments. The Witpeer (Apodytes dimidiata) board below has spent about 3 months acclimatizing to the shop so I thought it could do the job for all the file handles I want to turn. While preparing the stock for these handles, I decided to also turn a scratch awl.

IMG_8433

The board was a bit wavy so I first chopped it into shorter chunks as shown. Then I used the bandsaw to rip these pieces ideal for file handle turning and a scratch awl.

IMG_8434IMG_8435IMG_8436IMG_8437


The thin strips pictured, were cut from the off-cuts on the bandsaw intended to be used as spatulas while glueing (other projects).

IMG_8439IMG_8438IMG_8440

This was all that was left of the board, and soon to become “fynhoutjies” to start a fire.

IMG_8442

Before turning the handles and awl, I changed my lathes around. The grey one has developed a slight wobble so it is now earmarked to become a disc sander.

IMG_8443IMG_8444

I used this beautiful shop made Jack plane to find a piece of stock with very straight grain by planing the various surfaces to see what is going on.

IMG_8451IMG_8452


The Awl being turned.

IMG_8453IMG_8455IMG_8456

For the ferrule I used part of a 7 mm Remington Magnum brass case. You can see how I proceeded to shape it.

IMG_7254IMG_7255IMG_7256IMG_7258IMG_7259IMG_7260


In the end I came up with a ferrule that suited my purposes perfectly.

IMG_8457

In the picture below you can see the steel punch I used for the sharp end of the awl. I drilled a hole in the wooden shaft and cut a slot in the front part intended to end up inside the ferrule. This part was turned slightly bigger than the inside diameter of the ferrule to ensure that the two sides would clamp down on the shaft of the punch when the ferrule is tapped over.

IMG_8459IMG_8460

As you can see the wood was first lubricated with epoxy  and then the ferrule was taped over. The block of wood underneath has a hole drilled into it to let the punch through in order to only move the ferrule into position.

IMG_8461IMG_8462

Here you can see the final product after a tung oil treatment.

IMG_8463IMG_8464IMG_8466IMG_8468