All posts by Gerhard Marx

Psychiatrist and Woodworker

Stanley no. 66 beadingtool rehab

15/6/2015

This is a pre-1900 Stanley no. 66 beader that I bought from Patrick Leach. If you consult the appropriate chapter of his epic work entitled “Patricks Blood and Gore”, you will find that pre-1900 beaders were japanned and later models were nickel plated. I got it bead-blasted to remove all the old japanning before redoing it with my usual sequence of potions. I wrote extensively about this in previous posts concerned with this topic so I will not repeat all that here. The Jack plane in the background is a so called Shaw’s Patent by Sargent, which I am also working on at the moment. I will write a post on that process in due coarse.

IMG_4678IMG_4686

I bought a set of beading tool blades from Lie-Nielsen some time ago and they fit this Granddad perfectly. For US$ 45 and a bit of elbow grease I have a new and highly respected classic tool. Those of you who (undoubtedly) thinking to yourself well I can buy one of those for $5 at a garage sale, shame on you. This is just another example of how lucky you are. To me here in the sticks, this is a very cheap option and it does not even include the arm and a leg it cost me to get it here from the US.

IMG_4692IMG_4693

In the pictures below you can see where it found a home on my so called Hovering Skeleton Chest.

IMG_4696IMG_4697

My journey 6

15/6/2015

In this instalment of “My journey” I would like to discuss the next frontier that is looming in the distance. As most of you probably know by now, I have spent almost all my shop time over the past 4 years building shop structures, building jigs, building tools and restoring vintage tools. It is starting to dawn on me that I need to move on to building furniture as the lion’s share of the setting up phase should be completed by the end of the year.

Last week I found a link to an excellent document that a reader posted in a comment on the Lost Art Press blog. It seems to be an inventory for an antiques auction that took place in March of this year. It consists of page after page of some of the most beautiful and timeless pieces of furniture I have ever seen. There are more than a few examples of pieces designed by heavyweights such as Klaare Klint, Arne Jacobson, and Peder Moos.

2413872_l_s

It got me thinking that I should probably start building lose interpretations of these, while continuing to grapple with the ancient guidelines on preindustrial design as documented in the seminal work By Hand & Eye. This is a book by George R. Walker and Jim Tolpin. It is available from Lost Art Press. I thought this could be a hands-on way to develop a feel for shape and proportion. Once I feel comfortable with building such interpretations, it should be a natural progression towards more personal designs.

If one decides to be influenced/inspired by a particular style it should probably be one you really like. The same goes for designers, it is probably best to follow the lead of a legend who’s work has stood the test of time. I really like the timeless (to me anyway) look of early to mid-century Nordic furniture. It therefore makes sense to build some of these before launching into the full-blown je ne sais quoi (in other words my own) phase of design.

It is of course also true that very few people come up with truly unique designs, we are all influenced (whether consciously or subconsciously) by stuff we observe. We are all standing on the shoulders of those who have gone before. That gives us an opportunity to see where we can go next. Our designs are therefore literally grounded in history whether we like it or not.

Thus, my idea is to consciously ground myself in a style I admire, before trying to envision the next frontier.

PS – Please feel free to point me towards similar documents or websites that deals with the same style. It will be much appreciated.


Roubo sharpening bench – part 2

15/6/2015

I would like to apologise for my silence over the past week. Due to a lack of shop time I had nothing to report.

You might have noticed one of the comments on the first part of this series, but if not Carsten from Germany commented  as follows: ”

this wood is without doubt what the english call “scotts pine” and what we just call “Kiefer”; being “Pinus sylvestris”.
The sapwood sometimes gets blue streaks, as one cross-section shows; this does not mean any mechanical weakness, it’s just cosmetics. OK, it is a fungus, but it does no harm at all.

You where lucky to get wood of this quality; all the engines, parts and fittings we get here on the shipyard are packed in crates of spruce with cm-wide growthrings.

I love the smell of this pine, especially as you cut a knot…

I am very grateful for his contribution as it makes the whole project more meaningful. It was really good to get confirmation that I am dealing with quality wood that would otherwise be impossible for me to access. If you are interested in reading more about this species click this link.

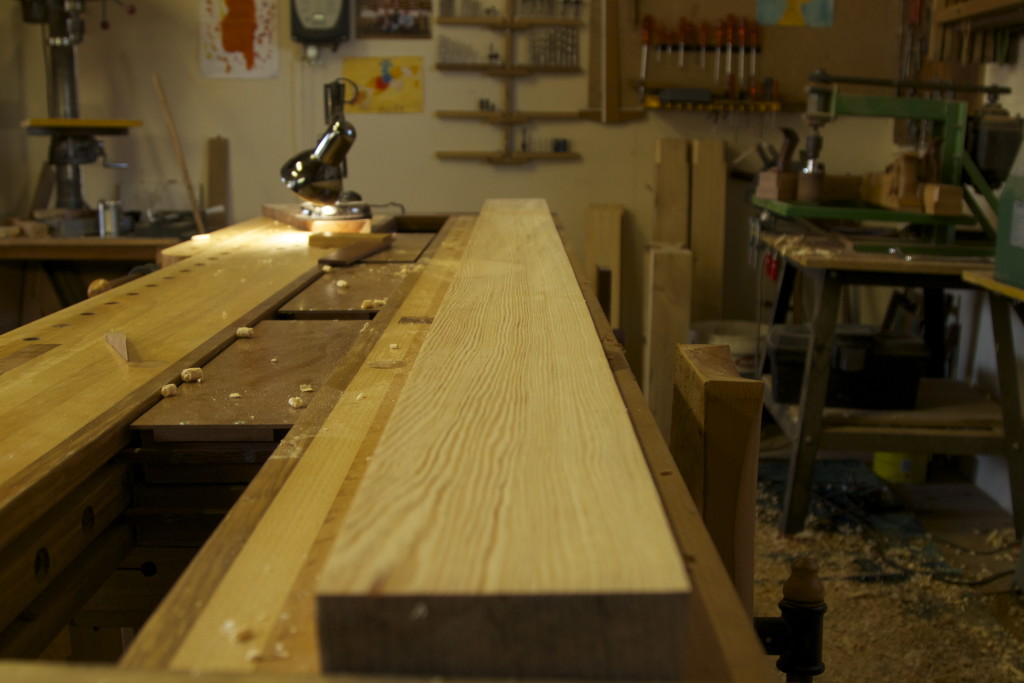
In the picture below you can see how well my leg vice and sliding-deadman-cum-leg-vise function together to allow hand planing of the edge of these long stretchers. The second picture show my version of a crochet. It is minute, removable, moveable and does pretty much the same job as the more elaborate versions being bandied around.

IMG_4680IMG_4681

I simply cannot get over the beauty of the grain on these boards. I have never been much of a pine fan, but this is superb wood that is a joy to work with. Carsten was also spot on in terms of it’s smell, it is exquisite. You can appreciate how it looked like after the planer took care of the non-reference surfaces. You might remember that I hand planed the reference surfaces.

IMG_4682IMG_4683IMG_4684IMG_4685

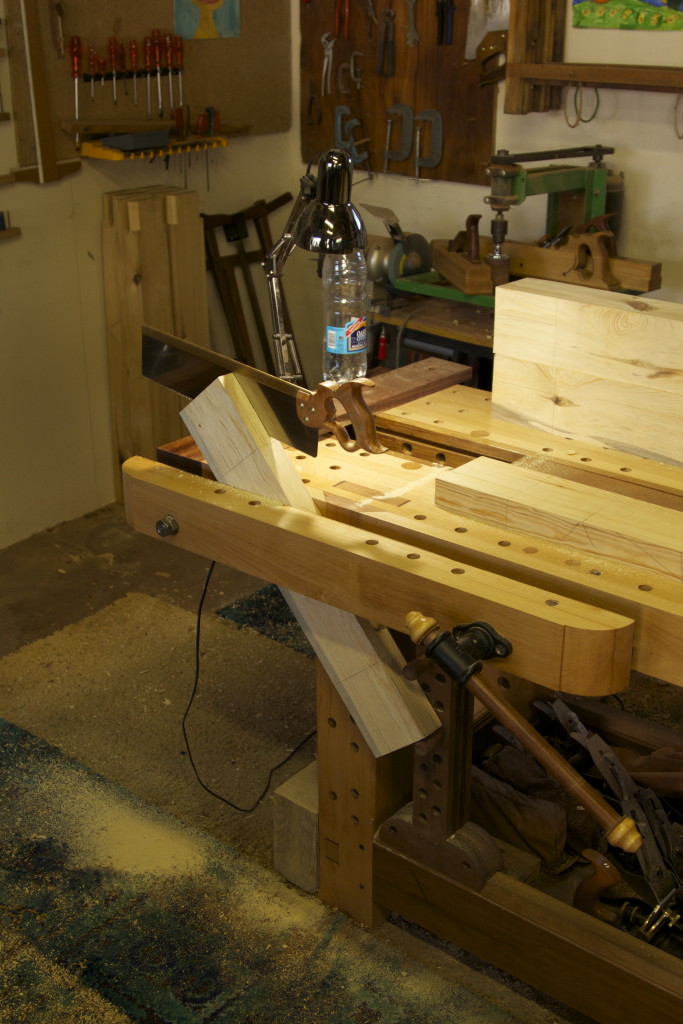
In winter I have the privilege to work in this wonderful cosy late afternoon sun. In summer this same sun will kill you on sight. Here I started marking out the tenons of the aprons and short stretchers.

IMG_4687IMG_4688IMG_4689

My whole Sunday was spent hand sawing the tenons. My Lie-Nielsen tenon saw does not have enough blade under the back, which meant a lot of extra work. Mark Harrell of Bad Axe Tool Works recently built me a monster Roubo Beast Master for this type of job, but I will only take possession in two weeks time. Watch this space for a post on my experience in dealing with Mark. I just want to test the saw a bit too, but so far I can only say good things with regards to his professionalism and personal attention to customers.

IMG_4694IMG_4695

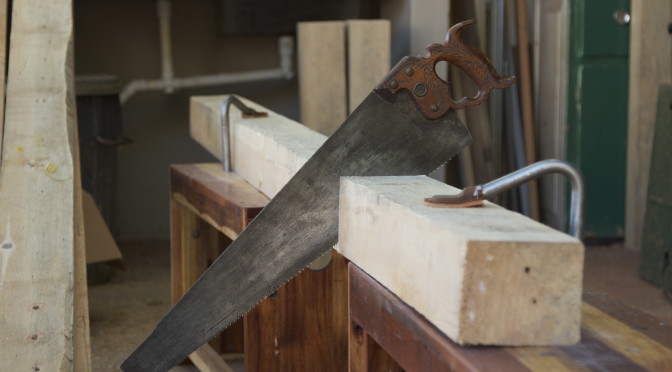
Here you can see the setup I use for cutting the shoulders.

IMG_4706IMG_4707IMG_4708IMG_4710IMG_4711

This step was necessitated by the tenon saw blade being to short. I want to point out that my Lie-Nielsen tenon saw is a fine tool, it is simply a case of not being designed for these gargantuan tenons. It is more in the timber framing ballpark.

IMG_4715IMG_4716


Roubo Sharpening bench – part 1

1/6/2015

I’ve been planning to build a small sharpening station in order to make it easier to keep all my edge tools in top nick. At the moment I have to dig out the sharpening paraphernalia, set it up, sharpen what ever needs attention and pack it all away. This has the side effect of postponing one of the most important tasks of a hand tool woodworker.

Since stumbling across a very nice stash of wood I’ve realised that I could fit a 3.2 meter (length) by 600 mm (width) bench up against one wall of my shop. The dimensions of the wood would also allow for such a bench. The idea is that I might as well build a big bench and it could double up as a stand for my drill press, bench grinder, the green monster and a dedicated sharpening station.

I enjoyed using the Roubo joinery for my current workbench so much that it was an obvious choice for this bench.

IMG_0331

As this is reclaimed wood, my team of keen apprentices had to do quite a bit of cleaning before we could removed all the nails carefully.

IMG_4561IMG_4565IMG_4555IMG_4554IMG_4559

Once that was done, I used one of my favourite tools to chop up these beautiful beams for the legs, aprons, and stretchers. It is of course my 24″ Disston no. 12 (7ppi crosscut) saw that dates back to 1896. It is an absolute gem of a tool. It is mind boggling how a tool of this quality could have been mass produced. The pictures (above and below) also show how useful a set of saw benches can be in conjunction with holdfasts for this type of work.

IMG_4578IMG_4579IMG_4571IMG_4615IMG_4602

This is definitely the best pine I have ever worked with. Can anyone out there identify the species from these photos, I have no idea?

IMG_4621

I then removed wind and squared up two reference faces before feeding the legs to the electric planer. My shop made fore plane and scrub plane (which was used as a super aggressive fore plane in this case) made short work of this job. I must say it was a pleasant surprise to realise how easy it can be to plane wood like this after years of planing African hard woods. I am starting to realise that I have been a “metal” worker up until now, if this is how it feels to work wood.

IMG_4638IMG_4639IMG_4641IMG_4642

IMG_4655IMG_4656IMG_4657IMG_4658

This is what the legs looked like just before it went through the planer.

IMG_4659

After the planer munched on it, it looked like this. You can see how I marked out the famous Roubo through tenons. In the process of sawing these I discovered a very handy design advantage of my sliding deadman. The pictures show how the leg sat comfortably and stable at the correct angle for the sawing between two dogs.

IMG_4661IMG_4668IMG_4663IMG_4665IMG_4664IMG_4667

The next step was to drill out material as illustrated with a spade bit. The rest was removed with my shop made bow saw in order to free up the waste between the tenons. The shoulders were sawn using the setup as shown.

IMG_4671IMG_4669IMG_4670IMG_4672


I had to fetch another beam for the stretchers and my Cruiser was at the garage. The only option was to use the small delivery car of my practice. Luckily it is only a few blocks away. As you can see, I used my newly built Roubo bow saw to chop off the length that was required. I ripped this piece down the middle (on the band saw) to created the two long stretchers. In order to plane them I had to use the whole length of my bench, which necessitated an improvised planing stop. The pictures tells the story.

IMG_4643IMG_4644IMG_4673IMG_4674IMG_4676IMG_4675IMG_4677


Shop made Fidgenian frame saw – part 3

1/6/2015

I had the pleasure of finishing this Tom Fidgen inspired frame saw over the weekend. If you missed the first two posts in this series, click these links:

Part 1

Part 2

I treated the Kershout with Tung Oil followed by a coat of Woodoc.

IMG_4640IMG_4632


One last foto pre-assembly.


IMG_4645


My righthand man Connor (my son’s best mate) had the honour of first handling the assembled saw. As you can see it came out pretty nice.  Kershout is really one of the most beautiful wood species from this part of the world.


IMG_4647IMG_4648IMG_4649IMG_4650IMG_4653IMG_4651IMG_4652IMG_4654


Unfortunately, I have not been able to weigh it yet, but will post the weight as soon as I have it.  However it felt reasonable during a test cut, but I will have to report on how it feels after a few heavy re-sawing cuts. Before I can do that I need to build a kerfing plane. I have an idea which departs significantly from Tom Fidgen’s model, but you will have to wait with me to see if it works, otherwise we will revert to his version.

Shop made Fidgenian frame saw – part 2

26/5/2015

Finally the next chapter in this fascinating series arrive to ease the eager anticipation of the woodworking proletariat.  If you missed part one, simply click the link. Since part one of this story I’ve realised that it is a lot more work than the previous two saws I’ve built.

In the pictures below you can see how I started to shape some of the parts. The Kershout is so freaking dense and heavy that I really had to remove as much timber as possible to reduce the weight.

IMG_4545IMG_4546IMG_4547

I first tried to use my vintage Witherby drawknife to remove material from these long sections (not sure what the correct term is for these parts), but the wood is simply too hard. Then I tried the bow saw I built recently, followed by a Veritas spoke shave and it worked much better.

IMG_4548IMG_4549IMG_4550IMG_4551IMG_4577

I reassembled the saw to check that the chosen shapes work aesthetically.

IMG_4589IMG_4587IMG_4588

As you can see, I did not do myself any favours in terms of reducing weight with the dimensions of the steel I chose for the hardware. That is because I usually use the bits of scrap (that I collect religiously) lying around the shop rather than to go and buy stuff.

IMG_4594IMG_4595IMG_4596IMG_4597IMG_4598IMG_4599IMG_4600IMG_4607IMG_4623

This piece of steel is meant to protect the wood from potential damage by the tensioning bolt.

IMG_4608IMG_4609IMG_4610IMG_4611IMG_4612IMG_4628

Then followed the careful shaping and smoothing phase. You will notice the range of tools used sitting on my bench.

IMG_4613IMG_4619IMG_4625

This is a picture I was reluctant to share, but decided that it would be silly not to. What I needed to do here was to fill quite a few wood borer holes with epoxy. It must be borer that did it’s damage while the tree was still alive or at the very least still green, as the wood is simply too hard for borer now. Looking at the stuff I had to dig out of the holes they had severe constipation even at that stage. I knew about these imperfections from the start. It is a fairly frequent obstacle I face while working with the feral woods of the Knysna Forest.

It simply serves as a reminder to all of you out there who can walk into a lumberyard and choose from board after board of perfect wood that you are very lucky. So remember that.

IMG_4626

… and finally a brief preview of what’s to follow in part 3.

IMG_4629IMG_4631IMG_4634IMG_4637

Lucky Strike

26/5/2015

It is my lucky day. I managed to secure a deal for some reclaimed pine in massive dimensions (given what is generally available in Namibia) from a friend in the building trade. The deal goes like this: I need to build him a huge table that can be disassembled from some of the timber and the rest of it is mine.

The timber was used to build a container for a massive machine that weighed more than 5 tons to transport it from Germany to Namibia. In the picture below I am referring to the stuff at the bottom.

IMG_0331

There are about ten piece of 200 mm (8″) x 75 mm (3″) x 3200 mm (10½), a few that measure 130 mm (5¼”) x 110 (>4″) x 3200 mm (10½’), and 5 or so of 150 mm (6″) x 130 mm (5¼”) x 5000 mm (16′). It is next to impossible to find solid wood in these dimensions in the Land of the Brave.

IMG_0333

If you look at the year rings, it is clearly quality stuff. The pine we can buy around here has year rings as wide as the Benguela sea current that grace our Skeleton Coast. These trees must have grown in quite harsh conditions (I am guessing) in the Northern Hemisphere.

IMG_0332

Unfortunately this means that I will not be able to do the chair build with Brian Eve in June. I hope he will understand my situation. He has suggested that a few bloggers build a chair together and compare notes via his website. I still think it is a wonderful idea and will certainly join something like that in future, but cannot let this opportunity slip either. Sorry Brian!

Shop made Fidgenian Frame saw – part 1

20/4/2015

The next traditional saw on my list to build is a frame saw. You might remember that I have completed a 12″ bow saw and a 700 mm Roubo-esque cross cut bow saw already. After some research I decided to use Tom Fidgen’s (The Unplugged Woodshop) design as inspiration for my version. Tom is an icon of note as far as I am concern and that was enough reason for me. He produced two excellent videos on how he built his frame saw (see the link profided if you are interested.

For this project I chose Kershout (Pterocelastrus tricuspidatus) which is ridiculously hard with a specific gravity of > 1 (it sinks in water). The third picture show the end grain of a small piece. I tried to count the year rings and got to about 120. This gives you an idea of how slow it grows and why it is so dense.

IMG_4133IMG_4134IMG_4137


The usual lamination process I have to endure to make up stock with appropriate dimensions.

IMG_4146IMG_4147


The rough stock before work started.

IMG_4460


Living in Africa means I have to cobble together my own hardware for the saw. A scrap piece of mild steel angle iron seemed to fit the bill. As you can see I am no welder, but we all have our little problems.


IMG_4461IMG_4462IMG_4463IMG_4465IMG_4466IMG_4468IMG_4469


My shop built Jack plane came in handy to square up the parts.


IMG_4471IMG_4476


I have been struggling to saw off smaller pieces of stock like this perfectly square. Since I received my holdfasts I tried this approach and it improved my accuracy immensely being able to see the two lines you are sawing. You then flip it over and repeat on the other side.

IMG_4479IMG_4480IMG_4475


Dual tenon design, ala Mr. Fidgen.


IMG_4504IMG_4506


I like making a small notch with my chisel to start the crosscut saw.

IMG_4507IMG_4508IMG_4509IMG_4511


My shop made bow saw removed the waste between the two tenons.

IMG_4513IMG_4514


Dual tenons necessitates dual mortises.


IMG_4523IMG_4540IMG_4527IMG_4535


Now the fun part will start. Shaping the saw will be the topic of the next riveting installment in this series.

IMG_4544

Holdfast boots

18/5/2015

As self-proclaimed leader in the field of woodworking haute couture, I would like to introduce the next frontier in menuisier fashion. Last week the four Gramercy Tools holdfasts that I ordered arrived  after 5 weeks of traveling across time zones, an ocean and the equator. Holdfasts work like a charm, but tends to mar your work unless you stick a bit of scrap between it’s fangs and your stock. It can be a bit of a hassle so I thought of a way to address this particular issue.

I like to do leather work from time to time and it made sense to use this skill to alleviate the problem. As you can see in the pictures below, I custom-fitted these stunning Almond-toed leather booties to the business end of the holdfasts. I used two layers of Skeleton Coast seal skin for the sole and free range Namibian cow’s hide for the upper. It would not look out of place on a catwalk in Milan (says he), but I am not sure whether the common adage used to describe particularly sexy boots would necessarily apply. Apart from the obvious visual appeal, it has real functional advantages as well. It improves grip, protects your stock and cuts down the time spent fiddling with bits of scrap wood.

IMG_4444IMG_4445IMG_4447IMG_4446


I also took to the shaft section of the holdfasts with a rasps to improve it’s grip. It works like magic.

IMG_4450IMG_4451IMG_4448IMG_4449

Below you can find some examples of the boots in action. The pictures also provide ample evidence to support my decision to ignore Monsieur Schwarz’s Commandment to stick to very few dog/holdfast holes.

IMG_4452IMG_4453IMG_4454IMG_4455IMG_4518IMG_4524IMG_4528IMG_4540IMG_4535

Here are a few examples of a saw bench modeling the trend-setting footwear.

IMG_4456IMG_4457IMG_4458IMG_4487IMG_4488IMG_4491IMG_4492

My bench holdfasts live here.

IMG_4459


So there you have it, once again the best of tres chic woodworking. Only at Je ne sais quoi Woodworking.

Two more sun ovens

28/4/2015

In November 2011 I built a sun oven for our holiday house. It  became a real gem with regards to my holiday cuisine. I do almost all the cooking while we are at the beach house and there is few things better than chucking a North African tagine in a black cast iron pot, stick it in the sun oven at 09h30 and sit around reading until sunset for a perfect meal. Seeing that the beach house is probably 1500 km south of Windhoek I though it should work even better in the vicious Namibian sun.

While engaging in sun oven building activities, it made sense to build two. One for Jacana Junction and one for our Windhoek house. It is not rocket science so I will leave it up to the pictures to tell the story.

IMG_4148IMG_4149IMG_4151IMG_4154IMG_4159IMG_4158IMG_4161


At Jacana Junction we built this stand for it where it catches all day sun every day of the year. As you can see it has a glass lit and foil to reflect the sun onto the cast iron pots. You will be surprised how effective this oven is. I once cooked a leg of lamb that went into the pot frozen (because I forgot to take it out of the freezer the previous night) to perfection in 6 hours. It works even better than a commercial slow cooker and needs no electrons.


IMG_4295IMG_4296