All posts by Gerhard Marx

Psychiatrist and Woodworker

Roubo sharpening bench – the not so grand finale

12/10/2015

OK, I realise this will not be the most exciting post in the history of woodwork blogging, but seeing that my site is in the first place a way for me to document my journey for myself you will have to bear with me. This will however be the not so grand finale to a riveting series of posts on building a second Roubo-style bench. As per the title of these posts it will be used as a permanent sharpening station during it’s first life and hopefully become a workbench in a second life once my shop gets extended. I plan to add a holdfast type “twin screw vise” as a face vise at that stage.

As you can see in the pictures below I used Without (Cape Holly or Ilex mitis) for the shelve boards. They all received tong and groove treatment with my Lie-Nielsen no. 48 T&G plane.

IMG_5200

As you can see here it is a beautiful wood species.

IMG_5201

The shelve boards were nailed into position with finishing nails. I did not used to like the idea of using nails for proper woodworking, but Christopher Schwarz has convinced me that there is historical evidence for the use of nails for specific tasks. In this particular case I thought that the nails will allow the boards to move with the changes in ambient humidity and having such small heads make them almost invisible. As you can see, I left two gaps to allow for wood movement, which also doubles up as convenient slots to get rid of debris when cleaning the shelve.

IMG_5202IMG_5203IMG_5204IMG_5205

In these pictures you can see my sharpening station taking shape. Now I can simply walk over and sharpen what ever needs a razor edge. Up until now, I always used to procrastinate for too long before sharpening, because it meant that I had to set up the station first, sharpen and then pack it away.

IMG_5238IMG_5239IMG_5240

Thank you for joining me on this journey.

My second commission – part 2

12/10/2015

If you want to read this epic tale from the start, go here for part one.

The stock for this Nakashima-esque table has been sitting in the shop for the past 2 weeks. It should have acclimatised adequately by now for us to take the next step. Having said that, we’ve had a heatwave warning were they expect temperatures to go above 45ºc on a regular basis in the next 5 days or so. That might mean that the stock will need further acclimatisation, but what the heck.

I still remember vividly how we were waiting in eager anticipation for the  so called ‘heatwaves”, while living in Yorkshire UK. Usually we would ask the locals when the heatwave was supposed to hit when it got up to 18ºC (if you are lucky) and they would say that we are in the midst of it! At that stage we usually noticed that all the locals were halve naked in the streets. We would still be wearing jerseys and only venture outside if absolutely necessary.

Clearly it seems Namibia has a different type of heatwave. Anyway, it seems as if I went on a wee bit of a meteorological tangent there.

In the pictures below you can see the Kershout (Candle wood) boards we chose for the top. This stuff is exceptionally hard and the tree that the board on the right came from must have been close to or more than 900 years old. These trees spent all that time in the pristine surroundings of the Knysna-Amatole montane forest. Since being harvested the boards has been air dried and seasoned for at least 11 years, possibly closer to 16.

I spent quite a bit of time trying to work out what would be the best way to join them into an aesthetically pleasing top, while allowing the natural ‘defects’ and cracks to take centre stage, as per George Nakashima’s famous mantra: “Every part of each tree has only one perfect use.”

IMG_5197IMG_5198IMG_5199

I used my Festool TS55 with it’s guide to cut as straight as possible. Another variable I had to keep in mind is the maximum width of my planer, which is 300 mm. The wood is so hard that you will simply toast all your hand planes and yourself in attempting to plane these by hand. As you will know by now, I am not one to shy away from ridiculous hand planing tasks, but to attempt it in this case would be absolutely mental.

IMG_5216IMG_5218IMG_5219IMG_5214IMG_5215IMG_5220IMG_5222IMG_5230


I plane the boards in two very tiring sessions down to the appearance in the pictures below. As you can see there is still some way to go, but it needs to settle down for a while before I can do the rest. If one does too much at once, the wood tends to move all over the place.

The wood was so hard that the planer really complained while removing as little as 0.1 of a millimeter. You can just imagine how many passes it took to get it down to the current state of play.

IMG_5231IMG_5232

By Sunday night I clamped the boards to each other and the top of my assembly table to keep them straight while they wait for probably 2 weeks before we touch them again.

IMG_5249

… because I want to be like David Charlesworth

5/8/2015

Stanley no. 5 1/2 C (ca 1902-1907) rehab

I bought this plane from Jim Bode in August of 2015. It is my 4th no. 5 and 5th Jack plane (if I include my shop made wooden Jack plane). Why, … because I want to be like David Charlesworth, that is why! It is more than an adequate reason to buy another Jack plane in my book. David is such an icon to me, I just love his meticulous and cerebral approach to the craft.

In the interest of woodworking ethics/morality, I should probably say to the beginners out there (who wants to be like me … did I say that out loud?), that you do not need 5 Jack planes. In fact ,you do not need any other bench plane than a single no. 5. The problem is that I like the tools of the trade as much as the trade itself.

This plane seems to be David Charlesworth’s favourite as it is never far from his reach in those famous Lie-Nielsen DVDs. The no. 5½ was made between 1898 – 1958 and this particular specimen is a Type 9, which were made between 1902 – 1907. The pictures below are those taken by Jim, before it traveled to Sub-Sahara Africa.

287428287433287428

Kenny at the Prop Shop did the usual bead blasting for me.

IMG_4976IMG_4977

I actually prefer the Type 8’s frog receiver to these, but they are still pretty good. Stanley changed the frog receiver in 1902 as indicated by the patent dates in the main casting. They did this to cut the time and cost of production, not as an improvement in function. The slippery slide towards poorer quality at a higher price is probably what led to the emergence of so called ‘tool shaped objects’ that we are so familiar with in the 21st century.This particular plane does not have the frog adjusting screw, which was added to the Bailey series from 1907 onwards.

IMG_4978IMG_4979

One of the reasons I like this plane so much is that it does not have anything cast into the area of the main casting behind the frog. I find the smooth surface much more comfortable when putting firm thumb pressure in this area, … you’ve guessed it … ala Charlesworth.

IMG_4980IMG_4981

Rust converter.

IMG_5010

Anti-rust undercoat.

IMG_5014

High gloss truck enamel paint.

IMG_5031

12/10/2015

This past weekend I managed to assemble the plane.

IMG_5206

Sorry for the poor quality of this picture, but you should be able to see that I did some work to flatten the area where the blade beds down …

IMG_5207

… as well as the frog receiver area.

IMG_5208

David Charlesworth eat your heart out.

IMG_5210IMG_5211IMG_5212IMG_5213

I have already done some work with this plane and it is an absolute gem.

Disston back saw (ca1887)

24/6/2015

I bought this beautiful saw from Jim Bode Tools in June and organised for them to first send it to Mark Harrell at Bad Axe Tool Works for a proper sharpening.

Mark had the following to say when he received the saw: “It’s a VERY nice 1887 saw from the PHILAD’A era (1887-1896) in impeccable condition. The only thing that needs to be done to it is to retooth the asymmetrical toothline”. 

303049303121303125

17/9/2015

I received it together with another saw Mark sharpened for me on the above date packaged as illustrated below. I will write a separate post on the mystery saw in future.

IMG_0362IMG_0363IMG_0365IMG_0366IMG_0367

OK you can have a sneak preview of the mystery saw to wet your appetite.

IMG_0371IMG_0375

Didi got stuck into testing it out before I could even remove the Bad Axe Business card.

IMG_5089IMG_5090

I have to say that Mark did a sterling job of sharpening this saw as it cuts exceptionally well. I have no hesitation in recommending Mark to anyone who wants to get a saw sharpened to absolute perfection.

My new Disston also fits my hand like a glove and therefore became my favourite saw within days. It was already used on several tasks while finishing my most recent bench.

IMG_5100IMG_5181

Roubo sharpening bench – part 12

28/9/2015

By 18h30 yesterday evening the bench was finished and in it’s place. When I say finished, it means that it is adequate for it’s intended use over the next year or so. It will simply function as a stand for my drill press, a permanent sharpening station, grinder and a few more things. Once my shop get’s expanded, it will receive a holdfast vise and start functioning as workbench.

I used my Disston no. 12 to saw off the the protruding through tenons, wedges and drawpins. As you can see, I left quite a bit in tact in order not to damage the bench surface too much.

IMG_5159IMG_5160IMG_5161 IMG_5162 IMG_5163

The rest of the protrusions were planed away with my Lie-Nielsen low angle Jack plane. I find this to be the best plane for end grain work like this, especially when used with a toothed blade.

IMG_5164 IMG_5165IMG_5166IMG_5167

I then used a Stanley Bailey no. 3 smoothing plane to get rid of the toothed blade’s characteristic finish.

IMG_5168IMG_5169

In this picture you can see that my crosscut saw did chew a bit of the leg in this case. Fortunately this is the side of the bench that goes up against the wall.

IMG_5170IMG_5171

While I had the bench in a convenient position I screwed the cleat to the bottom of the long stretchers.

IMG_5172IMG_5173

The Marx-Roubo bolts were covered up with inlayed chunks of perfectly quarter sawn Scots pine. As you can see, the inlayed pieces were initially 1-2 mm proud of the surface. After the glue dried, it was planed flush.

IMG_5174IMG_5175

I decided not to do a proper flattening of the top as it is not necessary at this stage. Seeing that the bench will only be used as a table for now, I thought the top could happily move with the changes in humidity and settle down over the next year or so. Once I need to start using it as a proper bench, I can then do that fine tuning.

IMG_5176

After a treatment of Tung oil and turps. I decided to leave the top beams at full length at this stage. By the time it becomes a proper bench, I might add breadboard ends on both sides. Currently it is 3370 mm (just over 11′) in length.

IMG_5177

The next task is to finish off the preparation of the shelve boards. Here you can see my Lie-Nielsen no. 48 in action. It is one of my favourite tools.

IMG_5178IMG_5179IMG_5180IMG_5181IMG_5182

Pewa is a bright young Namibian whom we are helping to realise her dream of becoming a Medical Doctor. She is currently staying with us while writing her final school exams. She took a break from her studies to help me to get the bench to it’s home for the next little while.

IMG_5183


Here we are in the process of clearing the area allocated for the bench.

IMG_5184IMG_5185


While the helpers took a break I quickly treated the underside of the bench with the mentioned potion.

IMG_5186IMG_5187IMG_5188


It just so happened that our friend Heidi turned up at the right time to help us with the tricky resettlement procedure.

IMG_5189IMG_5190IMG_5191


Once the bench was in place, Pewa and I started to populate it with paraphernalia.

IMG_5192IMG_5193IMG_5194

My second commission – part 1

1/6/2015

It might be a bit of a stretch, but it makes me feel good to call this a commission. My only other commission (which really was a proper one) was back in 2001 when a friend of mine wanted a top for his bar and I needed money to fund a move to New Zealand.

You might remember how I came into possession of this pile of exceptional Scott’s Pine, by agreeing to build a table for the former owner (and personal friend) and get to keep the rest of the wood. Well, the plan has mutated on several occasions since then. We started off with the idea of building two trestle type structures with an unattached top simply sitting on them.

IMG_0331

I started by getting my team of boisterous apprentices to clean up the reclaimed wood. After that I took out all the nails and other foreign objects.

IMG_4561IMG_4557IMG_4555IMG_4554

After a long day of sawing the beams into pieces of the appropriate length by hand, we (my friend Anton and I) had another chat about the design in the shop. We used the actual cut pieces to get an idea of what the structure would look like. We realised that, for the intended function we might be better off using some of the timber in my Knysna Forest collection.

IMG_4569IMG_4580IMG_4620

I forwarded some pictures of Nakashima style tops to him the following week via e-mail and he liked it. For the legs we first considered a very elegant design I found in a document on Danish modern furniture, as it reminded of the trestle idea we started off with.

The next step was for Anton to come and look for appropriate boards that would fit the bill. Unfortunately they have been going through a tough time with a father in hospital after MVA. That meant that we did not manage to pick out the timber until this weekend.

21/9/2015

All the wood in this collection was dried naturally after being sawn into planks between 2000-2004 (several batches that was bought back then). In other words it has been matured over 10-15 years of which the past 4 was spent in the very dry Windhoek climate.

IMG_5113IMG_5114IMG_5117IMG_5118IMG_5121IMG_5122IMG_5124IMG_5125IMG_5126IMG_5128IMG_5129IMG_5131

As per usual, my apprentices were integral to this activity.

IMG_5132IMG_5133IMG_5135IMG_5137

We decided on Kershout (Pterocelastrus tricuspdatus) for the top with Nakashima style Witpeer (Apodytes dimidiata) keys to stabilise cracks. I have not built a Nakashima-esque top before, so it is a tad stressful to think that it might go wrong at some stage.

In the picture below you can see how we stored the chosen boards to acclimatise to the shop environment.

IMG_5138IMG_5139

Roubo sharpening bench – part 11

21/9/2015

It gives me great pleasure to report that the bench was successfully glued up yesterday. Before I show you those pictures, let’s just look at the lead-up . In the pictures below you can see how the dowels finally came into being. I changed the cutter on the dowel cutter to a ¼” size and cut a short section at the end of each dowel to that size. This made it easy to fit the dowels in a cordless drill to do a quick bit of sanding.

IMG_5076IMG_5081

The dowels had these burnished areas coming out of the no. 77.

IMG_5082

A quick sanding made for a very smooth dowel.

IMG_5083IMG_5084IMG_5085

They were then chopped to length …

IMG_5086IMG_5087

… and pointed using the BPS.

IMG_5093

The hand made dominos were shaped using this block plane.

IMG_5095

I used an array of rasps, a spoke shave and a block plane to cut the stopped chamfers on the legs.

IMG_5096

The Marx-Roubo bolts each received their own little slot, which will be covered up with wood in future.

IMG_5097IMG_5098IMG_5101IMG_5102IMG_5103

I used a mortise chisel, Lie-Nielsen router plane and my new 1887 Disston backsaw for this operation.

IMG_5099IMG_5100

The wife was so kind as to help me with the dry fit and the actual glue-up a day later.

IMG_5104IMG_5105IMG_5106

Dry run finished.

IMG_5107IMG_5108IMG_5109IMG_5110IMG_5111IMG_5112

On Sunday afternoon it was time for the glue-up. The three beams forming the top remained 3 mm apart to allow for wood movement. The are only linked by the (unglued) dominos to ensure that they line up flush and support each other.

IMG_5141IMG_5143

Annamie looks like an evil Urologist about to examine a victim’s prostate.

IMG_5145IMG_5146IMG_5148IMG_5149IMG_5150

As you can probably see I used slow setting epoxy, as the glue-up took more than an hour.

IMG_5152IMG_5153

All the draw pins and wedges in place.

IMG_5155IMG_5156

Just a reminder why I make such a fuss with wood movement in terms of my bench design. This is the ambient humidity and temperature for the past month or so. By mid rainy season it would be up around 75-80%.

IMG_5158

Didi’s bird feeders

24/8/2015

My son has been honing his woodworking skills by making several bird feeders over the past few weeks. He takes advantage of my obsessive collection of offcuts and nails these very basic double story feeders together while I am working on other stuff.

IMG_4962IMG_4963IMG_4964IMG_4966IMG_4968IMG_4969

Here you can see one of his feeders with an Acacia pied barbet having breakfast on the top storey.

IMG_4973IMG_4974IMG_4975

On the weekend he made this monster using the ends of the Without boards I processed last week for my bench’s shelve. He painted it with a mixture of Diesel and recycled car oil as an African wood preservative. Then he used bits of scrap metal we pick up all over the place for the rest of the hardware. Three screws drilled through the wood acts a convenient place to fix bits of fruit for White-backed mousebirds and African red-eyed Bulbuls.

IMG_5074IMG_5073

If you want to look at a few more ideas on bird feeders go here. My friend Bob Demers (The Valley Woodworker) is a very experience woodworker who likes making them too.

Roubo sharpening bench – part 10

14/9/2015

As the bench is approaching it’s glue-up stage, it is as if my toil has taken on a new verve characterised by a strange mixture of pep and angst. At this stage I plan to get it assembled in the next couple of weeks.

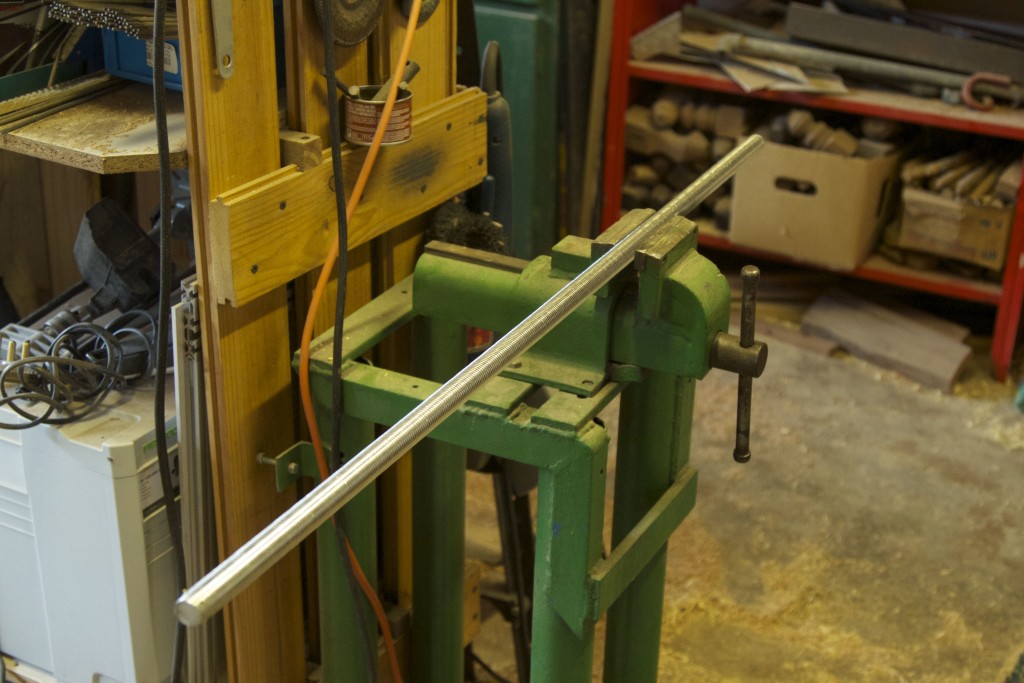
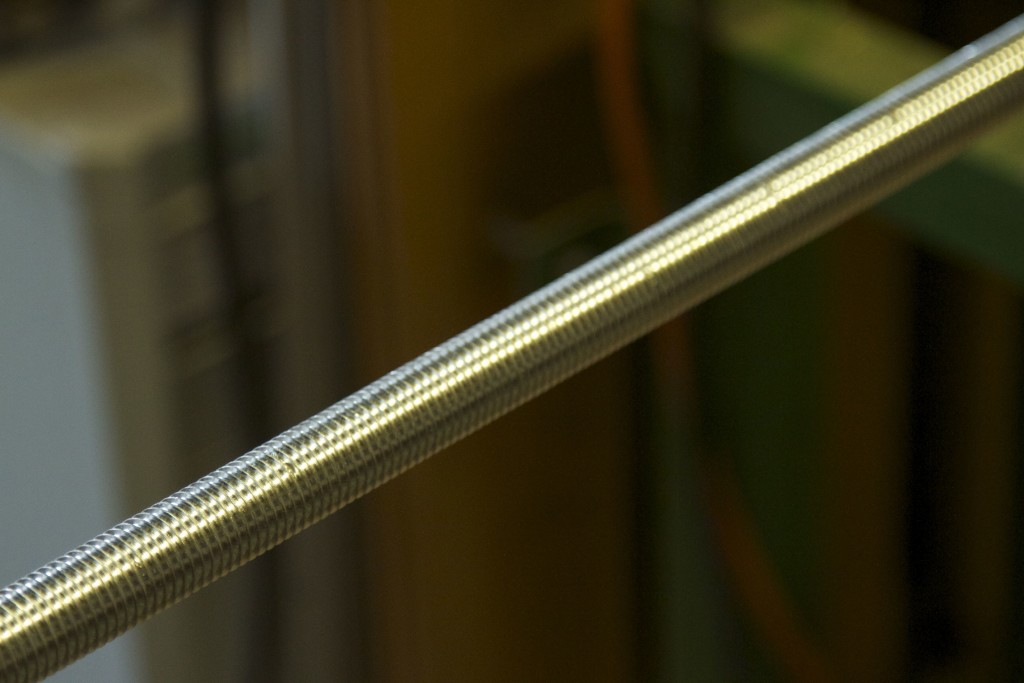
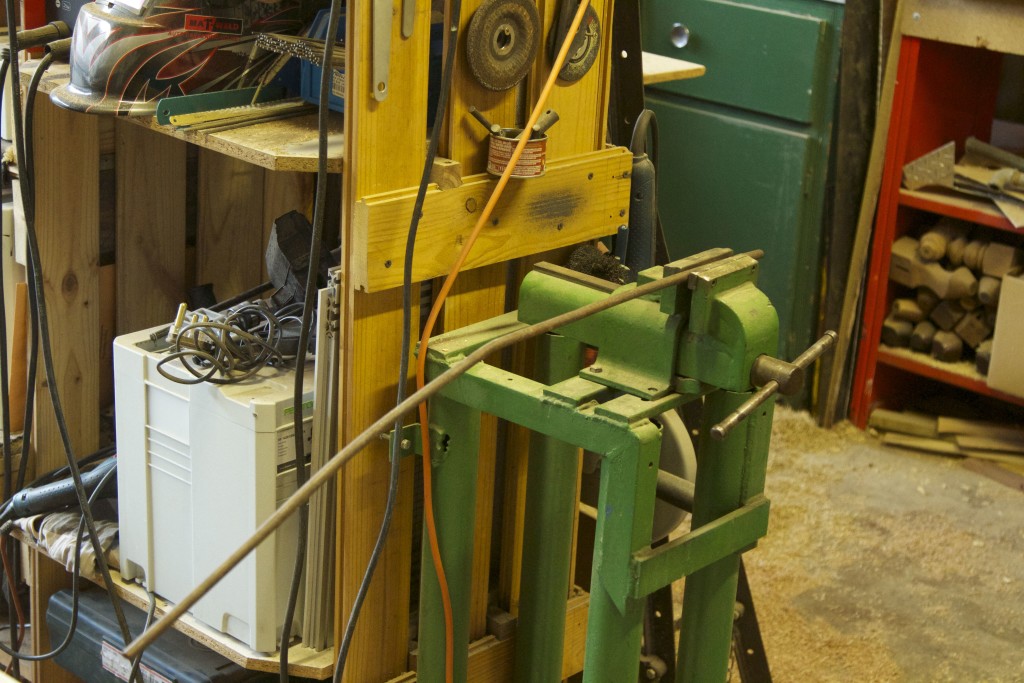
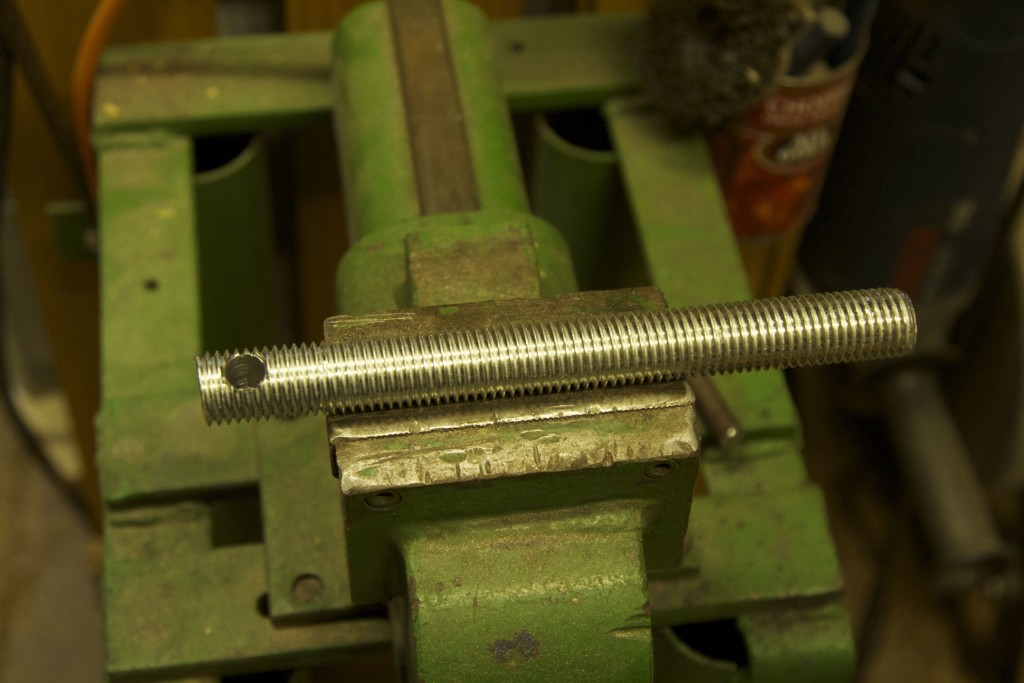
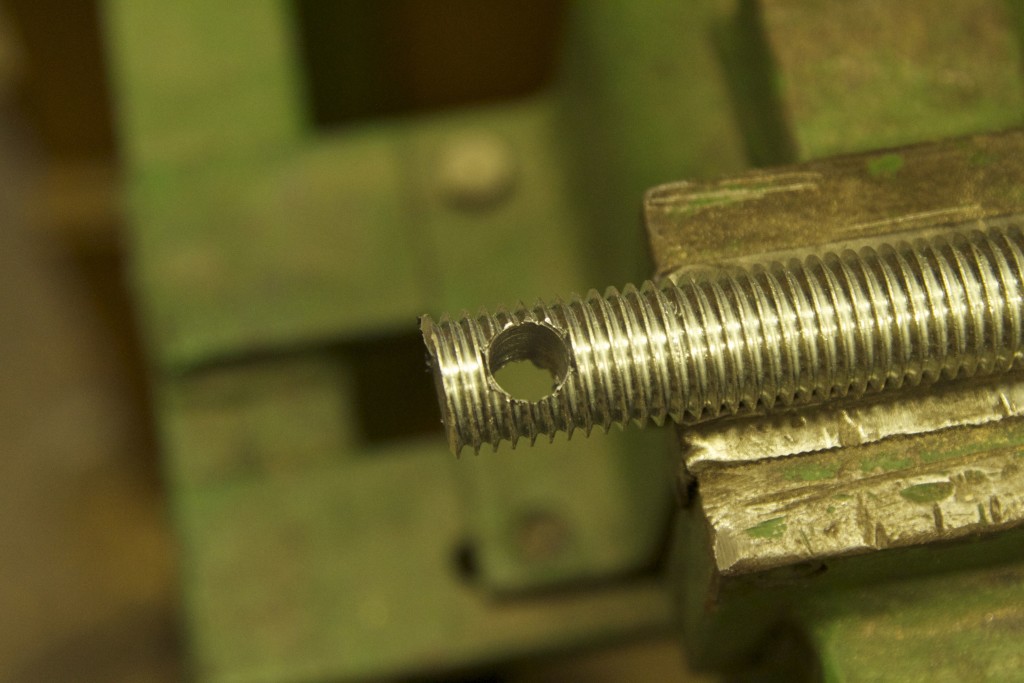
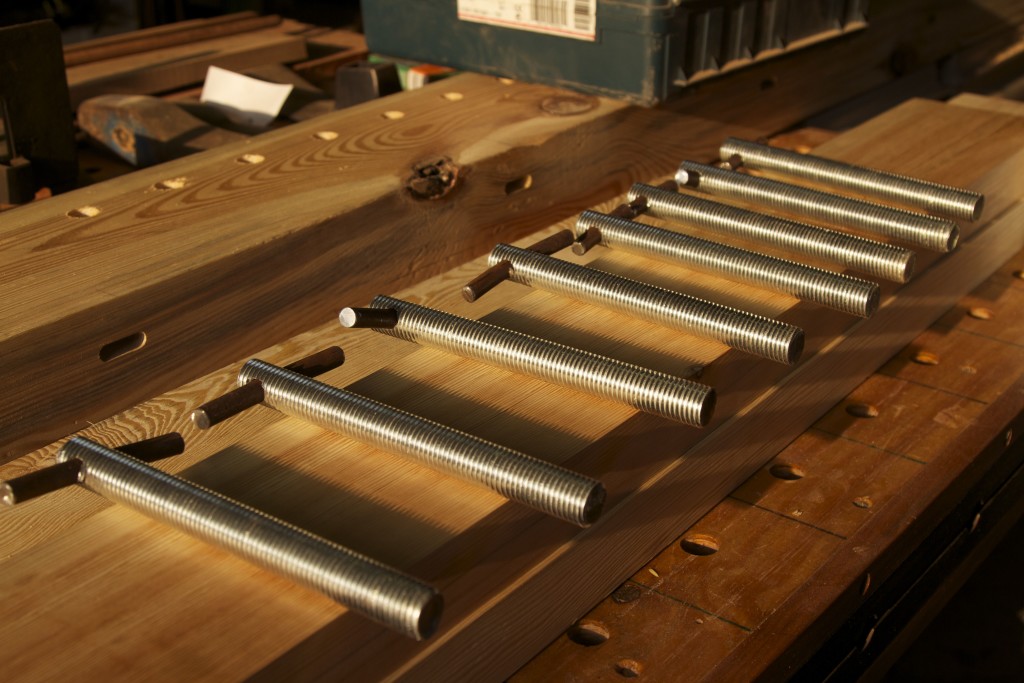
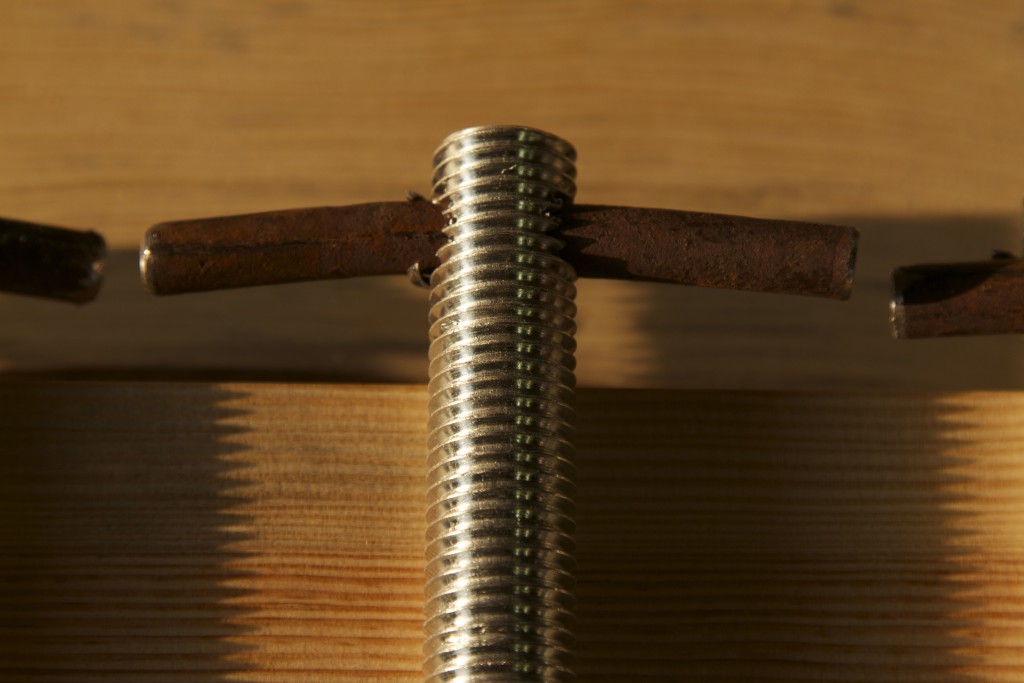
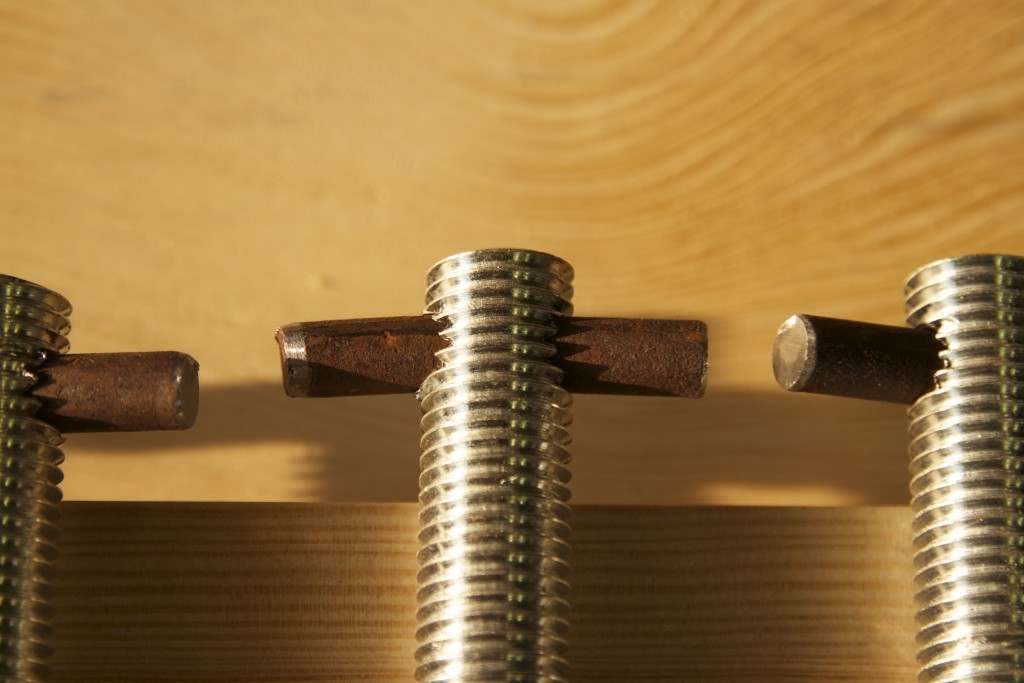
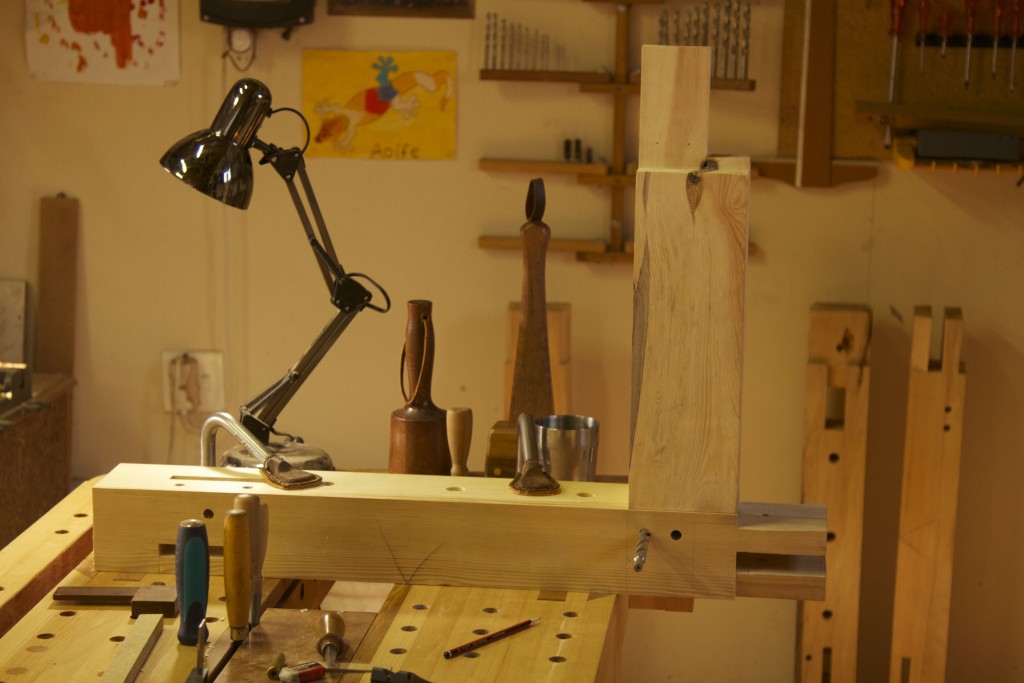
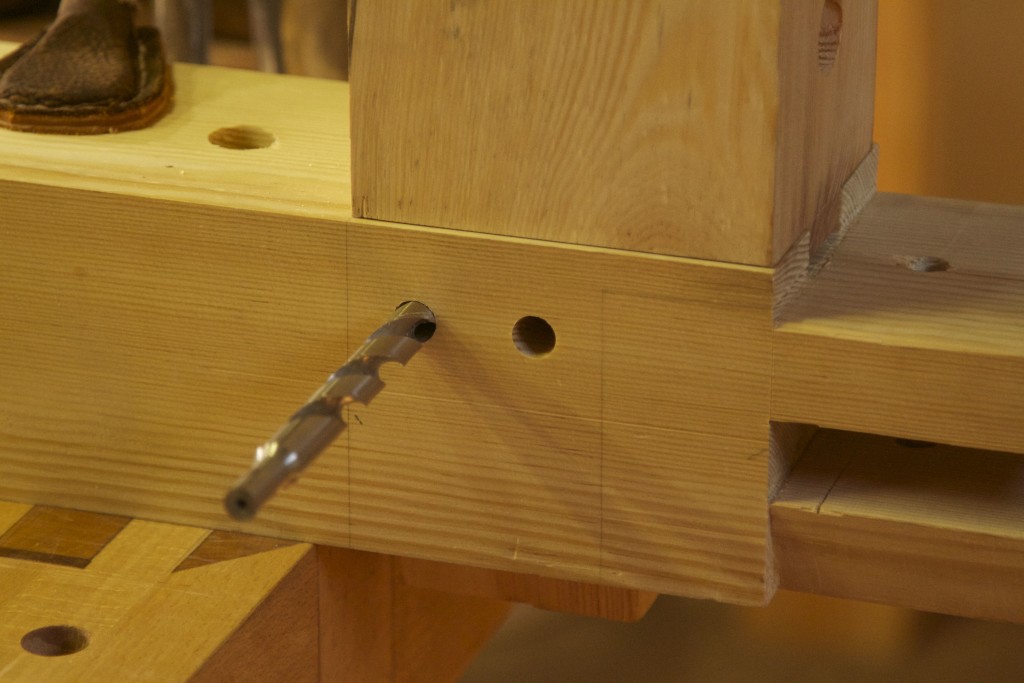
The pictures below should  suffice as an explanation of how I created the custom bolts, which will fix the top beams to the apron in conjunction with the Roubo joinery. As you can see, it is made up of galvanised 20 mm threaded rod and scrap mild steel rod forming a T. The ends of the T-piece is bent downwards ever so slightly to ensure that the custom hardware exert pressure across it’s entire length once properly fastened. We will call this the … wait for it … Marx-Roubo Bolt.

The idea is that the top of the T will be embedded/entrenched (and covered up with wood) crossgrain in the top, which will prevent it from rotating when it needs tightening due to possible seasonal movement of the wood. It also provides quite a wide area across which it exerts downward pressure to keep the top beam tight against the apron.

IMG_5037IMG_5038IMG_5039IMG_5050IMG_5041IMG_5042IMG_5066IMG_5069IMG_5068

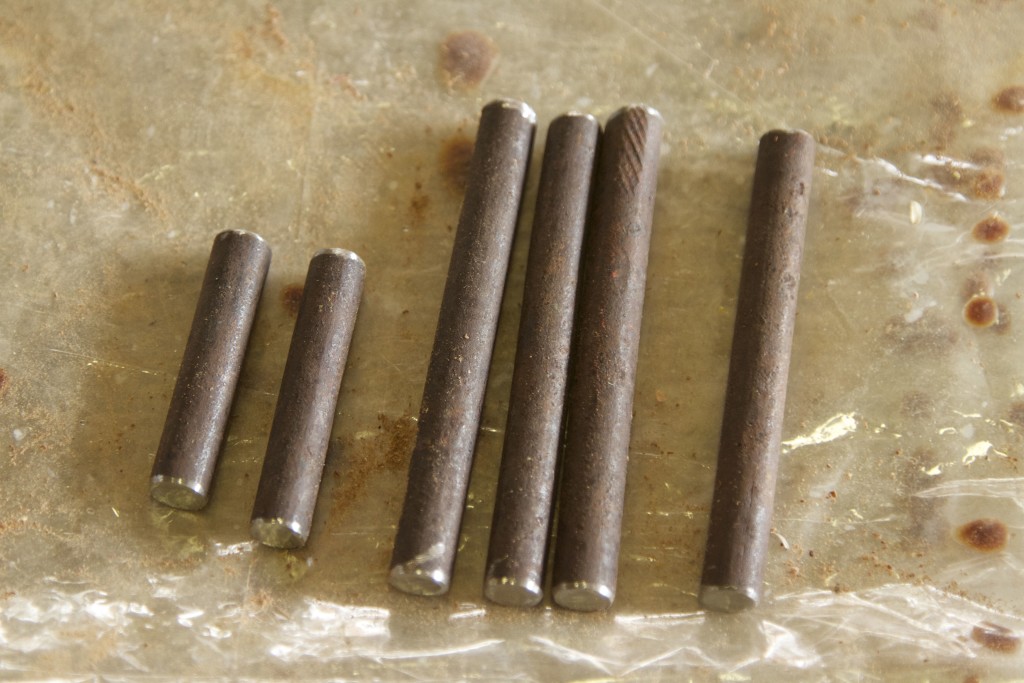
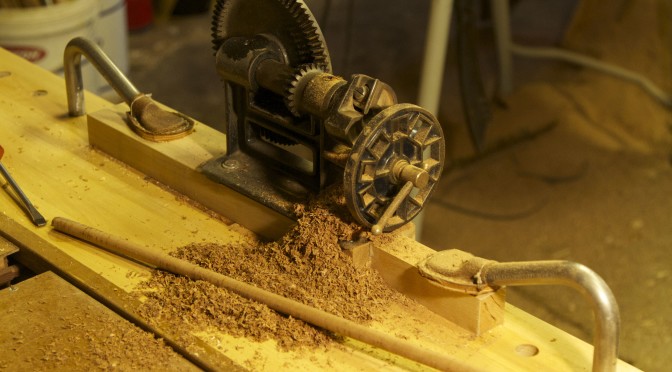
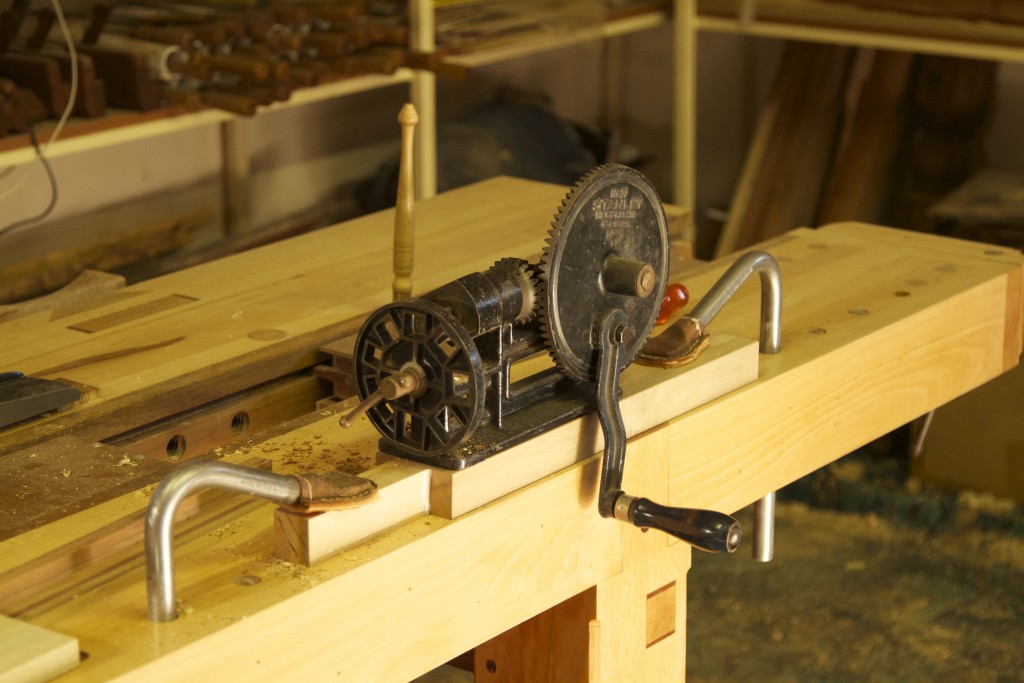
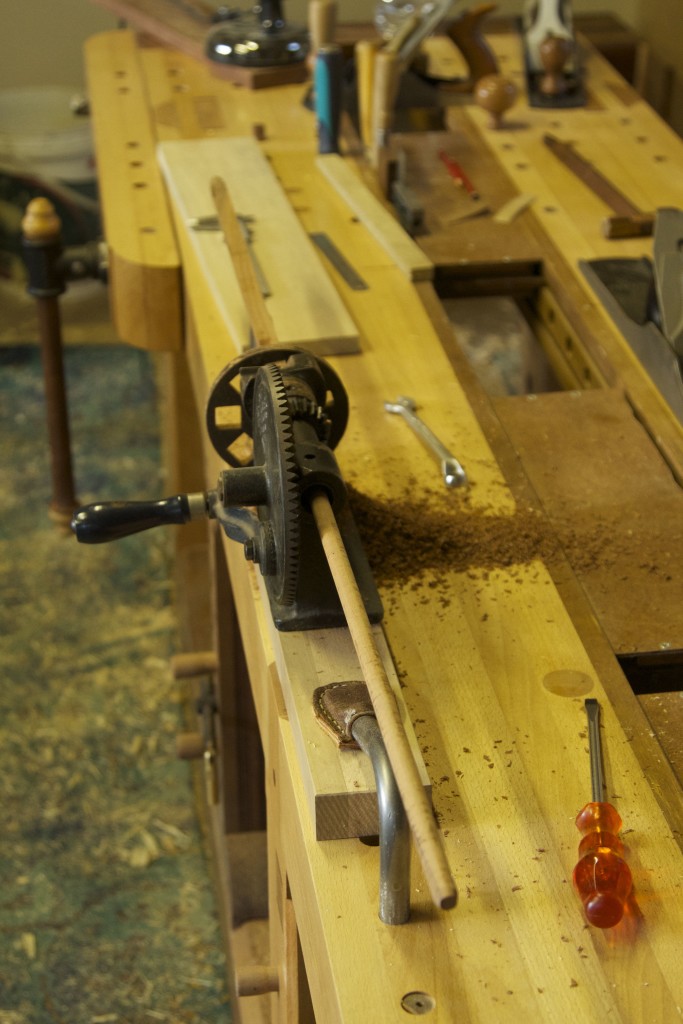
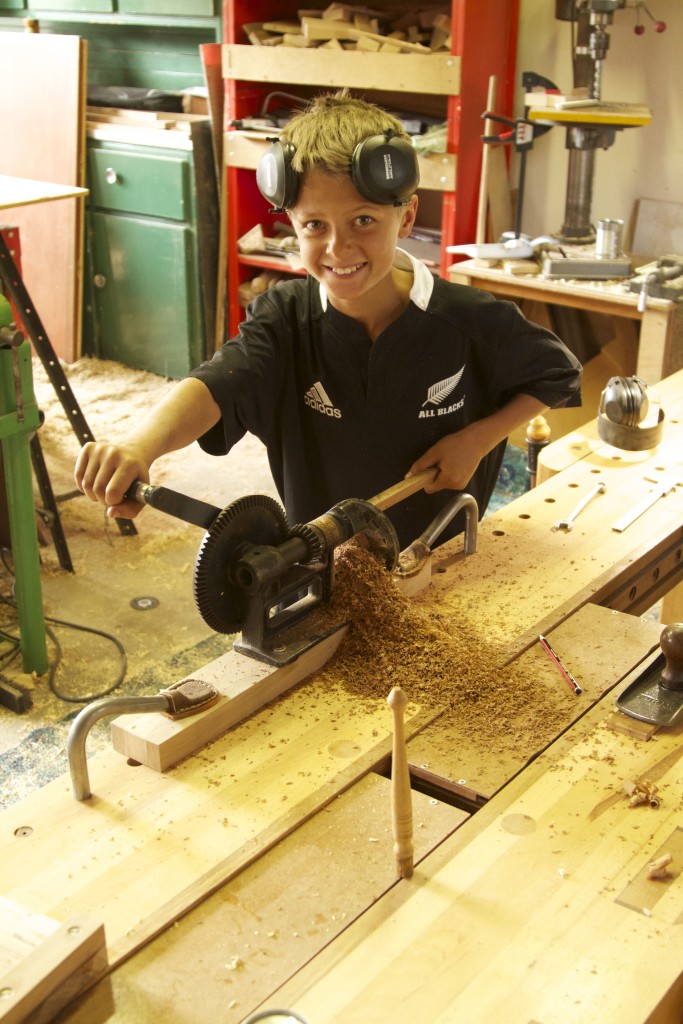
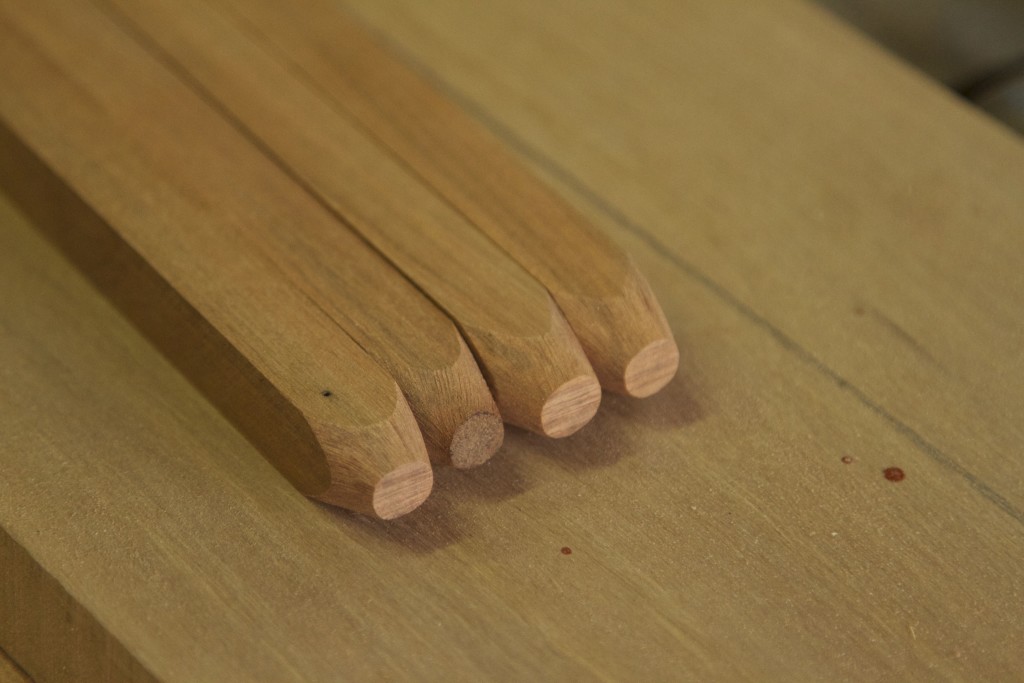
A task that I though would take me 30 min has been dragging on for the past week. I thought that my Stanley no 77 dowel machine  equipped with a ½” cutter would make short work of the 24 dowels (½” x 6″) I need for the bench. It turns out that perfectly straight grained Assegaai (Curtisia dentata) tends to fight the machine all the way.

I chose Assegaai as it is very hard, yet extremely flexible and does not move much at all once dry. The problem is that even with a very sharp blade it is hard work to make the dowels. On the upside, it is absolutely perfect dowel that emanate from the no. 77’s hind side (third picture). I will post some more pictures once the dowels are finished.

IMG_5032IMG_5033IMG_5036IMG_5035

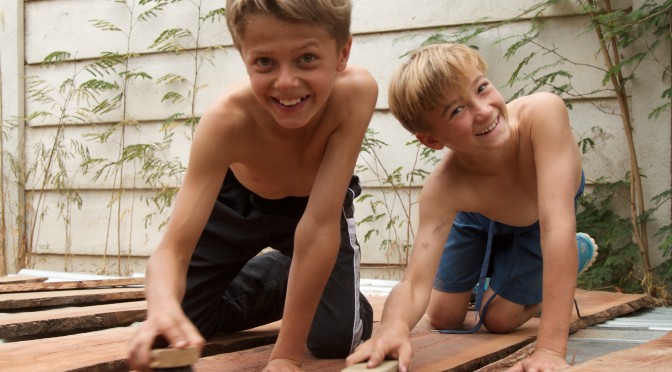
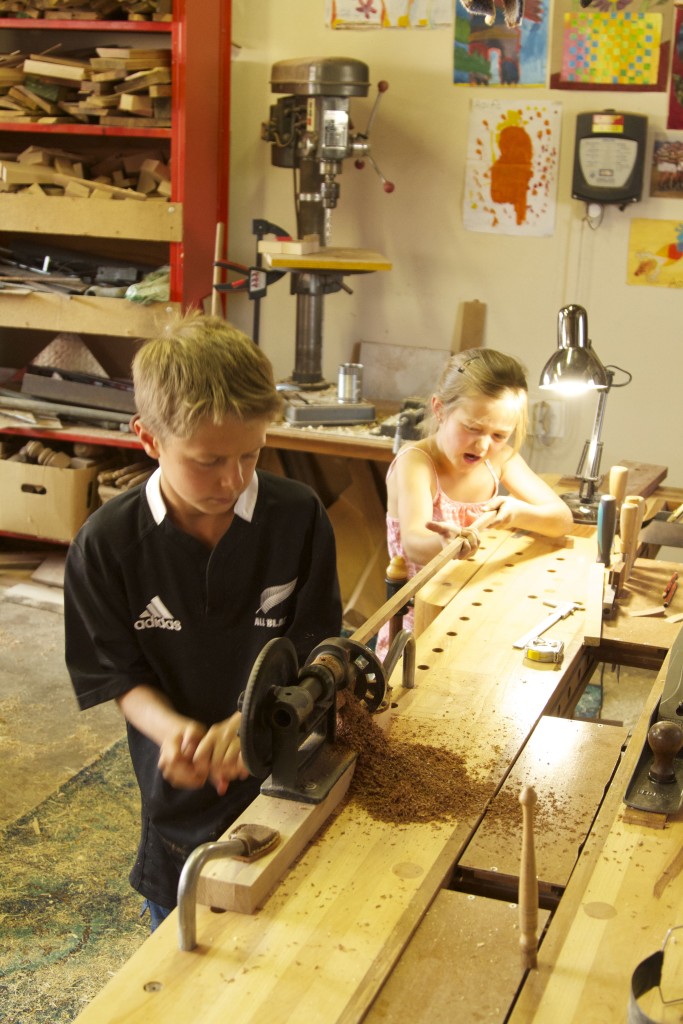
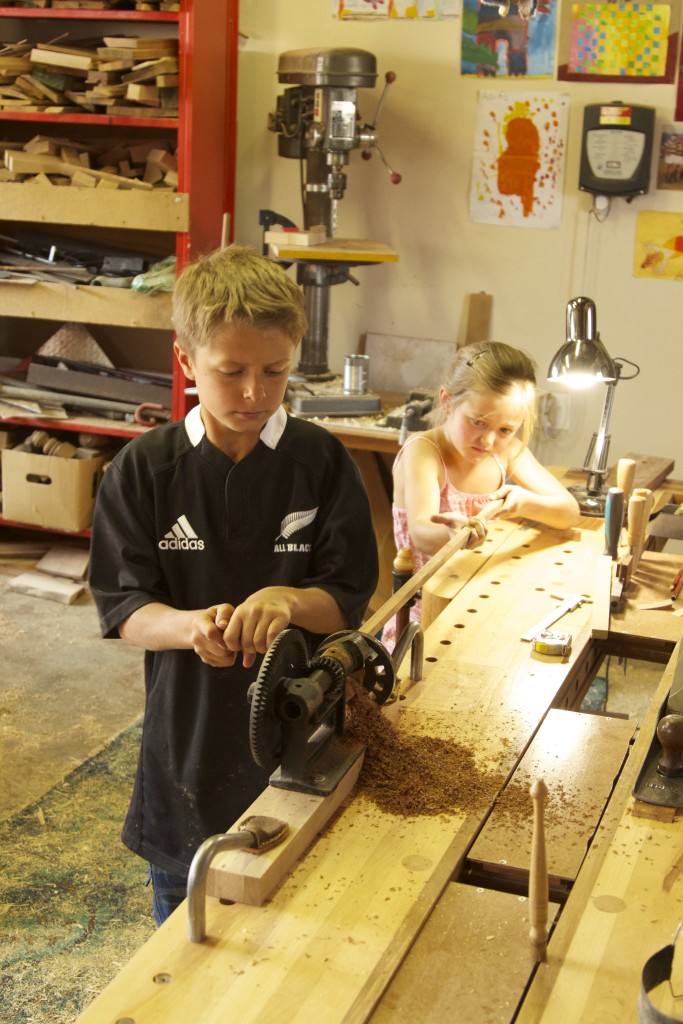
As you can see the kids also got stuck in once my arm was completely moer-toe.

IMG_5047IMG_5046IMG_5053

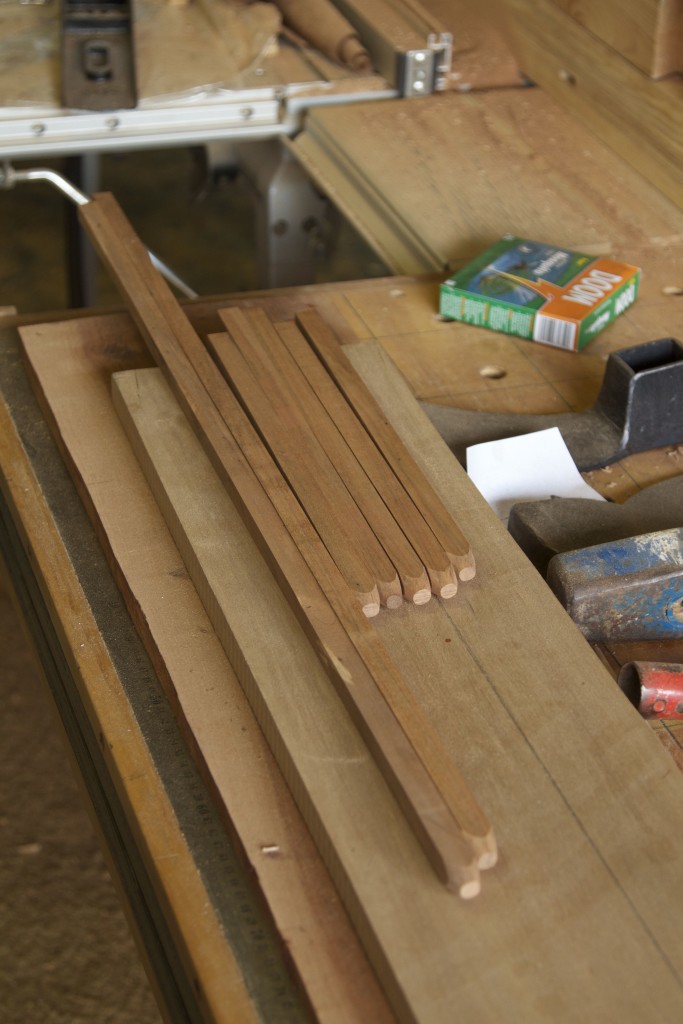
By the way, this is the stock I prepared for the no. 77. It is perfectly straight grained Assegaai pointed using the legendary new tool in my shop known as the BPS (Boorish Pencil Sharpener).

IMG_5051IMG_5061

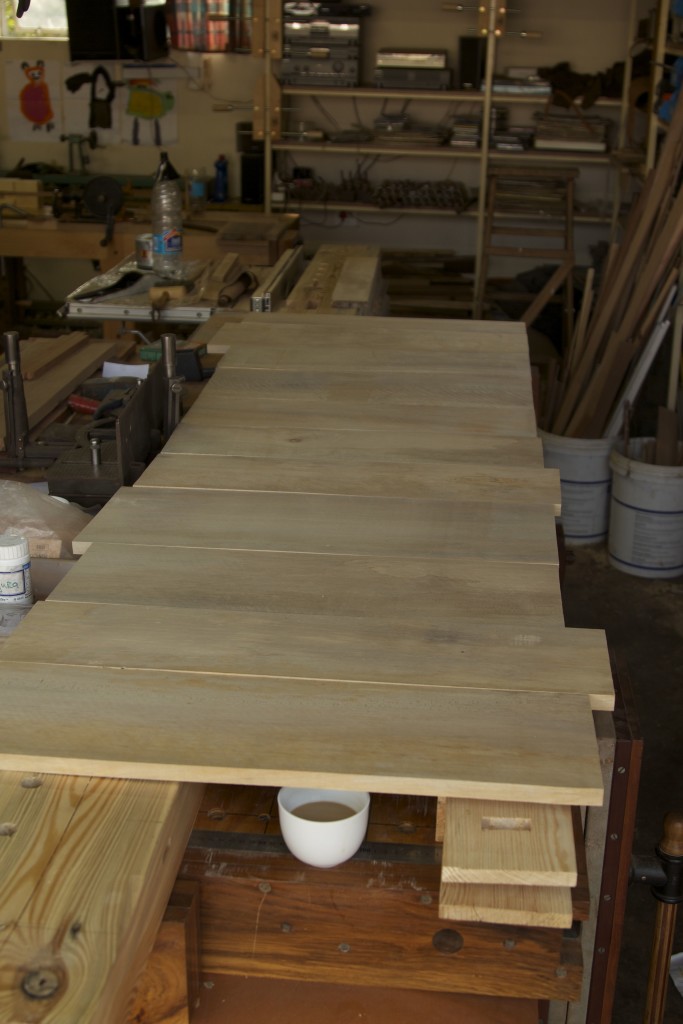
Due to the extreme exertion inflicted by the dowel making activities, I had to come up with ample “legitimate” reasons to take a break. One of those was to check whether I prepared enough Without to span the entire length of the shelve below the bench.

IMG_5057IMG_5059IMG_5058

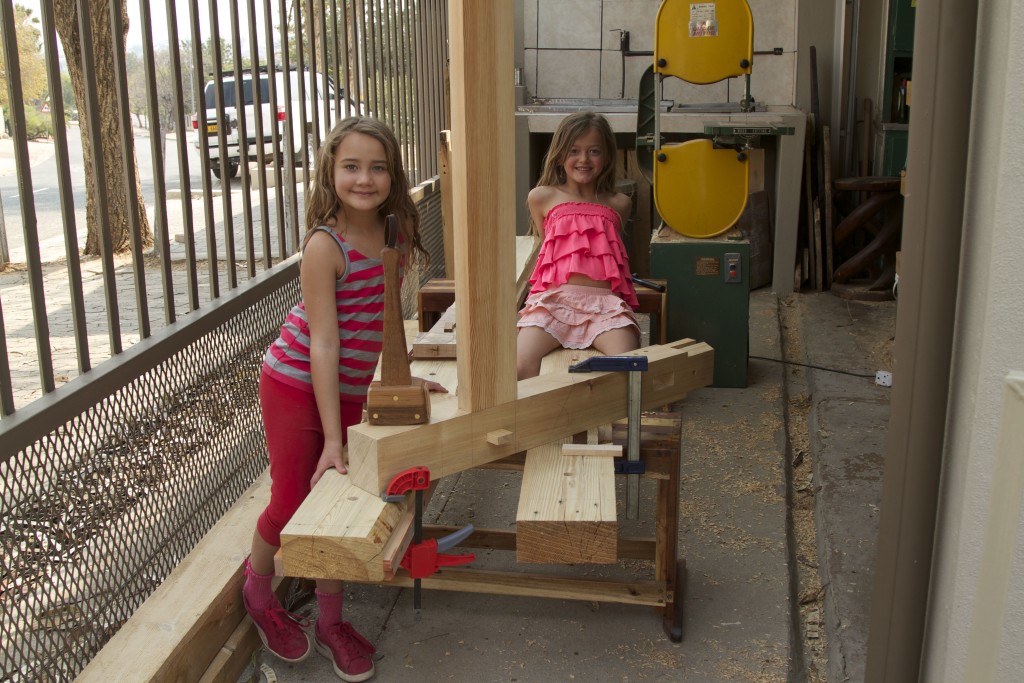
OK, so I have enough Without, … now what? Back to the Dowel machine? Eish!!, … maybe not just yet. How about fitting the last set of stretcher tenons? That sounds better.

These beautiful girls assisted me to do just that.

IMG_5063

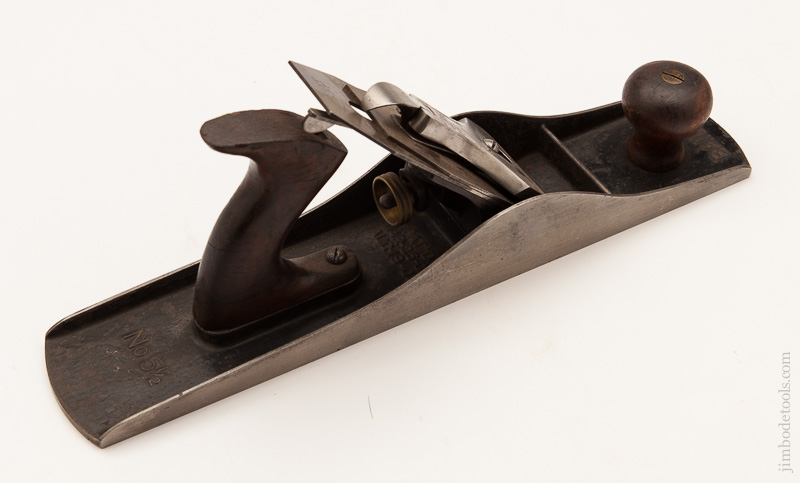
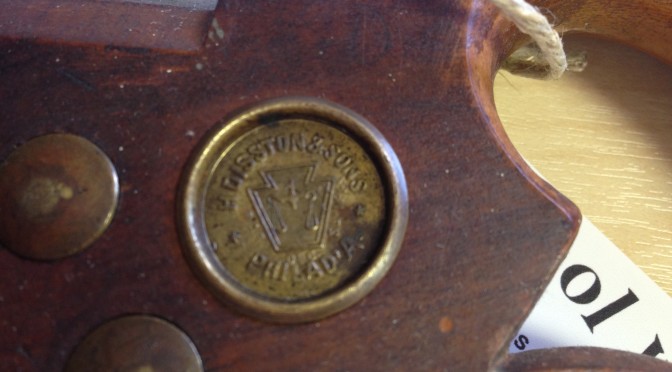
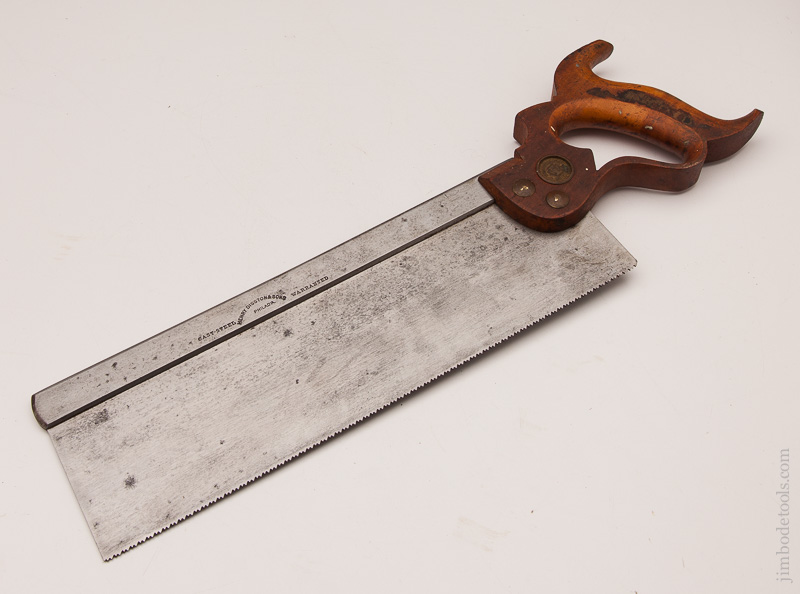
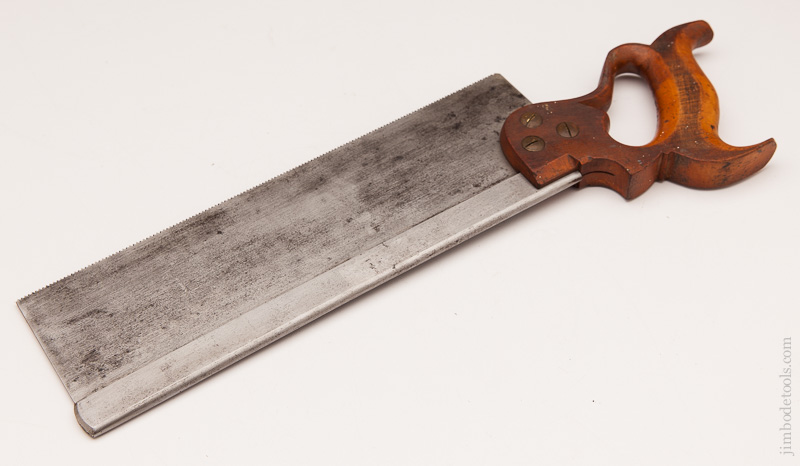
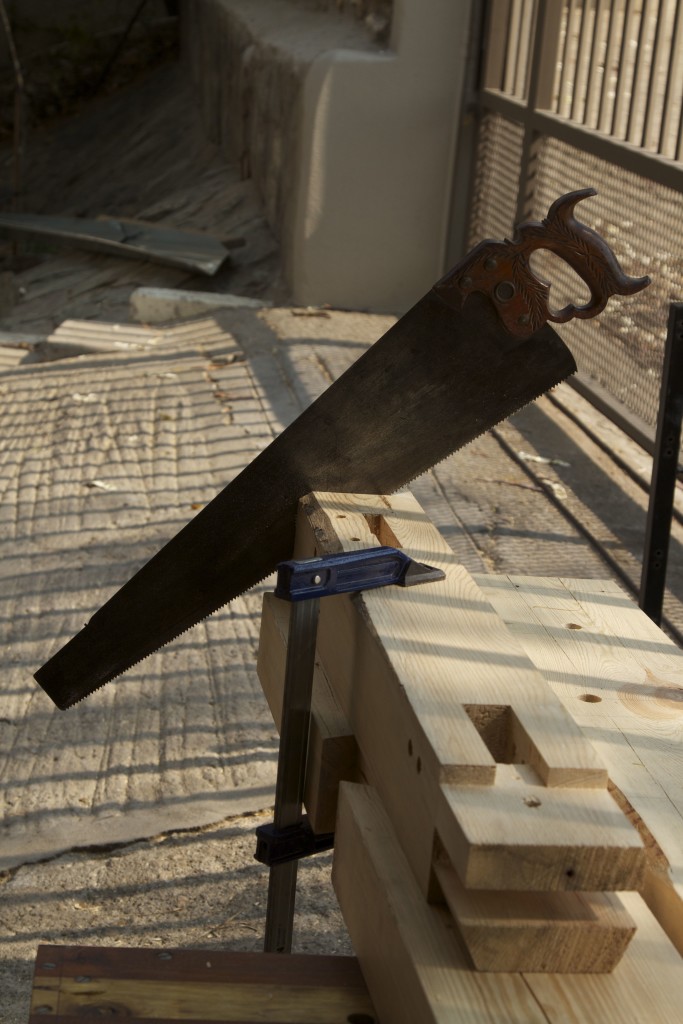
The legs were finally cut to length using my Disston no. 12 crosscut saw. It is without a doubt one of my favourite tools and probably one of the best that was ever made.

IMG_5065

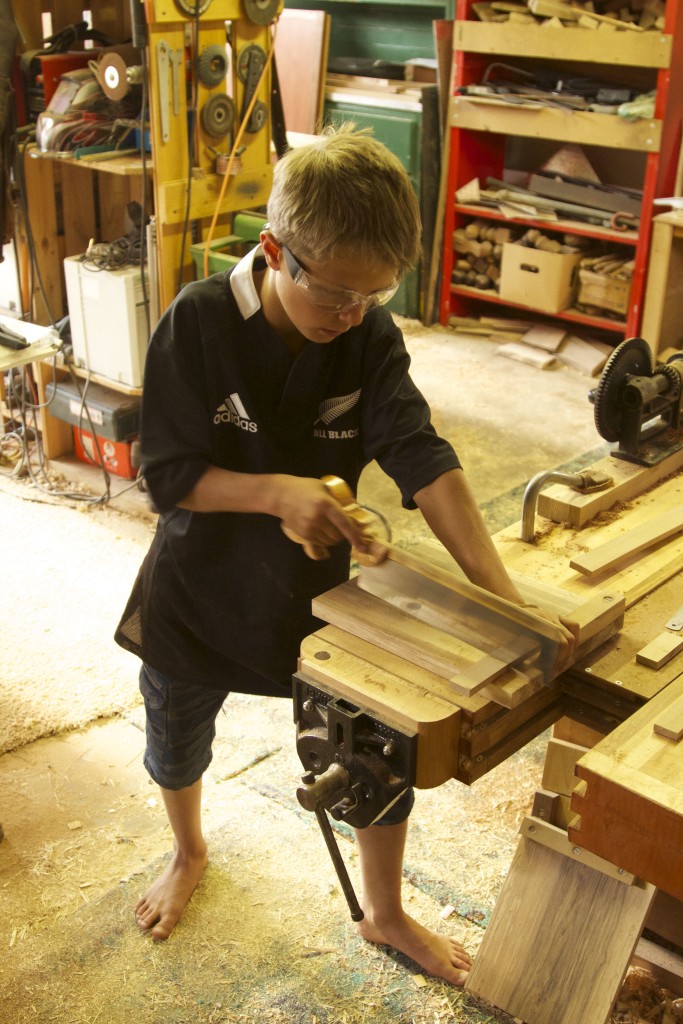
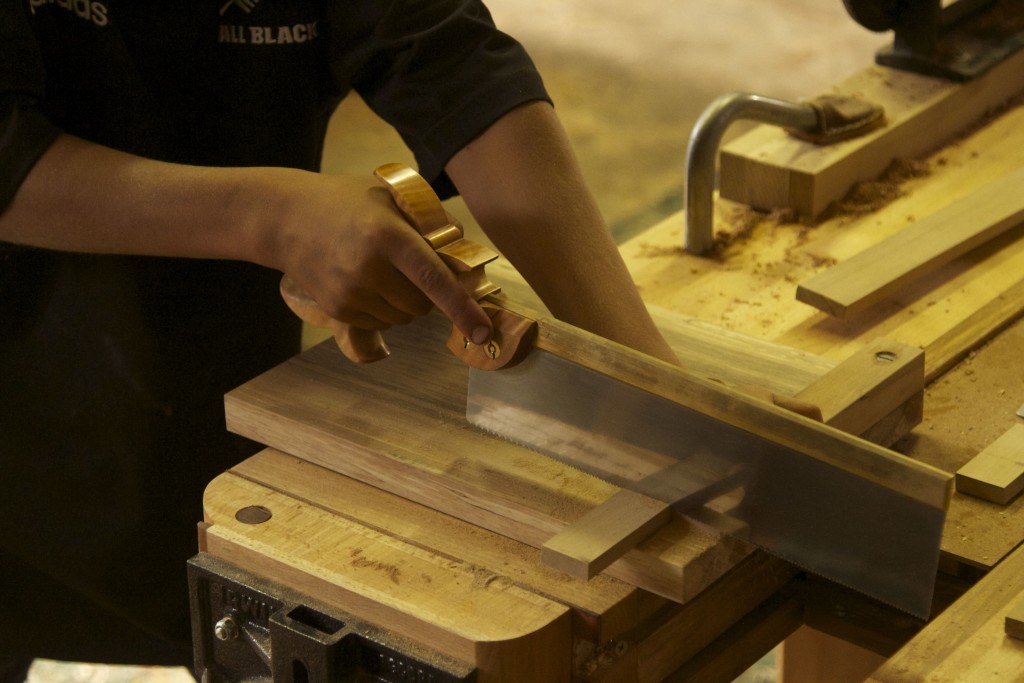
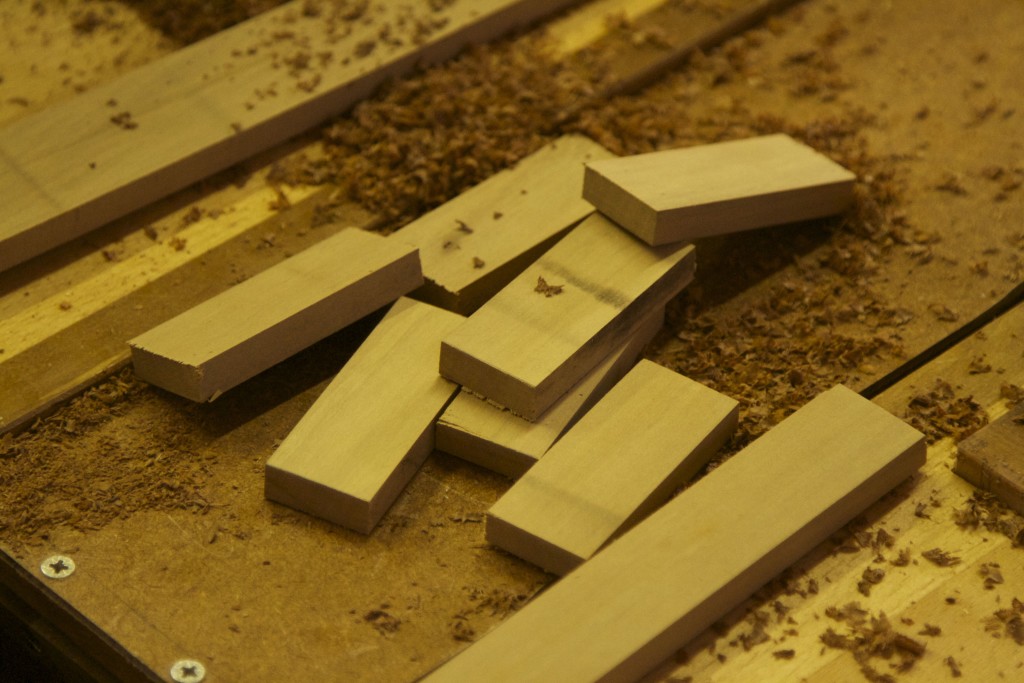
While all this was happening, my son Didi got stuck into making the Dominos we need. It was very good practice to hone his sawing skills.

IMG_5054IMG_5055IMG_5056

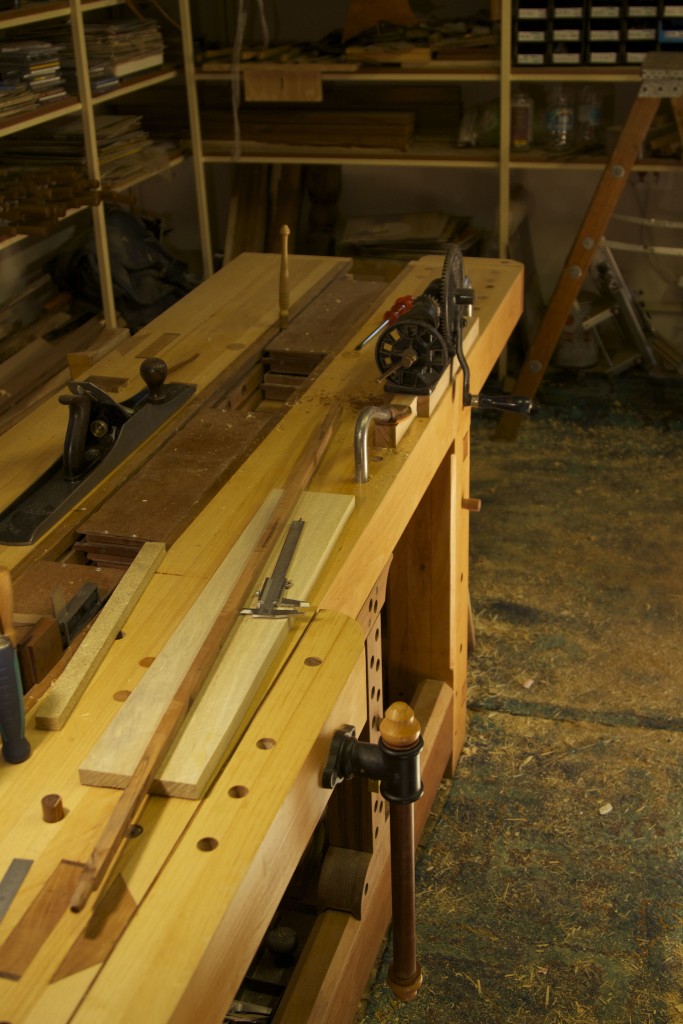
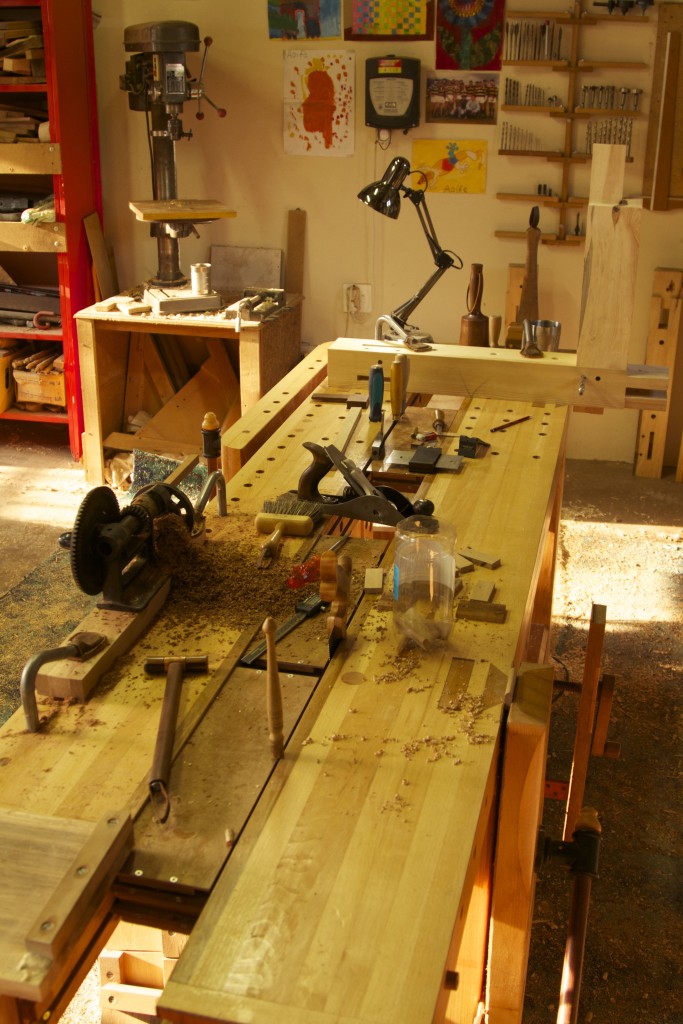
This is what a bench looks like where several different jobs are being done at the same time. I like jumping from task to task and have different stations set up for each. This way I do not get bored or tired doing one thing for too long. It works well for me, especially when there are tasks that necessitates serious stamina, like drilling a gazillion dog holes with a bit and brace, hand sawing 4″ x 5″ legs to length, creating dowels from Assegaai by hand etc, etc. The down side is of course that you need more workspace.

I am interested to hear what others think of this type of approach.

IMG_5070

Here I am using the ½” bradpoint bit to mark out the middle of the draw pin (Assegaai dowel) on the tenons. Once I know that location it is fairly easy to mark out the required offset for the hole through the tenon.

IMG_5071IMG_5072

Boorish Pencil Sharpener

7/9/2015

A few months ago I bought an electric pencil sharpener from Tools for Working Wood. Very excited with my new purchase I changed the plug (as we have different plugs in Namibia), inserted it into the power outlet and sharpened a pencil. Afterwards I saw some smoke emanating from the device, followed by a prompt discontinuation of function. On further inspection, I saw that this was a device made for 110 V power! Were the hell do you find 110 V in Namibia, I did not even know something like that exists!

I did, however, not allow my ignorance to get me down. This past weekend I found an old drill stashed away in a corner of the shop. It is in such a poor condition that it cannot be used as a drill anymore, but does still turn the chuck most of the time. For some unknown reason I thought of turning it into a pencil sharpener. Yes, I know it is probably a fire risk, can cause cancer (in California), might disturb the migration of several million mosquitoes during the next rainy season etc etc, but in Africa we do not fuss too much about stuff like that.

The result of my inventive activities is on display in the picture below. Unfortunately, it is probably the loudest tool in my increasingly hand tool orientated shop. One small downside of my ingenious invention is therefore that I need to use earmuffs when sharpening a pencil!

The BPS  works like a one armed bricklayer in Bagdad, but certainly would get some Greenies upset with the speed it churns through a forest. Please feel free to let me know how dumb (and/or politically incorrect) I am, or alternatively how I can find 110 V electricity in Africa, or how to turn the 110 V sharpener (what is left of it) into a 24O V consumer.

IMG_4988