All posts by Gerhard Marx

Psychiatrist and Woodworker

My second commission – part 8

20/10/2016

We finally arrive at the stage of this project that has generated the most anxiety for me. It will be my first attempt at using Windsor technology in any piece of furniture. As you know from the previous posts in this series I have completed the bulk of the so called trapezoid leg, so now we need to grapple with the so called Windsor leg. The rest of the table was inspired by (and leans heavily on) the work of George Nakashima, but this leg is entirely my creation. Having said that I am quite sure there would be similar designs out there, but it was not something I can remember seeing on the net during my research phase.

The idea with this design in general is that it suites the feral nature of the wood I have available. As most of you probably know, Nakashima was a master in the art of allowing the wood to speak for itself. The idea behind this particular leg is to create an elegant counterpoint to the otherwise rugged robustness of the design. It is meant to establish a sense of the top deceiving gravity. In other words, I wanted it to appear as if the top is floating in mid air. There will be a few more details added to the inside of the trapezoid leg to further enhance the mentioned effect, but for that you will have wait.

IMG_6279
A quick reminder of what we are aiming for, a few pics of the prototype.

IMG_6282IMG_6283

As you might remember the Kershout beams that will form the top and the bottom of the Windsor leg were laminated previously. My first step thus, was to square up a face and an edge by hand planing. I included the monstrous beam that runs between the two legs (at floor level) in this process as it has exactly the same dimensions i.e. 66 mm x 88 mm.

img_7445img_7446

The electric planer then leached off my elbow grease to flatten the opposite sides of the beams.

img_7447img_7448img_7449

The spindles presented the first major challenge. I did not want to laminate stock for the spindles as it would be very obvious in the final product. As I discussed earlier in this post these spindles also need to be elegant, which are the two main reasons why I prepared Kershout stock in the order of 1″ (25 mm) x 1″. As you can see the square stock was first planed into an octagon-shaped spindle, before it was introduced to the lathe.

The major challenge of turning these spindles was that I purposefully kept them ever so slightly bowed (lengthwise) as it would aid in turning more natural looking bamboos. Yes Bamboos. I want these spindles to look like bamboos to fit in with the Japanese theme of the table’s design, as well as the feral nature of the timber that was chosen.

That of course is no drama at all, but as anyone knows who’s tried to turn off centre work it is not a joke. You add to that the Kershout characteristic of being ridiculously hard and you have yourself a full-blown drama.

img_7534img_7535img_7536img_7537

In the end I was forced to use 60 grid sandpaper to do the rounding as every other more conventional technique wanted to rip big chunks of timber out at the fat end of the bow (if you see what I am saying).

img_7538img_7558

As you would expect, while rounding off the last of the four spindles I found that this particular one had an area where the grain developed a brief psychotic episode, which would have compromised the strength of it. Given the delicate nature of the design I could not risk any weakness to one of these four spindles, which meant that I had to start from scratch with fresh stock.

img_7559

25/10/2016

Once all the spindles were round and passed the grain-reading/strength test I marked out the location of the tenons and Bamboo’s nodes. As you can see I used the trapezoid leg as a guide seeing that the Windsor leg will mirror it’s shape. The angle of the spindles is exactly the same as the sides of the trapezoid leg i.e. 9º. The nodes were placed in such a way that the different sets of nodes (across the 4 spindles)  will form (partly invisible) chevrons pointing upwards. The chevrons are at 9º in relation to a line that run perpendicular to the spindle. Now that sounds very confusing, but it is the best my grasp of the English language will allow for.

Once all that was done I had to take the plunge and try to shape natural looking bamboos from spindles that is neither completely round nor completely straight. First, I very carefully placed the nodes using a skew lathe tool. After that I used 60 grid sandpaper to hollow out the internode segments ever so slightly. I purposefully made no attempt to shape them exactly the same. This was a deliberate ploy to have it looking more natural. Unfortunately attempts at making stuff look natural often ends up with it looking tacky, which was one of my main concerns. Luckily it came out looking reasonably good.

img_7576
In this picture you can see how the slight bow in the length of the spindle made the nodes asymmetrical (for lack of a better term). The node is clearly much deeper on the left hand side than the right. This together with the slight inconsistency in shape and thickness of the internodal segments contributed to the natural look of the bamboos. Oh yes, that and the fact that the spindles are not completely round all over.

img_7573img_7574img_7575img_7581img_7582

Once all four of the spindles were roughly shaped, they went back to the lathe for finishing (sanding with progressively higher grid sandpaper) and the shaping of the tendons.

img_7583img_7585img_7588img_7586img_7587img_7589img_7590

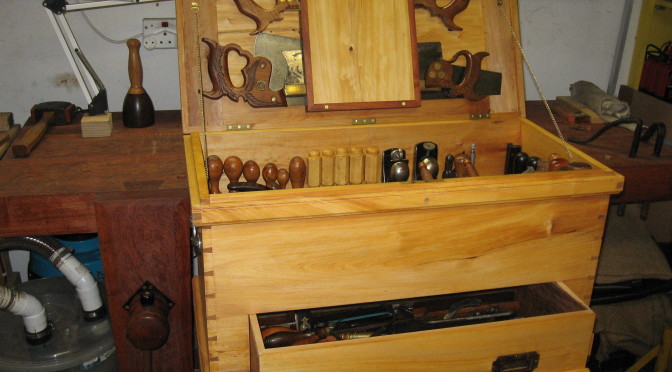
At last it was time to use a set of hand tools I made back in January. I am of course referring to my shop made Reamer and tenon cutter.

img_7624img_7625img_7626img_7627

As you can see here I again used the trapezoid leg to position the two beams of the Windsor leg before marking out the location and angle of the mortises.

img_7609

It all went swimmingly as I first drilled pilot holes on the drill press to keep the spade bit that followed honest. Unfortunately I decided to drill these pilot holes out (with the spade bit) at the end of a very long Saturday. The concentration was going south and it ended up with me drilling one of the holes in the wrong direction!!!!

Enter: Panic Attack! #@!$^%*(&^&*%#@%^!!!!!

Seeing that this is not the first stuff-up I have made in the shop, I know that it is better to just stop working and try to calm down. In this case I added an ice cold G&T to treat the acute exacerbation of my Anxiety Disorder. After my rational mind retuned, it became quite clear how to fix the indiscretion. I had to turn a piece of Kershout to the exact diameter of the hole and glue it into place.

Let this be a lesson to all of us, stop working when you get tired (or gatvol as we would say in this part of the world).

img_7610img_7611

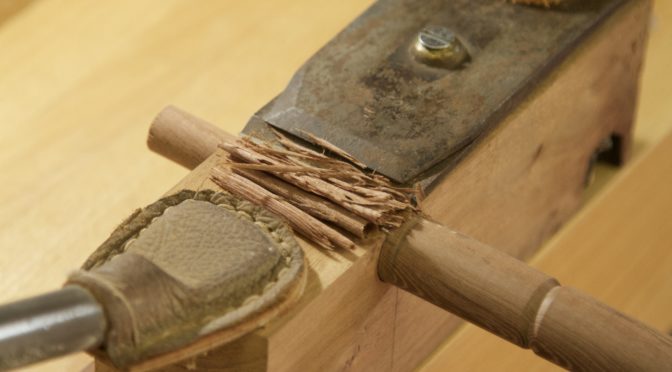
The next day I was able to plane the fix flat and drill a new hole, this time in the correct direction. After that I got to play with the second of my two shop made tools, the reamer.

img_7613

I drew a square around the hole before I started reaming. This helps to give a visual guide of the progress and alignment.

img_7612img_7615img_7616

I tend to do only 3-5 turns with the reamer before scraping out the debris (that tends to clog the reamer) and checking my alignment.

img_7619img_7620img_7621

I use this stick that has a tenon of the exact size and a straight shaft as a reference point for my bevel. That way you can make small adjustments as you go.

img_7617img_7618

One done seven to go.

img_7622img_7623

Please vote for Je ne sais quoi Woodworking

26/10/2016

I realised with a shock this morning that Je ne sais quoi Woodworking made the shortlist of 5 nominees that received the most nominations in the “Best Hand Tool Work Blogsite” category. It is a competition run by the Woodworkers Guild of America.

It was also a real delight to see my favourite blogger Jonathan White’s site The Bench Blog among the finalists. Congratulations Jonathan, it is well deserved.

I would like to ask all of our (Jonathan and I) readers who enjoy our reverie to please vote for us here. This a link to the voting page.

It is a wonderful feeling when you realise that there are people out there who actually finds my musings useful, so thank you to all of you out there who took the time to nominate Je ne sais quoi.

Je Ne Sais Quoi Woodworking received a nomination for the Blogger Awards

A big thanks to Jonathan White from The Bench Blog for the nomination. He on the other hand was nominated by the Woodworkers Guild of America themselves and I would like to encourage anyone out there who enjoys his excellent blog to do the same. After learning about the nomination of JNSQW, I in turn nominated Robert Demers’ blog The Valley Woodworker.

I want to ask our readers who finds these blogs useful to keep nominating as it seems only the blogs with the most nominations will end up being selected for the voting stage of the competition.

You can go here to check out how the competition works.

Let’s see if a woodworking blog from Africa can make it in America?

A table for a shebeen

9/8/2016

Actually, from my feverish and extensive research through the length and breadth of this fair land, a table is by no means compulsory in a shebeen. In fact the only compulsory ingredient is a delinquent supply of Zamalek and/or Windhoek Lager. However in the few exceptional cases where it were found to be present, it was a very welcome addition.  So I thought my shebeen should have one, but it took a long long time to find all the ideal ingredients to build a shebeen proof/worthy table.

This project got underway in late July after I managed to secure a beautiful slab of wood from a friend who insisted that he did not want any money for it. In the end I gave him a Record no. 6 fore plane that I restored some time ago as payment. The slab of wood will make an ideal top for a table in Wamboland (our shebeen in the backyard).

Just to remind you what Wamboland looks like, a few pics.

IMG_7039IMG_7045IMG_7046IMG_7048IMG_7053

And here it is, a massive slice of Eucalyptus. Unfortunately I do not know much more about the origin and specific species of this wood. I know it came from South Africa and measures up to 2700 mm (length) x 1000 mm (wide at one end and 1200 at the other) x 70 mm (thick). After a bit of research on the net I would say it is probably what is called Rose Gum or Eucalyptus grandis, but by the time it is finished some of our Australian friends will probably give us a better idea of the exact species.

IMG_7265
I decided that this will be the underside.
IMG_7293
This will be the side facing upwards.

IMG_7266

I apologise for the poor quality of this picture due to the contrast in lighting. What I am trying to illustrate is how I marked out the longitudinal centre line on the underside of the slab. Seeing that it is wider at one end than the other, I measured out the centre at each end and tapped in a panel pin. A piece of string stretched between the two pins then helped me to mark out the centre line.

IMG_7302IMG_7303

I used trammel points (not pictured) to divide the length of the slab into 5 equal parts along the centre line. The areas to be flattened for the legs were then marked out perpendicular to the centre line at the intersection between the 1st and 2nd fifth, as well as the 4th and 5th fifth. I hope that makes sense to native English speakers.

The first of these areas were flattened using my Festool router with the guide rail. I propped up the rail with bits of wood to stop it from bending. This was a very unpleasant experience. I have developed an allergy to electrical routers. They make too much noise and feel very unsafe to me.

IMG_7304IMG_7305IMG_7306IMG_7307IMG_7308

The waste was removed by chisel and a slick (not pictured).

IMG_7309IMG_7310

At this stage it was time to start the process of preparing the reclaimed Scots Pine, which will become the undercarriage of the table. I wrote a post on the origin of this wood which you can find here. These beams were first cut to length using my Disston no. 12 24″ crosscut handsaw and then ripped where necessary on the bandsaw. Unfortunately this was also the last job I will ever be able to do with this Chinese made 1982 model bandsaw, as it raised the white flag after an admirable career. Now I am in the market for a good affordable bandsaw, which is something that is probably impossible to find given the #Nenegate #Zuptamustfall #Nkandla #Failedtoupholdtheconstitution #Paybackthemoney #Khwesi #Itookashowerafterwards #eleventyseventyhundred #UntilJesuscomes-induced currency tragedy. RIP my dear friend, you have served us well (in reference to the bandsaw, not you know who).

IMG_7336IMG_7338IMG_7339IMG_7343

8/9/2016

OK so back to the top. The second of the areas that needed flattening had quite a big bump in it. I decided to use my Festool tracksaw rather than the router.

IMG_7385
The bump should be quite obvious to see from this angle.

IMG_7383IMG_7384

As you can see below, I again propped up the guide rail with bits of wood until the two winding sticks were lined up perfectly. This ensured that the two flattened areas would be in the same plane (or wind free if you like).

IMG_7386IMG_7387IMG_7388IMG_7389

So in this case I made a series of cuts checking the orientation of the guide rail with the aid of the winding sticks prior to each cut.

IMG_7390

I got lucky in that this area ended up “open” on one side, which allowed me to get in there with my shop made scrub plane to remove the waste (in conjunction with a slick and a chisel of course).

IMG_7391IMG_7392IMG_7393IMG_7394

This is the slick I mentioned earlier. The actual slick handle were removed for this job, so I simply seated an old pairing chisel handle as I did not feel up to turning a custom one for such a quick task. It is a Peck, Stow & Wilcox (PEXTO) for the sake of the tool geeks (like me).

IMG_7395IMG_7396

Seeing that there is a major crack in this slab of wood running all the way from one end to the other, I wanted to ensure that it does not fold like a book being closed when the top is handled during the building process. It actually feels quite resistant to such movement, but you never know. In order to lend it some extra support I screwed down these two heavy blocks of wood across the crack. I know, I know, possibly more screws than needed #JonathanWhite!! This is of course only a temporary arrangement, while working on the top. Eventually the undercarriage will fulfil this role.

IMG_7397IMG_7398IMG_7399IMG_7400IMG_7401IMG_7402

Here you can see the legs, (some of the) stretchers and aprons after hand and machine planing.

IMG_7370

The legs being cut to final length.

IMG_7373IMG_7374IMG_7375

Hand sawing of joinery.

IMG_7377IMG_7378IMG_7379IMG_7380IMG_7381IMG_7382

12/9/2016

The pictures illustrate a technique that I employee fairly often now. I leave an area of waste which helps to stabilise the sole of my Lie-Nielsen router plane. Once the router plane have the area perfectly flat and to it’s exact depth I remove the waste and use the flat area created by the router plane as a reference surface for a pairing chisel.

img_7426img_7427img_7428img_7429

For some reason I did not take a picture of the part with the waste removed. Sorry.

img_7430

The next major task is to stabilise that massive split in the top Nakashima-style as approached from the side that will face upwards. For this purpose I had to laminate Kershout stock to created massive Dutchmen (aka doveltail keys).

IMG_7371IMG_7372img_7412img_7413img_7414img_7418img_7419

Now they need a cosy new home. As I have described this process previously I will not bore you with it again. The pictures will probably do the job anyway.

img_7420img_7422img_7423img_7424img_7425img_7433img_7434img_7435img_7436

Glued into position using slow setting epoxy.

img_7437img_7438img_7439img_7440

At this stage I am in a race against time as this top is living outside my shop (due to it’s size) so I need to finish my Dutchmen-placement-activities before the rain comes. If we are lucky we might see a few drops around the start of October. The top needs to be safe and sound under roof in Wamboland by then. Then I can happy toil away at the undercarriage (which does fit in the shop) until it is ready to be joined in matrimony.

My Second commission – part 6

9/8/2016

It has been a long time since I posted the previous update on this project, so here goes.

Maybe we should first just remind each other what we are aiming for. Below are two photos of the final version of my protracted design process in the form of a small mockup. In this post you will see how I progress with work on the solid trapezoid shaped leg and stock preparation/lamination of the various parts of the so called Windsor leg.

IMG_6281IMG_6279

In the pictures below you can see how I cut dovetail keys from Kershout. I recently learned that the these keys which were made famous by George Nakashima are also known as “Dutchmen”. Why, I do not know, maybe Dutchmen like wearing bowties??

IMG_7253IMG_7254

The keys placed on the face side of the trapezoid leg.

IMG_7256IMG_7257

The Dutchmen is meant to stabilise natural cracks in the wood. Of course it also adds a certain je ne sais quoi, as you would expect.

IMG_7258IMG_7259IMG_7260IMG_7261IMG_7262IMG_7263IMG_7264

I used slow setting epoxy to fix the Dutchmen about two thirds of the way into the thickness of the Witpeer panel. As you can see they stood proud of the surface of the panel by quite some margin (post insertion).

IMG_7271IMG_7272IMG_7273IMG_7274IMG_7275

As a result of how incredibly hard the Kershout is and the amount of material to remove I followed the approach pictured. Several crossgrain cuts with a carcass saw, followed by chisel, followed by Jack plane.

IMG_7276IMG_7283IMG_7277

The two edges of the panel were then laminated with the off-cut piece of Witpeer flipped over head-to-toe and back-to-front. This ensures the best colour match possible and per definition results in the grain running perfectly in the same direction. The lamination on the one hand aims to create a component that is twice as thick as the top of this table, which is a choice made in the interest of pleasing proportions (from a design perspective). It also creates space to hide a second layer of strips that run perpendicular to that of the first layer. This is quite useful when working with my beloved feral hardwood as it has a tendency to warp in the absence of something to keep it honest.

IMG_7285IMG_7284

As you can see below, I used Dominos to keep the edges flush during glue-up.

IMG_7286IMG_7287IMG_7289IMG_7290IMG_7292

After glue-up the edges were cleaned up with a hand plane.

IMG_7295IMG_7298

Next came the preparation of the strips of wood that will run perpendicular to the grain of the trapezoid panel. This involved the usual array of tools including winding sticks, straight edge, and hand plane.

IMG_7267IMG_7269

As this will ultimately be a layer that will be completely hidden from sight, I used proper off-cut level stock.

IMG_7268

Preparing lapjoints  at end of the perpendicular strips.

IMG_7299IMG_7301

Followed by the mating lap joints in the raised section of the trapezoid panel.

IMG_7311IMG_7317IMG_7318

A useful trick that I employed here is to leave a narrow strip of waste intact to support the sole of the router plane while shaving 90% the floor of the lap mortise (for lack of a better term) perfectly flat and to the desired depth. Then it is easy to use the flat area as a reference surface for your chisel while pairing away the remaining waste.

IMG_7320IMG_7321IMG_7322IMG_7324IMG_7325IMG_7326IMG_7327IMG_7328IMG_7332IMG_7331

The gaps you see in the lap joints are there to allow for ample movement of the trapezoid panel with changes in ambient humidity, while the perpendicular strips resist warping. You will also note the slots around each screw which allows for the same thing. I used my Festool Domino to cut the slots. At this stage the leg is ready for it’s final layer, which will cover up the perpendicular one and take the thickness up to 44 mm. More about that in a month or so as we now have to first build the other leg using Windsor technology!!! It will be my first time so I am stressing!!!

IMG_7329
This picture was take before the joint was fitted perfectly, but does show the gaps left to allow movement.
IMG_7348
Here you can see the lap joint after proper fitting.

IMG_7330IMG_7335IMG_7344IMG_7345IMG_7346IMG_7347

At the level of the paint bucket you can see the Kershout I chose for the Windsor leg.

IMG_7337

6/9/2016

I can assure you that the time and effort it takes to liberate the few pieces of Kershout (aka Candle Wood or Pterocelastrus tricuspidatus)  pictured below from the pile pictured above will surprise you. This stuff is very hard and extremely heavy. It actually sinks in water!!! The Kershout is the deep red coloured wood.

IMG_7351
I am sure it is quite obvious from this picture that even after liberation and some planing these pieces still look as wild as a pet rhino.

IMG_7349IMG_7350

Below I am laminating the top and bottom beam of the Windsor leg.

IMG_7366IMG_7367IMG_7369

In the next addition of this series of posts we will plunge into the world of Windsor technology.


Coconut shell lights

20/6/2016

I would like to apologise sincerely for my long absence from the blogosphere. We lost our internet connection at home for several weeks which curtailed my ability to load photos to this website. I also missed out on shop time for over a month due to traveling and other challenges. At the moment though, I am back in action working on several exciting projects.

As you might remember from a previous post, we had a wonderful week in Thailand some months ago. We picked up a whole heap of coconut shells in Ying’s (our cooking class teacher) backyard. They were then smuggled in our luggage via Hong Kong back to Namibia. A few of them were damaged during the arduous trip, which I then turned into spoons. The rest were lined up to become lights.

It is quite a mission to get rid of the fibrous material on both the in and outside of the hard shells. I used the wire bits pictured to do just that.

IMG_6938IMG_6929IMG_6999IMG_6996IMG_6997IMG_7000IMG_7001

For the other halve of the light I used empty tin cans from household use. The big hole is for the light fitting.

IMG_7002

The cans were then snipped into four strips to allow it to flare open.

IMG_7010IMG_7011

Each of the four strips are attached to the edge of the coconut shells with one self-tapping screw.

IMG_7004IMG_7005

In order to allow light to shine through the shells I drilled sets of “carefully messed up” holes. The inspiration for this is Aboriginal art from Western Australia that I saw many moons ago while at a Congress in Perth. As I am sure you can imagine, this took ages to accomplish.

IMG_7012IMG_7013IMG_7015IMG_7016IMG_7017IMG_7018IMG_7019IMG_7022IMG_7023

One coat of Woodoc enhanced the beautiful natural colours of the shells.

IMG_7033

I decided not to include any photos of how the lights were wired up as it might become a legal liability for this website, not to mention the myocardial risk in might impose on people like Jonathan White. So here they are hanging off the roof of our Shebeen called “Wamboland”  located in the backyard.

IMG_7044IMG_7046IMG_7045IMG_7404IMG_7406IMG_7407

An accidental arty photo.

IMG_7403

As an added bonus I include a few picks of super hot Namibian chicks hanging out at the Shebeen a while ago. If some of the photos are less than perfect it is because they were not able to keep still for long enough given the slow shutter speed in such a low light setting. Certainly not as a result of anything to do with the photographer!!

IMG_7039IMG_7053IMG_7054

Why do we collect tools?

20/6/2016

This is a question that came up in a recent discussion I had with Frank Bartlett and Bob Demers. I thought it could be a good idea to have a wider discussion to hear what other woodworkers and collectors of woodworking tools have to say. To get you thinking I will try to verbalise my ideas on the topic.

As a (very much) parttime hobbyist woodworker I do not get to spend a lot of time doing woodwork. It is a constant frustration, especially when you end up not being able to do any work for almost a month, like what happened to me recently (hence my prolonged absence from the blogosphere). During times like that the only thing I can do is to use the little bits of time I do have to read about woodworking or tools. When I think about it, I probably spend a hell of a lot more time reading than working (woodworking that is).

I sometimes get the impression that some bloggers/writers tend to make negative comments about people who read more than what they work. It creates a type of stigma which I think is very unhelpful. Most of the woodworkers that form part of the online woodworking community are not able to make shavings constantly, but tends to read as much as they can because you can do that in short breaks at work, on holiday etc. They are therefore perhaps slightly less skilled, but usually quite a bit better informed about various historical aspects of the craft. That certainly does not make their contribution less valuable or in any way inferior.

Now that I have opened that can of worms, I would like to argue that it is this specific dynamic that has the biggest influence on my collecting tendencies. Reading about various different tools, how they are used, who made them, why they are so “essential” etc etc, plays a huge role in that urge to find such a tool. Once you find one, especially a really old one, it is like finding a treasure of some sort and therefore quite a challenge to resist.

That brings me to another angle on the same basic idea. It is very strange how life can sometimes go full circle. When I had to make the decision to drop woodworking as a subject at school, I replaced it with History. It is a long story which I explained in a previous post, which you can find here.  Despite history being something that took me away from woodwork I have a suspicion that it now plays a role in my fascination with tools.  Partly as a result of my interest in history, I find it extremely fascinating to read about the history of tools, the companies who made them and learning how to date the tools according to various features that changed over the years of it’s production.

Once you (armed with the above knowledge) then come across a tool that you know was for example made before 1900, it becomes irresistible, especially if the price is ridiculously cheap. It almost feels like time traveling when you have the privilege of using a tool that was used by other craftsmen more than a 100 years ago. In this way you also become part of that history.

At this point I have to state that I still like to think that I buy tools to work with rather than put them on a shelve (of course with no judgement on those who prefer doing just that). I can back that up by the fact that I am buying a lot less now than before. I almost have a complete set of stuff I need for the work I am doing at this stage. Well, to be honest the unprecedented  weakening of our currency also played it’s part. Despite that I now only tend to buy very specific tools that I need for certain tasks that would be difficult with my current set.

Again there is probably a caveat to the above statement that would be important to add in the interest of complete transparency. I have been able to find a way to justify further “unnecessary” tool procurements. If I see a tool that is reasonably priced and a significant step up from the one I already have, my justification goes like this: “the new tool can replace my old one and I can then keep the previous one for my son”. In fact I actually also buy tools “for his best mate Connor”. Crafty hey?

Unfortunately it has already happened on a few “isolated” occasions that the justification had to be utilised.  It therefore made me take note of Frank’s comment that he decided not to build up a second set of tools for his son. He argues that his son will actually appreciate the tools more as heirlooms if he (his son) has his own history with the tools. In other words, used those very same tools for some years with his father. I have never thought of it like this and think he makes a good point. The only problem I have with that is that it would negate my handy justification (for continued indulgence in tool procurement) and expose my carefully manicured tools to inevitable albeit non-deliberate abuse until their skill level picks up.

What I have noticed though, is that I tend to nowadays lean towards tools that would not need much rehab whereas in the past I bought stuff that needed a lot of work. I do not regret it at all though, as the rehab projects taught me so much about the tools and how they work (or should work). After restoring 6-7 bench planes you should however know what you need to know and it actually becomes something that keeps you from generating shavings, hence my change in tactics. In the picture below you can see a picture of my Stanley no. 78 rabbet plane. It is from my early phase. As you can see it was completely reconditioned, needed a levercap (which I fashioned out of a piece of brass), made an idiosyncratic levercap screw from scratch and ordered a new blade from Lie-Nielsen for it. Now I would not even dream of doing that.

IMG_6470

I hope these musings will suffice as a good starting point for a wider discussion on this topic. Please join in and add your two cents’ worth.

PS – for a comprehensive and riveting discussion on the topic see this post by The Valley Woodworker.

The Wiktor Kuc experience – take 2 and related reverie

2/2/2016

This is another post that almost got lost in the drafts section of my site’s dashboard. I was reminded of it as a result of discussing the merits of various types of breast drills (for the metal-like qualities of the wood I work with) with the famous Bob Demers (aka The Valley Woodworker). One of my all-time favourite tool manufacturers is North Brothers. Despite that I have never been able to find a true North Brothers tool, only Stanley made versions of their tools. So when I ordered my second Eggbeater from Wiktor Kuc I went for the legendary North Brothers no. 1530.

It so happened that he had one that was halve way through the restoration process already so I was in luck, because my previous order took a very long time. That is of course because Wiktor is so good at what he does that everyone wants drills restored by him, which means that you have to be patient.

Anyway while Wiktor was busy finishing the 1530, I realised that what I really need is a drill with a low gear that would work better in the hardwoods. The Miller’s Falls no. 2 (circa 1938) he restored for me previously works fine for drill bits up to maybe 5 mm in hardwood, but is difficult to turn smoothly using something bigger. As luck would have it, I happened to stumble across a Goodell Pratt no. 5½B on Jim Bode’s site at that exact time. I have never given Goodell Pratt any thought, but it seemed to fit my needs perfectly at an price I could afford (back then, before Jacob Zuma’s well documented indiscretions). So I quickly checked with Wiktor who agreed for me to get it sent to him so he can ship it together with the 1530, which saved me a fair bit of dough. Thank you Wiktor.

A few months later the duo arrived in the Land of the Brave (quite literally sometimes). The Wiktor Kuc restored no. 1530 was as expected top drawer work. It is one of my favourite tools and I am so glad I bought it when I did because I probably will never be able to afford it again. Thank you Mr. Zuma.

IMG_6158IMG_6159

That said, the Goodell Pratt was a real surprise packet. It is just one of those tools you bond with immediately. Like love at first sight. It clearly does not have the pristine beauty of the 1530, but boy is it a great tool. I now do most of my work with it and Goodell Pratt has shot up in my estimation as one of the best manufacturers known to man. It works particularly well in the hard stuff in it’s low gear, so that is where I leave the setting.

Here is some information I found on the Old Tool Heaven website for those who wants to know a bit more:

No. 5 1/2B

Goodell-Pratt hand drill no. 5 1/2BTwo-speed hand drill

  1. 1898— malleable iron frame; hardwood head and handles, head with mushroom-shaped top; detachable, elongated side handle; non-adjustable gear guide; spindle runs on hardened steel cone bearing; speeds adjusted by turning shifter knob on frame; three-jaw chuck adjustable 0 to 3/8 inch. Frame enamelled black; drive gear painted red, bright parts are nickel plated.
  2. 1911 — as above, but detachable chef’s cap side handle; ball bearing spindle.
  3. 1926 — as above, but mahogany-finished hardwood head and handles.

Manufactured by Millers Falls as of 1931.

Illustration from 1903 catalog.

Mine was therefore clearly made after 1911 and before 1931.

IMG_6156IMG_6157IMG_6499

Here you can see where they all found a happy home on my Hovering Skeleton Chest.

IMG_6160

2/6/2016

As mentioned before, I had another delightful exchange with Uncle Bob concerning my preferred choice for a breast drill. He had the following to say:

Now as far as the elusive breast drills are concerned, agreed with you that the GP model 6 would be a good one, but…
these all enclosed switch mechanism don’t seems to come out very often. ??
You need a two speed model, Goodell Pratt, or Millers Falls, or North Bros and yes Stanley
Out of these 4 you can trace their origins to either GP or North Bros before being acquired by MF or Stanley

As for using them, they can be a bit tricky for the unwary 🙂 I’ll explain later in a blog post perhaps?
The second trust bearing on the wheel or a dedicated roller/slider to support the big geared wheel makes a big difference in how smooth they can operate since less chances of binding.
That leaves us with the speed selection.

The one you shown me, has the selector mechanism all enclosed and used sliding pawls to switch gears. I have no experienced with these, but it cannot be as strong as the simpler mechanism where you simply move the wheel one hole over., such as on my Miller’s Falls No 12s
Even there, we have a few small changes thru the years as to how to release and lock the wheel.
The earliest No 12 (green) simply uses a screw that you remove and re-install on the other hole. Simple, strong, but you got potentially a loose screw to keep track of.

Later models (red) uses a captured slider that you push or pull to release/lock the spindle wheel. Nothing to loose, bonus.
And then there are a myriads of variations on this theme, some No 12 uses push buttons to release/lock the wheel and etc.

Today these types of mechanisms lives on, a testament to their rugged simplicity.
Once in a while I come across modern German made version (Schroeder, and etc) They sport an all enclosed mechanism, gearing and all..
They seems to operate smoothly, but again, no personal experiences.

I always learn so much from these exchanges that I thought it might be useful to a wider audience. He has given me permission to publish it, so relax.

Thank you Bob.

Cape Yellow Wood Tool Chest Journey

7/6/2016

Thanking Gerhard once again for opening up his website to woodworking friends and Toolgaloots. What follows is my Cape Yellow wood tool chests’ journey –  and some more!

Not surprisingly, not very long after I developed the fatal fascination/affinity for old tools, I realized that these restored things of beauty can’t forever reside wrapped in pieces of cloth, all around the shop. No, they needed a nice little tool chest/enclosure, a wooden one, not plastic, not that I had that many old woodworking hand tools at that stage! Included amongst the antique restored tools was a Lie Nielsen dovetail (just missed the Independence era when I bought it) and a set of octagonal Boxwood handled Robert Sorby chisels. Otherwise, the majority of the tools were antique (another “less vintage” set of tools was kept elsewhere).

So, off I went and built a little chest out of the available wood I had, 12mm plywood….. By the way, the chest is sitting on a Kiaat wood (Pterocarpus Angolensis also called Bloodwood, Mukwa, Dolfhout) 8 chair dining set made about 40 years ago by Kavango residents in the Northern Namibia bushveldt. Having no electricity, the logs used to be cut in a saw pit (one guy on top and the other at the bottom of the pit) and the resulting planks then left upright against trees to dry. The finer “kilning” details I know not! Do they frequently turn it, how come it doesn’t warp and twist??!! I’ve heard that it tends to shrink very little from its green state, that perhaps being the reason. Never seen them stacked and stickered, but must have been! These bush artists used to make beautiful furniture, this set an example using just saws, jack planes and for the carved bits, little self made axes (with astounding accuracy and dexterity) and homemade knives, finishing by sanding it (with sanding paper!!). Just furniture polish was then applied. Working on loose sand as reference, these furniture were often a bit wonky and therefore often needed to be trimmed at home, once bought. This set is 40 years old and going, still using it!

ToolkassieToolkassie0

Back to my effort.

Toolkassie1

Somehow, the dovetails ended up on the side of the little chest….

Toolkassie2

As the infatuation with old tools grew, the requirement for proper storage increased. At some stage I started to do away with doubles and triples (also read a very sensible Chris Schwarz article on reducing your tools and rather getting to know the one’s you have better), I still continuously strived to upgrade some of the tools that I already had, to more valuable ones. The old Disston D8 and #7 was not good enough, no-no, it had to be a set of #12’s. Since the ordinary wedged-stem plough was hurting my office hands, a Mathieson 9B would be more practical…… Often now, in hindsight (also looking at the costs incurred), I’m in two minds whether to kick myself or not!! Must have been the “collector” part in me (but does it mean I’m an official ToolGaloot???). But….. must admit, these tools are “rather nice” to have in your hands, albeit they come at a price (and which took endless times of bidding on eBay because these type of tools demand mostly ridiculous prices). You have to search for “old plough” (with bad pics) instead of “Mathieson 9B”. Also “old rusty wood saw” (with bad pics) instead of “Disston #12”. And then ask questions and hope for honest answers. And so we have all burnt our fingers once (or twice…). But also in hindsight, one should also strive to still keep a balance in your live and your daily responsibilities, because these old tools research, collection, restoration etc etc could become a obsessive beast, consuming all your free time and energy and may just pull you away from your family! Should always be viewed as just a hobby!

So, me being friends with “planning and scheming” started to make drawings en noting down ideas of what I require and would like to have eventually to store the majority of my old tools in. Again, as with my Roubo, not too large, not too small. Collected endless photos of other tool chests and played it off against what I wanted (and space I had). Because of my specific requirements, I didn’t really favour the idea of a large traditional floor standing tool chest. Have a bad back, so I wanted  it sitting on a wheeled chest of drawers (with my lathe tools and accessories in the drawers). Furthermore I wanted a drawer to keep my measuring tools and other small items apart from the large tools. Didn’t like the idea of diving into a toolbox in order to access something at the bottom! But all this is purely personal and what works for me! The downside is that it takes more planning in order to cater for the tools hanging down from the top part in order to optimize space available. And because you run the risk of losing real estate for tools just because you want your tools to be a little more accessible and visible, you have to have quite tight tolerances, measuring each tool and plan your drawer and drawer compartment accordingly. I have built-in dividers keeping the chisels in the sides away from the side of the drawer.

Also liked the Seaton idea  of some of my saws sitting in the lid (without overstuffing the lid). While the lid arrangement was a practical decision because of my smaller sized tool chest, it also serves a display purpose to me (remember I’m not just a user, I’m a collector-user)! I’m not working in the shop because I have to, no, I’m “playing” in the shop because I want to! “Playing” because I’m still not overly confident in many of the daily woodworking skills required in my cave, but love every step I take to up my knowledge, every new skill I acquire along the way. I suppose I’ll be a student until the day these old hands can’t hold these old tools anymore, just like the old hands that held them before me.

Lets continue now with the chest at last!!? Starting the project in parallel with my Roubo, you’ll notice some of the work was done on the old, metal framed bench (not wonder I struggled to get my panels flat!) Here I was also evaluating my newly acquired Mathieson jack and smoother.

Toolkis1Toolkis2

Great timber to work with (also refer to my first post on the Stanley 246 regarding the Cape Yellow wood or Real Yellow wood (Podocarpus Latifolius)

Toolkis4

Doing panel tails

Toolkis5Toolkis6

Cleaning up

Toolkis7

Trying my best with a mitre joint of the skirt…

Toolkis9

Doing a very, very delicate balancing act. With a very, very expensive 607 on the oak bottom…..! What we’ll do for a work in progress pic…

Toolkis10

Starting to work on the lid.

Toolkis14Toolkis18

Panel insert

Toolkis19

Decided to use brass detailing because I also have an affinity for Campaign furniture (not that I own any). Also practical to protect the corners, because Cape Yellow wood, although beautifully grained, is a lighter type of wood (just 510kg/m3 and a Janka of 830). Such a nice wood to work with, workability very similar to pine but ten times more beautiful (especially when aged). Bought the brass new and then “antiqued” it (files-sandpaper-ammonia fumes-rub/polish). Examples of the tree stages; new, fumed, final (the fumed one had not been man handled before the process, was just experimenting)

Toolkis21

I treated it with a few coats of BLO, polish and finally a polissoir.

Toolkis24 (1)

Inside the lid:

Toolkis26Toolkis27

Top half:

Toolkis28Toolkis29

And then the drawer, which is still not finished. Want to make one or two trays that will drop into the drawer to really keep my measuring tools out of harms’ way. Cork or felt bottoms perhaps. And, trying to be extremely clever in an effort to use one piece of plank for the front, bottom of the chest (inclusive of the drawer front), I now have to make a cock bead (or something) for the drawer (in a 17mm thick front), because I’m not satisfied with the 1mm (saw width……) gap on the sides. The top on the drawer engages air tight (i.e. no saw width sized gap!!). Lets not go into the drawer planning detail… Perhaps I’ll just make another drawer when I REALLY have nothing else to do. I’m not as fast and experienced in drawer making as most of you guys! But as they say practice…..

Toolkis30

Reviewing my chest now after using it for a while:

I’ll have to re-fit the inside chisel rack because I recently replaced the octagonal Sorby’s with Witherbys (re-handled with Kamassi ie Cape Boxwood).

Also, while its nice to have the Mathieson jack and smoother, and though I’m using them sometimes (the smoother much more often) which is a real kick, it means that my other (very nice and very old) planes (Stanley 4½, 5, 6 and 7) are sitting in a wall mounted cupboard – and gets used more often. As previously mentioned, I’m still trying to reduce my tools but it is very difficult for me to say “bye” to my Mathiesons! Bit of a dilemma.

Furthermore, I have replaced the very nice tough looking cast iron “Campaign like” handles that I bought via eBay (which snapped first time I tried it out) with brass Campaign handles from Whitechapel. Still don’t trust these handles, even though they’re brass…..

The lid holding chains, even though they may be appealing, are not very practical. Might be looking at a simpler lid stay ala Chris Schwarz, just not as ugly (sorry Chris)!!  Also have to take into consideration that I have to remove my saws from the lid without interference. Speaking about the lid, I’ll have to revisit the saw till as well, because while removing a saw is quick, but to put it away takes double the time and more care, not a simple out and back in, especially the Disston #12. I have to guide the saw a bit. Tried to design and built too tightly with too close tolerances. But, currently it works, so why change something that works!!

Although I achieved what I wanted with this chest in that it is unique as well as suit my personal requirements (also trying to built heirlooms), perhaps I should have given more attention to ratios, like in Golden ratios… Even if I increased the width by an inch or two, it would have looked less “upright”. But then it would have taken space away from the chest of drawer top, in front of the tool chest, which was a design requirement of mine. But given me more space inside the chest. Should have sacrificed that outside space….. Eish.

Regards

Frank Bartlett

Cape Town

A tribute to Ying

18/5/2016

We recently spent a week in Thailand before moving on to Hong Kong for the Royal Australian and New Zealand College of Psychiatrists’ Annual Congress. I have to warn you that this post contains minimal woodworking, but there might be something towards the end that interests spoon carvers. However, I think that our woodwork is often inspired by a range of different things, not only the work of grand masters. It is my wish that this post will illustrate what I mean by the aforementioned statement.

It is amazing how a trip to a foreign country can inspire new ideas for the shop even without trying to find it. What struck me most was how the Thai people live close to nature and use everything it provides them with to the fullest. The best example of this is their use of the humble coconut. Literally every part of it is used and often for a number of different tasks. I will elaborate on this later.

Let’s first take a tour around the island of Koh Samui. I bought a stunning painting of the Buddha from this artist.

IMG_2806

Yes we did have many Happy Hours during our 1 week stay.

IMG_2836

There are so many perfect beaches it is difficult to know which one to enjoy.

IMG_2837

These are called “long-tail boats”. I took this photo one evening without a tripod so it is not perfect, but it has a few things going for it. At the very least it captures a little bit of the long-tail’s romance, I hope.

IMG_6633

I think it is now time to plunge into the main reason for writing this post. We attended a full day cooking class with a true artisan by the name of Ying. She first took us to the local market. We bought all we needed for the day’s cooking and was able to ask all those questions a westerner might harbour regarding some fairly challenging produce.

IMG_6647IMG_6648IMG_6653

Such as frogs …

IMG_6659

… and chicken feet, which are actually both on the milder end of the (weird) scale as far as my palate goes.

IMG_6686

Here you can see how the wife is sweating like the proverbial “Gypsy with a mortgage” If you venture outside the comfort of your airconditioned hotel room in 35º celsius with > 80% humidity this is bound to happen. Now add to that a sizzling Panang curry and that Gypsy needs psychotherapy.

IMG_6683

Ying explained how one should open up a Coconut.

IMG_6697IMG_6698IMG_6701IMG_6702

We did the final bit of “shopping” in Ying’s back garden.

IMG_6714

During the perambulations around her beautiful garden, we came across this pile of coconut shells. Ying’s father turns these into charcoal for cooking food. The soft fibrous outer layer is used in upholstery.

IMG_6706IMG_6707

The best shells are turned into these beautiful small bowls, which got me thinking …

IMG_6721

Our festive cooking stations.

IMG_6716IMG_6728

Here we are preparing curry paste from scratch. With all this effort in the mentioned weather conditions, that proverbial “Gypsy” is now needing chemical restraint.

IMG_6790IMG_6791IMG_6792

While the girls continued to pound away at the paste I was summoned to harvest coconut meat from the shells. Ying’s Dad built this delightful coconut shredding stool, for lack of a better term.

IMG_6793IMG_6796IMG_6794IMG_6795

Our ingredients.

IMG_6764

The food we cooked.

IMG_6773IMG_6780IMG_6788IMG_6804

Two days after our cooking class we nipped back to Ying’s place to ask if we could buy a few of those coconut shells destined to become charcoal. Ying would have nothing of it and said we could have as many as we want. In the picture below you can see the fruits of our shell smuggling efforts back in my shop in Windhoek. I want to turn these into a set of 18 lights for our beach house. You will have to wait to see the final product. I am pretty sure my friend Jonathan White (The Bench Blog) will need anxiolytics (having heard about my intentions), given my trackrecord with electricity and how he feels about it. Jonathan, you know whom to call. Special price, only for you!!

IMG_6928IMG_6929

In the meantime I made this spoon out of a shell that did not survive the journey intact. It has a Witpeer handle and seems to be a very respectable cooking utensil.

IMG_6930IMG_6931IMG_6932IMG_6933IMG_6934

I plan to also do a slotted spoon and a soup spoon with the shells below.

IMG_6935IMG_6937

In conclusion, I would like to thank Ying for her incredible hospitality and the wealth of knowledge she imparted during our day together. She also inspired several new projects that I cannot wait to get stuck into. Relax Jonathan relax!!