
15/2/2016
The first post in this riveting series can be found here.
So after all the drama of the past 11 days we can get back to the usual business of documenting a slow, yet delightful woodworking journey. The jaws of my fountainhead were fixed to the arms using slow setting epoxy and an almighty Assegaai draw pin. As I mentioned in the previous post, one should be carefully not to offset the hole through the tenon by too much if working with such extremely hard wood as this. You will be able to appreciate from the pictures below, how the excessive offset I used caused an obvious deviation in entry angle on the entrance side. You will also notice the gap on the exit side. If the offset was even slightly more it would have destroyed the jaw on the exit side.


A quick test fit.

Here you can see the so called leather hinge.


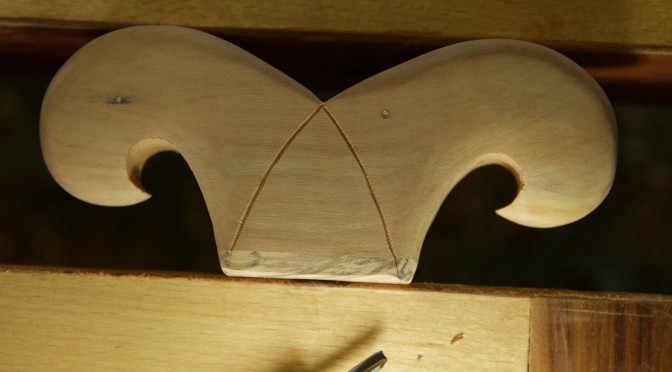
Driven by my shame regarding the issue of copying some else’s design, I decided to created my own unique clamping mechanism. It all started with a laminated block of Kaapse Swarthout (Maytenus peduncularis).

Which received an Ysterhout (Olea capensis macrocarpa) footing. The tool supermodel is obviously pre-glass-door-incident. The photos should paint a fairly comprehensive picture of how I went about shaping this wing nut on steroids.


… and Bob’s (Demers) your uncle.


The final product with a Cape Brewing Company craft beer in the background. Imagine a fountain of craft beer … Sorry I got a bit distracted there.


You should be able to see the seal leather grip on the inside of the jaw in this picture.


The shape of my giant wooden wing nut was inspired by my idea of the head of a fountain.

Nice touch that wing nut on steroids 🙂
Not much gives in the hinge, but it looks like it is sufficient.
Now all you need is a set of good saw files, which are getting harder to get these days, unless you happened to come across some NOS Nicholson (Made in USA).
Today’s Bahco and Grobet seems our best bet….
And here is hoping that the tool supermodel make a complete and prompt recovery.
Uncle Bob
Thank you Uncle Bob
I bought a some saw files from Lie-Nielsen a few years ago, but not sure who made them. The Supermodel is doing well at the moment, already back at school. She now has the challenge to learn how to write with her left hand while the right hand is out of action.
Send my regards to Heather and Rudi.
Gerhard
Gerhard,
That is simply gorgeous. Yet another beautiful job. I really like the wood that you used for the jaws. I had a good chat with Jason Thigpen at the Lie-Nielsen hand tool event yesterday in Seattle. I told him to stop by here and check this out. I really think that you’ve taken his design and turned it up to 11. Well done!
I hope that you are having a much calmer week than last.
Jonathan
Hey Jonathan
Thank you so very much for the compliment. I would love to hear more about your experience at the hand tool event. Did you meet lots of other interesting and famous woodworkers? Thank you for mentioning my post to Jason, I would love to hear what he thinks. It really is a top notch design he came up with.
Things are a lot calmer in our neck of the woods and I prefer it that way.
I hope to hear more from your weekend in the near future.
Regards to the family.
Gerhard