Category Archives: Building my benches

African Rosewood Roubo

30/5/2016

I’m sure this must be the millionth Roubo journey that’s been blogged about! Thanking Gerhard again for the opportunity, this time to convey my African Roubo experience to you, here goes yet another one.

Since reading Chris Schwarz’ Popular Woodworking Magazine blog entries on workbenches years ago, I have always wanted to build me a decent solid workbench. Nothing less than a Roubo. I like working with my hands and I’m not scared to strive to acquire new skill sets (still have a hard time with welding and plastering though…). Sure, at that stage I already had a few projects under the belt. Some of you may associate with this, you know, sawing on the stairs with the wife standing on one end, planing on a temporary table in the shop and picking the work piece up from the floor every few minutes because of makeshift bench stops, sanding outside on the lawn etc. And surprisingly these projects came out fine (also despite working with “hobbyist class” tools). Later I got my hands on a workbench that was quite sufficient but it was an ugly, impractical apparition. Partially perhaps because it doubled for the previous owner as a metalworking bench – steel framed, scaffolding plank top with a 16mm plywood sheet screwed onto it. Adding a vise and bench stop eased the pain a great deal.

Simultaneously I developed the need for better quality tools (not that I deserved them). That was when I started visiting antique shops looking for quality, antique bargains. And soon had the unfortunate life changing experience by discovering eBay (and the intimacies of shipping costs).

Fast forward to the Roubo. I started to investigate what lumber to use that was available in at least 4″ thickness. Didn’t really feel like following the “laminated pine” route, rather wanted to use solids as opposed to laminated wood. Our Pine is also generally softer than the US version(s), except perhaps for the Cape grown lumber, which has much tighter growth rings than those from up north in Southern Africa (because of less favourable growing conditions, I assume). I considered using railway sleepers and then just plugging all the holes but that could turn messy (and ruin your tools). Oak was available from a local timber agent but prohibitively expensive in such dimensions. Started to contact mills for rough cut lumber (any lumber of sufficient dimensions) and eventually got referred to a company that were importing and then kiln drying lumber from countries up north (Southern Africa). It turned out that they did have four sleeper sized beams that they wanted to get rid of, the reason I can’t remember anymore (not that the reason really mattered to me!). Between 2,4 and 3,2m lengths and 110mm (4½”) thick. It was African Rosewood (Guibourtia Caleosperma), family of Bubinga. Eisch!

Roubo0

For R400 (about US$30) all in all. Kiln dried at no extra cost (the courier down to Cape Town was about R900)!! Ridiculous, I know, a real giveaway!! Although I felt remorse using such beautiful timber for a workbench, I reasoned if I strive to do a real special job, I may eventually pass it down to my son as a heirloom! Furthermore, I have sentimental value to the tree species, since my dad and me used to camp under these species trees on our numerous hunting trips in the far north of Namibia. Winters in Namibia makes for a grey/drab landscape and these trees were the only evergreen trees in the veldt. It is ideal to set up camp under one of these. They call it “Ushivi” up there).

Usually, I can be quite a pain when planning something, because I have another pet hate, and that is to have to do something over, just because I messed up because of a lack of planning or because I was rushed. Perhaps a tiny bit of Kavango-bush mentality (“there is always tomorrow) left after all these years? Therefor I prefer to take my time, investigate something pretty thoroughly and only then commence with my project (which therefor often seems to take forever). And yes, I know I’m boring. I’m also well aware that I’m a jack of many trades but master of none. So, since I’m doing this part-time, there’s no rush? If some chores around the house comes up, it tend to take priority (or gets made my priority…) and my woodwork projects tend to gather dust. So, the bench for this part time wood butcher had to be not too large (I have limited shop space), not too small, dimension ratios acceptable, tenon selection also had to be a special feature without building a bells and whistles thing. And simultaneously optimising usage of my available lumber.

Also decided to build it with hand tools (bit of a traditionalist, but lets not go there yet), so ripping and cutting these beams into manageable pieces was a mountain I had to cross, sooner or later. But by just Googling a few black and white pics of (must be) “desperados” cutting down rather large Redwoods in the early days with hand saws and axes, made me feel much more positive about my intentions! The more the bench took shape in my mind, the more urgent my urge became to start plonking away!

Roubo1 (1)Roubo2

Sure enough, the project slowly started to gather momentum. Dimensioning the legs on my old workbench to 120x100mm (5×4 inches)

Roubo3 Poot

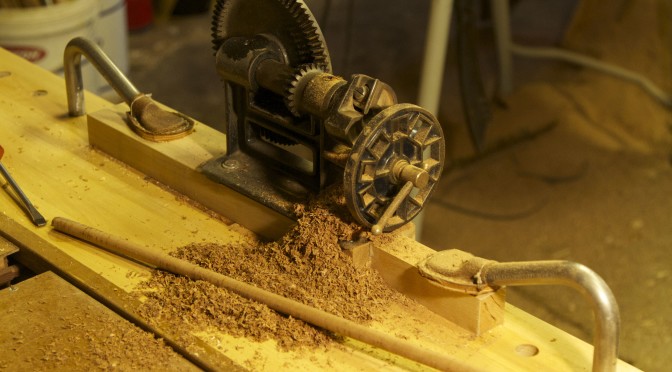
Dimensioning one of the tree top beams. Note, because of its sheer weight I required no clamps except for an improvised “bench stop”, just in case…

Roubo4 Blad

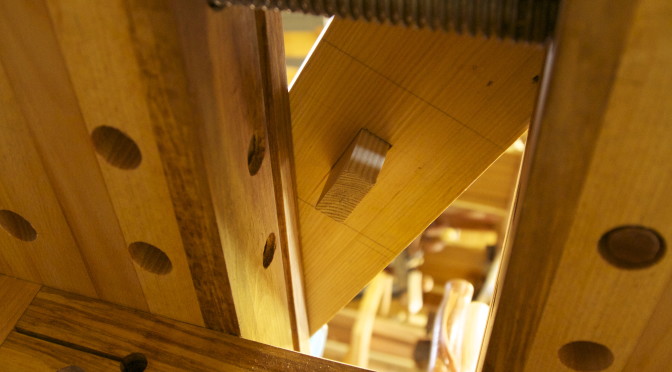
After the top glue-up, it was time for the leg top tenons. Decided (speciality factor) on rising dovetails (inspired by Roy Underhill, I think), which I knew was going to be fun and games in these large dimensions, all three cuts being taper cuts. To start the cut correctly, snugly next to the line on this tough hardwood, is really the key (second to the initial accurate measurements and marking, of course). Saw just wants to (and does) slip in the tough end grain. Chiselling to the line to aid the start (First Class cut),  helped with some of the cuts. If done carefully, minimal planing is required afterwards. Still, it is a workbench, so it doesn’t have to be perfect!! This timber weighs 800kg/m3 and has a Janka of 2090. I orientated the legs so that my cut would be more or less vertical using my sash. At that stage I still had trouble sawing accurately to a line, so I sawed 10mm at a time and then scrutinised my cut, until the cut was complete. Took forever, but the result, I felt, was acceptable. Had no room (read extra wood) for major errors. This is not necessarily a stronger or less stronger joint than the other traditional joints being used on Roubo. Just a bit of a fancy joint (for that x-factor aka je ne sais quoi!!) that I strived for to make the bench special. Also one of the joints the woodwork community calls “impossible joints”, because once assembled, it appears to have been impossible to assemble.

Roubo7 RDT pootRoubo8 RDT pootRoubo9 RDT pootRoubo10 RDT pootRoubo11 RDT pootRoubo12 RDT poot

Turning to the top 1800x600x100mm (72x24x4″)was ideal to test a recently restored 1″ Witherby, but I found it was almost too small for the job at hand.

Roubo13 RDT blad

Then the horizontal supports.

Roubo14 poottap

With lapped dovetails in front.

Roubo15 spartapRoubo16 DT spartap

The jaw (200mm or 8″ wide) was also a challenge to shape with ordinary spoke shaves etc

Roubo17 kaakRoubo18 kaak

Think these were sold as antique book clamps but they appeared acceptable to be used in the vise. Used the least chipped thread (almost 2 inches diameter) because there were some wear and tear on them. Not a nice tight fit on the female thread anymore after all these years but had to do. Using beeswax on them to reduce friction.

Roubo19 skroef draad

Something else that I found quite challenging was the glue-up because all the parts had to be simultaneously glued, fitted and clamped in the limited open time. Do you ever have enough clamps?? By the way, dry fitting (and disassembling) these tight fitting huge tenons was not a walk in the park either. Eventual result was fine though. Then used a caster wheel with a 6mm sawn off drill bit as axis to ease/support the vise operation. Also did something similar at the rear end of the vise (top of the tenon hole of course, in order to support leverage of the vise)

Roubo20 kaak glide

African Blackwood (Dalbergia melanoxylon) for the garter and handle knobs. Will probably inlay the garter later on (when I feel like acquiring inlaying skills!!)

Roubo21 garterRoubo22 garter

And finally the tool rack that’s mounted to the left rear of the top. Will add additional bench dog holes etc as required. Didn’t want to start boring holes just to find out later on: “this hole actually needs to sit 1,357211cm to the left…”!!

Roubo23 toolrak

Eventually, after flattening and some Danish Oil, voila!

Roubo24 kaakRoubo25Roubo27 (1)

Some reminiscences…. After working with it for a few years now, I have no regrets (of course I would say that…). There’s nothing bothering or irking me. Every shop should have a solid workbench and by building one yourself, it teaches you lots of skills along the way. I like the size of my Roubo and adjust my work accordingly. The final height is 870mm (34,25inch) because I’m tall-ish. The darker wood works perfectly fine, although I think lighter wood may perhaps have been more practical. Would have liked more natural light in my cave though, but have to make do with extra artificial light. Would like to replace the vise screw sometime (with another wooden one) but at least this one is not jumping threads and actually works fine! I have added a traditional bench stop recently and drilled two or three extra holdfast holes. Thinking about a sliding dead man but haven’t really had the need to use one yet and there are other ways to circumvent that. Oh, yes, and then perhaps an end vise, even one with just a 20cm range span could also be a helpful feature. Personally I’d prefer not to bolt a Record 52 or something similar to the end of the bench to double up as ‘n end vise, but that’s purely personal. This thing weighs a ton, so I’m currently satisfied to use it just as it is. Saves a lot on medical bills, by not having to manipulate it (yet) for additional mods!

Hope I didn’t bore you with this African Roubo experience! Just thought many of you may relate to much of this.

Cape Town greetings!

Frank Bartlett

Upgrades to my split-top Roubo bench

21/1/2016

It is almost a year since I finished my first Rouboesque bench, which gave me ample opportunity to see which design features works for me and which does not. One of several reasons (discussed in detail in this post) why I decided to go with a split-top design was to be able to have easy access to clamp work using f-style clamps along the centre of the bench. I therefore sized the sliding tool trays in such a way that there would always be gaps between them for the above mentioned clamping activities.

What has become apparent over the past year is that although this is a very handy feature I do not need it all that often due to the number and positioning of the holdfast/dog holes. I am able to use holdfasts for 95% of that type of work holding. To add to that, the gaps between the sliding tool trays constantly threaten to swallow tools which the end up crashing into the planes on the shelve below the bench top.

For these reasons I came up with a fairly easy solution. I made two gap fillers that can easily be removed. The pictures should make it clear how it works. The bigger one of the two now act as a more traditional type tool tray that can hold plenty of tools below the surface of the bench top. These gap-fillers do not interfere with the sliding tool trays at the top, which can still slide to expose the tool trays below them.

I hope that the series of photos that follows will make it clear how these minor tweaks prevent the bench from swallowing tools yet retains easy access for clamps when needed.

IMG_6007IMG_6008IMG_6009IMG_6010IMG_6011IMG_6012IMG_6014IMG_6015IMG_6016IMG_6017IMG_6019IMG_6020IMG_6022IMG_6024

Roubo sharpening bench – the not so grand finale

12/10/2015

OK, I realise this will not be the most exciting post in the history of woodwork blogging, but seeing that my site is in the first place a way for me to document my journey for myself you will have to bear with me. This will however be the not so grand finale to a riveting series of posts on building a second Roubo-style bench. As per the title of these posts it will be used as a permanent sharpening station during it’s first life and hopefully become a workbench in a second life once my shop gets extended. I plan to add a holdfast type “twin screw vise” as a face vise at that stage.

As you can see in the pictures below I used Without (Cape Holly or Ilex mitis) for the shelve boards. They all received tong and groove treatment with my Lie-Nielsen no. 48 T&G plane.

IMG_5200

As you can see here it is a beautiful wood species.

IMG_5201

The shelve boards were nailed into position with finishing nails. I did not used to like the idea of using nails for proper woodworking, but Christopher Schwarz has convinced me that there is historical evidence for the use of nails for specific tasks. In this particular case I thought that the nails will allow the boards to move with the changes in ambient humidity and having such small heads make them almost invisible. As you can see, I left two gaps to allow for wood movement, which also doubles up as convenient slots to get rid of debris when cleaning the shelve.

IMG_5202IMG_5203IMG_5204IMG_5205

In these pictures you can see my sharpening station taking shape. Now I can simply walk over and sharpen what ever needs a razor edge. Up until now, I always used to procrastinate for too long before sharpening, because it meant that I had to set up the station first, sharpen and then pack it away.

IMG_5238IMG_5239IMG_5240

Thank you for joining me on this journey.

Roubo sharpening bench – part 12

28/9/2015

By 18h30 yesterday evening the bench was finished and in it’s place. When I say finished, it means that it is adequate for it’s intended use over the next year or so. It will simply function as a stand for my drill press, a permanent sharpening station, grinder and a few more things. Once my shop get’s expanded, it will receive a holdfast vise and start functioning as workbench.

I used my Disston no. 12 to saw off the the protruding through tenons, wedges and drawpins. As you can see, I left quite a bit in tact in order not to damage the bench surface too much.

IMG_5159IMG_5160IMG_5161 IMG_5162 IMG_5163

The rest of the protrusions were planed away with my Lie-Nielsen low angle Jack plane. I find this to be the best plane for end grain work like this, especially when used with a toothed blade.

IMG_5164 IMG_5165IMG_5166IMG_5167

I then used a Stanley Bailey no. 3 smoothing plane to get rid of the toothed blade’s characteristic finish.

IMG_5168IMG_5169

In this picture you can see that my crosscut saw did chew a bit of the leg in this case. Fortunately this is the side of the bench that goes up against the wall.

IMG_5170IMG_5171

While I had the bench in a convenient position I screwed the cleat to the bottom of the long stretchers.

IMG_5172IMG_5173

The Marx-Roubo bolts were covered up with inlayed chunks of perfectly quarter sawn Scots pine. As you can see, the inlayed pieces were initially 1-2 mm proud of the surface. After the glue dried, it was planed flush.

IMG_5174IMG_5175

I decided not to do a proper flattening of the top as it is not necessary at this stage. Seeing that the bench will only be used as a table for now, I thought the top could happily move with the changes in humidity and settle down over the next year or so. Once I need to start using it as a proper bench, I can then do that fine tuning.

IMG_5176

After a treatment of Tung oil and turps. I decided to leave the top beams at full length at this stage. By the time it becomes a proper bench, I might add breadboard ends on both sides. Currently it is 3370 mm (just over 11′) in length.

IMG_5177

The next task is to finish off the preparation of the shelve boards. Here you can see my Lie-Nielsen no. 48 in action. It is one of my favourite tools.

IMG_5178IMG_5179IMG_5180IMG_5181IMG_5182

Pewa is a bright young Namibian whom we are helping to realise her dream of becoming a Medical Doctor. She is currently staying with us while writing her final school exams. She took a break from her studies to help me to get the bench to it’s home for the next little while.

IMG_5183


Here we are in the process of clearing the area allocated for the bench.

IMG_5184IMG_5185


While the helpers took a break I quickly treated the underside of the bench with the mentioned potion.

IMG_5186IMG_5187IMG_5188


It just so happened that our friend Heidi turned up at the right time to help us with the tricky resettlement procedure.

IMG_5189IMG_5190IMG_5191


Once the bench was in place, Pewa and I started to populate it with paraphernalia.

IMG_5192IMG_5193IMG_5194

Roubo sharpening bench – part 11

21/9/2015

It gives me great pleasure to report that the bench was successfully glued up yesterday. Before I show you those pictures, let’s just look at the lead-up . In the pictures below you can see how the dowels finally came into being. I changed the cutter on the dowel cutter to a ¼” size and cut a short section at the end of each dowel to that size. This made it easy to fit the dowels in a cordless drill to do a quick bit of sanding.

IMG_5076IMG_5081

The dowels had these burnished areas coming out of the no. 77.

IMG_5082

A quick sanding made for a very smooth dowel.

IMG_5083IMG_5084IMG_5085

They were then chopped to length …

IMG_5086IMG_5087

… and pointed using the BPS.

IMG_5093

The hand made dominos were shaped using this block plane.

IMG_5095

I used an array of rasps, a spoke shave and a block plane to cut the stopped chamfers on the legs.

IMG_5096

The Marx-Roubo bolts each received their own little slot, which will be covered up with wood in future.

IMG_5097IMG_5098IMG_5101IMG_5102IMG_5103

I used a mortise chisel, Lie-Nielsen router plane and my new 1887 Disston backsaw for this operation.

IMG_5099IMG_5100

The wife was so kind as to help me with the dry fit and the actual glue-up a day later.

IMG_5104IMG_5105IMG_5106

Dry run finished.

IMG_5107IMG_5108IMG_5109IMG_5110IMG_5111IMG_5112

On Sunday afternoon it was time for the glue-up. The three beams forming the top remained 3 mm apart to allow for wood movement. The are only linked by the (unglued) dominos to ensure that they line up flush and support each other.

IMG_5141IMG_5143

Annamie looks like an evil Urologist about to examine a victim’s prostate.

IMG_5145IMG_5146IMG_5148IMG_5149IMG_5150

As you can probably see I used slow setting epoxy, as the glue-up took more than an hour.

IMG_5152IMG_5153

All the draw pins and wedges in place.

IMG_5155IMG_5156

Just a reminder why I make such a fuss with wood movement in terms of my bench design. This is the ambient humidity and temperature for the past month or so. By mid rainy season it would be up around 75-80%.

IMG_5158

Roubo sharpening bench – part 10

14/9/2015

As the bench is approaching it’s glue-up stage, it is as if my toil has taken on a new verve characterised by a strange mixture of pep and angst. At this stage I plan to get it assembled in the next couple of weeks.

The pictures below should  suffice as an explanation of how I created the custom bolts, which will fix the top beams to the apron in conjunction with the Roubo joinery. As you can see, it is made up of galvanised 20 mm threaded rod and scrap mild steel rod forming a T. The ends of the T-piece is bent downwards ever so slightly to ensure that the custom hardware exert pressure across it’s entire length once properly fastened. We will call this the … wait for it … Marx-Roubo Bolt.

The idea is that the top of the T will be embedded/entrenched (and covered up with wood) crossgrain in the top, which will prevent it from rotating when it needs tightening due to possible seasonal movement of the wood. It also provides quite a wide area across which it exerts downward pressure to keep the top beam tight against the apron.

IMG_5037IMG_5038IMG_5039IMG_5050IMG_5041IMG_5042IMG_5066IMG_5069IMG_5068

A task that I though would take me 30 min has been dragging on for the past week. I thought that my Stanley no 77 dowel machine  equipped with a ½” cutter would make short work of the 24 dowels (½” x 6″) I need for the bench. It turns out that perfectly straight grained Assegaai (Curtisia dentata) tends to fight the machine all the way.

I chose Assegaai as it is very hard, yet extremely flexible and does not move much at all once dry. The problem is that even with a very sharp blade it is hard work to make the dowels. On the upside, it is absolutely perfect dowel that emanate from the no. 77’s hind side (third picture). I will post some more pictures once the dowels are finished.

IMG_5032IMG_5033IMG_5036IMG_5035

As you can see the kids also got stuck in once my arm was completely moer-toe.

IMG_5047IMG_5046IMG_5053

By the way, this is the stock I prepared for the no. 77. It is perfectly straight grained Assegaai pointed using the legendary new tool in my shop known as the BPS (Boorish Pencil Sharpener).

IMG_5051IMG_5061

Due to the extreme exertion inflicted by the dowel making activities, I had to come up with ample “legitimate” reasons to take a break. One of those was to check whether I prepared enough Without to span the entire length of the shelve below the bench.

IMG_5057IMG_5059IMG_5058

OK, so I have enough Without, … now what? Back to the Dowel machine? Eish!!, … maybe not just yet. How about fitting the last set of stretcher tenons? That sounds better.

These beautiful girls assisted me to do just that.

IMG_5063

The legs were finally cut to length using my Disston no. 12 crosscut saw. It is without a doubt one of my favourite tools and probably one of the best that was ever made.

IMG_5065

While all this was happening, my son Didi got stuck into making the Dominos we need. It was very good practice to hone his sawing skills.

IMG_5054IMG_5055IMG_5056

This is what a bench looks like where several different jobs are being done at the same time. I like jumping from task to task and have different stations set up for each. This way I do not get bored or tired doing one thing for too long. It works well for me, especially when there are tasks that necessitates serious stamina, like drilling a gazillion dog holes with a bit and brace, hand sawing 4″ x 5″ legs to length, creating dowels from Assegaai by hand etc, etc. The down side is of course that you need more workspace.

I am interested to hear what others think of this type of approach.

IMG_5070

Here I am using the ½” bradpoint bit to mark out the middle of the draw pin (Assegaai dowel) on the tenons. Once I know that location it is fairly easy to mark out the required offset for the hole through the tenon.

IMG_5071IMG_5072

Roubo sharpening bench – part 9

7/9/2015

I managed to do a little bit of work during the evenings last week. One of those tasks were to add two strips of Meranti to the sides of the bench top’s centre beam. These strips comes from a doorframe. A friend of mine Anton Nel, rocked up at my shop a few weeks ago with this doorframe. He is a builder and was working on a house just around the corner from us. The so called carpenter on the site, arrived (as is exceedingly common around these parts) without any tools of his own. He needed to remove about 20 mm from each side of the 80 mm thick frame.

My table saw struggled as it is not made for this dimension of cut, so we decided to cut a 20 mm deep groove from both ends as a guide. We then used my monster 26″ Disston no. 12 rip saw to remove the timber between the grooves. Two cuts of 2 meters each had us both sweating like a gypsy with a mortgage.

It was these offcuts that I planed down to 15 mm (thickness), before gluing and screwing it to the sides of the beam. The idea behind the addition of these strips is to close the gap between the three beams that make up the top to only 3 mm. This will be enough to allow for wood movement, but small enough to prevent most things from accidentally falling through.

In the second and third picture below you can also see the slots I made with my Festool Domino. The three beams making up the top will have several dominos between them to help them to keep each other flush and straight. They will not be glued to allow free movement (horizontal), while only restricting movement in one dimension (vertical).

IMG_4983IMG_4985IMG_5016

I used my 10 mm bit to cut the Domino slots. Unfortunately I do not have any 10 mm Dominos so I planed some Witpeer down to the desired dimension. Come to think of it, the standard Dominos would have been too short anyway as these will be breaching an 18 mm gap underneath the Meranti strips, extend 28 mm into one beam and 24 mm into the other. The slots are 28 mm deep in both beams, so the extra 4 mm allows for wood movement. In other words, I need to cut my home made Dominos at 68 mm (in length).

IMG_5017

Here you can see how I am progressing with the row of dog/holdfast holes along the front edge of the bench. They are not perfectly in line as the marked difference in hardness between early and late wood cause the auger bit to follow the softer stuff, but I am not overly fussed by this. One could overcome this problem by building a jig, but for this bench it should be fine with the slight meandering of the row.

IMG_4986IMG_4987

I spent most of my shop time this weekend on fitting the stretchers to their mortices. In the picture below, you can see how my chopping station is on one side of the bench and a station to shave the tenons down on the opposite side. I find it to be a very convenient setup and once again all those dog/holdfast holes come in handy. Monsieur Schwarz might have a heart attack, but he asked to be disobeyed.

IMG_5018

For each leg, I first fitted the long stretcher.

IMG_4989IMG_4990

In this picture you can see how handy the gap between the split top of my bench can be when fitting through tenons.

IMG_5029

Once the long stretcher’s tenon was in place, I marked out the exact location of the “mortice” that will allow part of the short stretcher’s tenon to run through it.

IMG_4991IMG_5023IMG_5002IMG_5003IMG_5013

Next up, the short stretcher being fitted in the absence of the long stretcher.

IMG_4999IMG_5001

This picture illustrates nicely how the one tenon pass through the other. As I stated in an earlier post, this is a slight variation to the joinery used in my first bench that was inspired by Japanese joinery.

IMG_5000

When fitting massive joints this precise (like a piston, as my friend Jonathan would say), it can be tricky to disassemble them. The picture below illustrate how useful my sliding-deadman-cum-leg-vise proofed to be in this regard. It kept the leg in position at the side of the bench, which allowed me to use both hands to carefully tap the tenon out with a mallet and a small off-cut.

IMG_5024IMG_5025IMG_5026

Once that was done I could check whether both stretchers fit simultaneously.

IMG_5004IMG_5005IMG_5006

At this stage I started to prepare timber for the shelve between the stretchers. I found two Without (Ilex mitis aka Cape Holly/African Holly) boards in my collect that I thought would go very well with the Scots pine (Pinus sylvestris).

Another reason for this choice concerns the fact that I have not worked with this species before. I am consciously trying to use all the different species in my collection during the shop-setup phase of my journey, in order to get a feel for each. Hopefully by the time I start building furniture it will enable me to make smarter choices.

IMG_4994IMG_4995


This is a picture from the internet to show what it looks like once planed and sanded.


cape-holly


The next few pictures should be a reminder to all of you out there who can walk into a lumber yard and pic from hundreds of perfect boards that is ready to use. I have to do a whole heap of work to liberate decent bits of wood from these feral planks. You might be able to see how I marked out the useable areas.

IMG_4996


My Disston no. 12 crosscut handsaw took care of all the crosscuts, while the bandsaw made short work of the rip cuts. I decided to keep the shelve’s boards at different widths to waste as little timber as possible and there seems to be a certain je ne sais quoi about the utilitarian appearance it creates.

IMG_4998IMG_5008


As I said, at least there is minimal wastage this way.

IMG_5009

Roubo sharpening bench – part 8

24/8/2015

The time finally came to properly use my new Bad Axe tenon saw. As you can see in the pictures below, I used it to cut the massive tenons of the long stretchers. It was quite easy to cut with the aid of the saw horses that held the stretchers at a comfortable hight. The saw wasted no time on these cuts as it has a fairly aggressive tooth geometry.

IMG_4913IMG_4914IMG_4915

The shoulders were done with a Lie-Nielsen crosscut backsaw. You can appreciate the surface of the tenons after the sawing (second and third picture below).

IMG_4916IMG_4917IMG_4920

I added these two pictures to show a trick I discovered by accident. The row of dog holes along the front edge of my bench that operates in tandem with my quick-release end vise has two areas where a couple of holes are missing due to the placement of the leg. When I have a piece of timber that is of that particular length, it is a bit of a hassle to find a scrap piece of wood as a spacer in order to pinch the timber between dogs. The other day I realised by shear luck that my Veritas Wonderdog can solve this problem without much fuzz.

IMG_4918IMG_4919

I then used a Stanley no. 10 rabbet plane to shave the tenons down to it’s exact size. You will notice how it also improved the surface of the cheeks (which is the important glue surfaces of the joint).

IMG_4922IMG_4931IMG_4932

Here I am chopping the shoulders to the knife line.

IMG_4933IMG_4923IMG_4925

I am not sure what this dimension of the tenon is called (?edge maybe?), but I trued it up with a pairing chisel and block plane.

IMG_4934IMG_4935IMG_4936

Before reassembling the bench in order to mark out the correct location of the mortises of the long stretchers, I drilled the holes through the top that will accept a bolt to fasten it to the apron. The idea being that I could then use that hole to mark the exact location of the corresponding hole through the apron, while the bench is assembled.

IMG_4937IMG_4938

Here you can see the bench assembled. The aprons are in their correct position, but the short stretchers sit at the top of the legs in order to line them up correctly without being in the way of the longstretchers.

IMG_4939

I usually use these batons to located the exact position of the stretchers, as referenced off the apron’s through tenon.

IMG_4940IMG_4941IMG_4943

The following two pictures might help to explain how the short stretcher’s tenon (traced off in pencil on the leg) will eventually pass through the long stretcher’s tenon to also become a through tenon that can be wedged. I got this idea from some Japanese joinery I saw some time ago and is one of very few subtle changes I have made to the design compared to my first bench.

IMG_4944IMG_4945IMG_4947

With the holes for the bolts marked out on the aprons, I could drill them out after de-assembling the bench once again. I started with a 40 mm hole that will accept the massive nut. I used a Forstner bit (in the drill press) as it creates a flat bottom for a washer (plus I simply did not have a big enough bit for my brace). That was followed by a 1″ Irwin auger bit to allow for some wood movement as I will use a 20 mm threaded rod to produce my custom bolt.

IMG_4948IMG_4949IMG_4950IMG_4951IMG_4954

I tried to copy (unsuccessfully) my friend Jonathan’s excellent photo of the in side of a rubbish bin. Check it out on his superb site by going here.

IMG_4958

Marking out the mortises for the long stretchers.

IMG_4952IMG_4953

Here I am drilling the set of dog holes along the front edge of the top and at the far end drilling out the waste from the mortises in the legs.

IMG_4959IMG_4960IMG_4961IMG_4972

Roubo sharpening bench – part 7

10/8/2015

It was a wonderful day when I was able to move on to  activities other than planing this past weekend. I first drilled out most of the waste from the massive mortises in the top with a 1″ Irwin bit and Stanley no. 923 brace (12″). Then followed the removal of the waste from the sliding dovetail part of the famous Roubo joinery.

This was the first time I used my new Bad Axe back saw on a project. It is not called a Roubo Beast Master for nothing. After doing damage with the saws and chisel, I used a router plane (Lie-Nielsen) and a Stanley no. 10 Rabbet plane to perfect the sliding dovetail mortise wall (unfortunately not pictured).

IMG_4886IMG_4887IMG_4890IMG_4891IMG_4892IMG_4893IMG_4894IMG_4895IMG_4896

Next up was the chopping out of the standard mortise. You can see how my shop made saw bench doubles up as a seat at the chopping station.

IMG_4902IMG_4900IMG_4901

Here I am in the process of fitting the legs. Non of them needed much persuasion to occupy their new home. I think these pictures also testify how well my bench handles these massive beams, which are currently in the order of 84 mm x 181 mm x 3300mm.

IMG_4897IMG_4898IMG_4899IMG_4904IMG_4905

By Sunday afternoon, I assembled the bench in order to mark out the exact location of the long stretcher’s shoulders. I always enjoy this stage of proceedings as it is the first opportunity to really get an idea of what the bench will look like.

IMG_4906IMG_4907IMG_4908

My father-in-law was so kind to help me, while enjoying the pleasant late afternoon winter sun.

IMG_4909IMG_4910

My final task was to do the rest of the marking out of the tenons. They are now ready for the Bad Axe Roubo Beast Master. You might notice that the tenons are off centre by quite a margin. I deliberately designed them this way. These stretchers sit flush with the front of the leg so I decided to move the tenon as far away from the front edge as possible. This should ensure a stronger joint to the leg as there will be more timber left between the front of the leg and the stretcher’s tenon.

IMG_4911IMG_4912

Roubo sharpening bench – part 6

3/8/2015

I really like my hand planes, but if I do not see them for the next few months it will be a blessing of note. After almost a month of hand planing these freaking beams for the top of the bench, I am sooooo over planing it is not funny. In the pictures below you can see the final phase of planing, which happened over the weekend.

After establishing a reference edge, I used my shop made panel gauge to mark out the opposite edge.

IMG_4847IMG_4848IMG_4849

I used a Stanley no. 9½ block plane to create a bevel to prevent splitting of fibers while working crossgrain.

IMG_4862IMG_4863IMG_4864

The bevel enabled me to take quite aggressive crossgrain  cuts with my scrub plane to get rid of the bulk of the waste. That was of course followed by a truck load of longitudinal planing with a fore plane followed by a jointer plane.

IMG_4865IMG_4866

Here they are after a month worth of removing nails, scrubbing away sand and bits of stone that got entrenched in the timber and planing. I include a few before photos to make me feel better about the ridiculous effort.

IMG_4790IMG_4789IMG_4792IMG_4794IMG_4796

… and after.

IMG_4867IMG_4868

Finally I was able to move on to marking out the location of the mortises for the legs. Before settling on a location, I moved the legs up and down with consideration for the length of the long stretchers (pictured) to ensure that they end up away from any knots. You will notice that the legs are still over-long, they will get shortened at a later stage.

IMG_4869IMG_4870IMG_4871IMG_4872IMG_4873

Before the final marking out the legs were clamped with their aprons to mimic the exact position once glued up.

IMG_4874IMG_4875

A glass of Whiskey to celebrate the end of another long day in the shop.

IMG_4876IMG_4877IMG_4878

I decided to drill out halve of one of the mortises, just to do a non-planing activity before the end of the weekend.

IMG_4879IMG_4880IMG_4881