
25/5/2017
One day in May while sitting in my shop at the end of a long day sipping usquebaugh I found myself staring at this so-called Shaw’s Patent no. 5 Jack plane of mine. It is the Jack plane that I use for heavy stock removal, which means it ends up on the receiving end of some significant elbow grease. As a result, the plane tends to reciprocate the well intended elbow grease with fervent vesication of that part of my hand that flirts with the ribbed edge of the main casting. It got me thinking that the plane could possibly be modified to amend this particular quirk.
You can read a post on how I restored it when I initially got my discombobulated mitts on it.

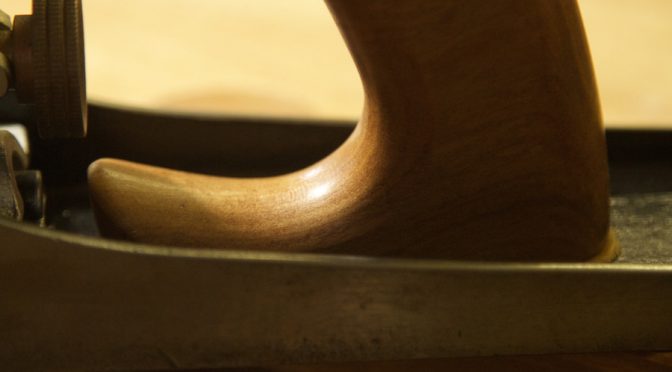
As you can see here, the slight design glitch with this Sargent plane is twofold. There is a lot of wasted space between the top of the tote and the lateral adjuster. Also the bottom end of the tote slopes downwards, which has the effect that the side of one’s hand tends to end up on the rib of the main casting. Thus a combinations of these two inadequacies coerce the hand of the user into a position much lower than what is needed.
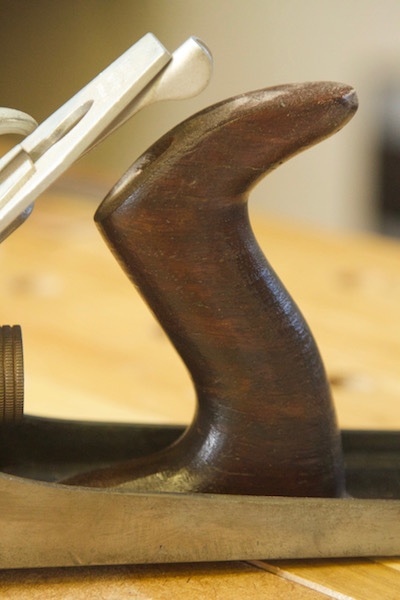
As you can see in the example below, the bottom part of the tote on this Lie-Nielsen low angle Jack plane does not slope down, but runs parallel to the sole of the plane. This design element stops the hand from sliding down too far. I thought that the Shaw’s Patent could benefit from a tote that employs the same strategy. Together with that I could utilize the dead space between the top of the tote and the lateral adjuster by lengthening the tote, which would also aid the user’s hand to ride higher.


I found a piece of Kaapse Swarthout, that would not suffice for any other purpose. This is by far my favourite indigenous species for producing totes.

It was quite a mission to fashion a tote that would fit the plane and at the same time tick the desired design tweaks. I used a combination of the original tote, the Lie-Nielsen tote, and documents on Stanley totes to accomplish the task.


The final product looks like this. You can see how the top of the tote is now much closer to the lateral lever and the bottom of it has a parallel section to hold the user’s hand up. Another neat little trick I discovered is to cut a leather washer to sit between the sole of the tote and the main casting. It makes a huge difference to the feel of the plane when using it. The difference is hard to explain, but try it and you will know what I mean.
The changes to the tote also necessitated a tweak to the length of the tote bolt. Unfortunately it is a change in the more challenging direction i.e. making it longer.


While I was at it I also changed the knob. I prefer a flat section at the top of the knob for my thumb when gripping the front end of the plane with the rest of my fingers on the sole acting as a fence.

The final adjustment I made was to file down the part of the rib in question by about 1 mm and rounded it. After all that the Shaw’s (re)Patent works like a dream. If you prefer woodworking rather than tool tweaking, I suggest that it might be better to buy a Lie-Nielsen plane from the start.
Good job, I lik your tweak. That leather washer idea, I never heard about, you makes me curious…
Bob, and Rudy enjoying a lazy day 🙂
Hi Bob
Thank you for the compliment, I would love to hear what you think of the feel of the plane with the washer in place. Let me know if you ever try it.
Kind regards
Gerhard
Hi Gerhard,
I have a Sargent plane, a 422 (#7 size) and the tote is close enough to the lateral lever that there are a couple of “snakebites” in the tote. Your tote does not look like an original since it appears short and has a lot of meat at the top where the taper is usually more graceful.
At the bottom of the tote where you noticed the LN is horizontal is to accommodate the front screw of the tote. Stanley #5’s use this screw while your Sargent does not. Stanley 4 and below rely on the pin in the casting to register the tote and feather down much like your Sargent.
I like the stylistic lift at the front of the tote. Very nice work.
Out of curiosity, have you had any experience fitting a replacement iron to the Sargent?
Steve
Hi Steve
Thank you for your insightful comment. You are spot on with regards to the top of the tote. If you have a look at the post on how I restored it, I bought the plane with the top of the tote missing, so it was my fix that caused the relative problem at the top. With regards to the bottom and to be fair to Sargent, I think the design at the bottom was necessitated by the presence of the frog adjuster screw in front of it. My elegantly upward sloping front end would make it a bit difficult to adjust the frog with the tote in situ. Seeing that this is my heavy stock removal plane I do not need to fiddle with the adjustment screw at all so it does not really bother me. I actually really like this plane, otherwise I would not have gone through all the trouble so I do not want it to sound like I am criticising it. It is a good plane.
I thought about getting a hock replacement blade for this plane, but as you know it is not clear wether they actually fit the Sargent planes. I also noticed that the original blade of Sargent is quite a bit thicker than the Stanley equivalent, especially at the business end as it becomes thicker towards the cutting edge. Is your’s the same? So I actually ordered only a 2″ replacement chip breaker from Hock Tools. I have not received it yet but will let you know if it fits. I though if it does not, I could simply use it on a Stanley no. 5 I have. The chip breakers are also a bit thicker and is supposed to also contribute to the stability of the blade to cut down chatter.
Please stay in touch mate.
Gerhard
My Sargent blade and cap iron look comparable in thickness to a Stanley. I tried to fit an aftermarket iron to it last year and I think the slot in the blade would not fit over the lateral adjust and I didn’t want to file the adjuster. There could have been an issue with the slot for the yoke adjust as well.
You can test compatibility easily enough by attempting to swap the Stanley stock parts into the Sargent. Also, you would verify whether I got the fit problem correct or backwards (too loose).
If I absolutely had to change the iron in my Sargent I would get a laminated Japanese iron which has great steel and soft material at the slot. A fully hardened iron would make the modification of the iron very difficult.
My shop is out of commission for some construction and I miss going in to tinker on even the least significant things. In the meantime I can tinker vicariously here.
Steve D
Fun Fact:
Just next door to the present location of the last Sargent facility is an IKEA.
Hi Gerhard,
And another thing…
The short stud on the tote can be addressed in a couple of ways.
One way is to drill the relief for the barrel nut a little deeper so it engages the threads. The other that works sometimes is to check if the stud is bottomed in the threaded boss. If it is, you can try backing it out partially so the nut end can grab the threads.
Option 2 has a risk if there are only a couple of threads engaged and you drop the plane, you may pull the end threads out of the boss. Rule of thumb is 3 threads of engagement and I consider that risky still.
Yet another way is to shave the bottom of the tote, giving you a chance to tweak the angle of the bolt hole to better match the angle of the threads.
Best luck
Steve