Category Archives: Shop made tools

Olienhout sector from the Groot Marico

18/4/2016

This project has been on my ‘to do’ list for at least two years. Ever since reading the seminal work “By hand & eye”, I just had to build a sector. It really is a magic wand in the shop once you understand a few basics of pre-industrial design methods.

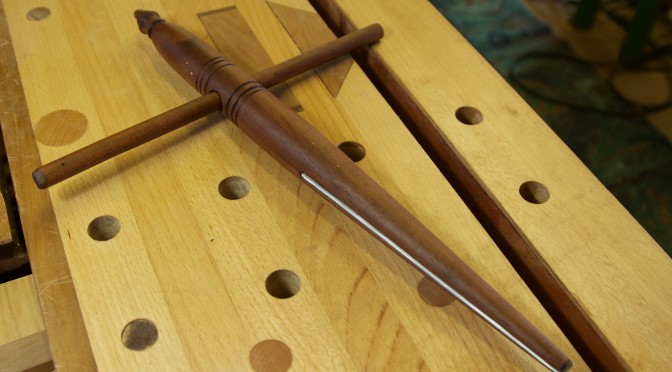
During the Easter break I aquired this broken Danish boxwood rule for R35 (US$2.24) at an antiques shop. I have been looking for something like this for a while, as these rulers have the perfect type of hinge for a shop built sector.

IMG_6510IMG_6511IMG_6512

Seeing that one needs to mark out measurements on the sector, I decided to use a light coloured wood. I found this piece of Olienhout (Olea europaea africana or Wild olive) that would have been harvested between 1988 and 1992 on a farm in the Groot Marico district. My father was building Grandfather Clocks at the time and one of his best clients (as well as a personal friend) supplied him with Olienhout from his farm. This is a piece that was left over from that era.

I can still remember driving to Groot Marico with my father to deliver a Grandfather clock to this guy called Oom Frik. Oom Frik purchased at least four of these clocks over the years and paid for it in part by supplying my father with the most magnificent Olienhout. On the way there we stopped at the Hotel in Groot Marico to sample some of the local mampoer that the area is famous for. When the barman heard that it was my first visit to Groot Marico, he explained that it is custom for first time visitors to be served a glass of the local elixir on the house. Being a student at the time, I needed no further convincing so he proceeded to fill a tumbler with crushed ice followed by more than a sensible amount of mampoer.

That stuff knocked my socks off to say the least, despite being a fairly fit alcohol consumer at the time. As I sat there sipping the poison, I could swear Oom Schalk Lourens wispered something to me. For those of you who do not know the work of the legendary Herman Charles Bosman, do yourself a favour and read (at the very least) “Mafeking Road & other stories” (1947). It is arguably the best literature ever to come out of Southern Africa and it will make Groot Marico and the Afrikaner come alive to you. I digress, but as a last thought on the matter I will leave you with a quote from Bosman where he described Groot Marico “There is no other place I know that is so heavy with atmosphere, so strangely and darkly impregnated with that stuff of life that bears the authentic stamp of South Africa”.

Anyway this piece of wood comes from that area, has been lying around for at least 25 years since being harvested and was most definitely enjoying those beautiful Bosveld sunsets with Oom Schalk Lourence at the time Bosman was writing his epic stories.

IMG_6513IMG_6513

On the table saw I ripped 6 thin strips from the side with the lightest coloured wood. Two of those were milled down to the exact thickness of the boxwood rule.

IMG_6529IMG_6552

I then got rid of the broken hinges.

IMG_6553IMG_6554

I planed the boxwood very carefully to expose fresh wood for the adhesive to bind to.

IMG_6555IMG_6556IMG_6557

The strips of Olienhout were then glued up as so …

IMG_6558IMG_6559IMG_6560IMG_6561

After removing excess glue and squaring up, I had two extensions with perfect slots to accommodate the rule.

IMG_6583IMG_6584

The rule was then epoxied into position.

IMG_6585

16/5/2016

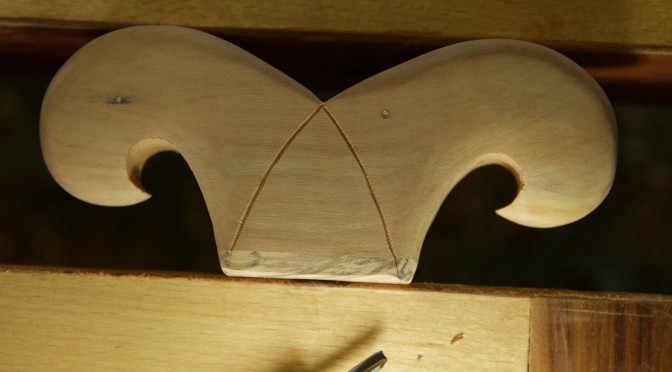
At this stage I first marked out the divisions on the inside surface of the arms. I decided on 25 mm divisions which gave me 24 of them on each arm of this sector.

IMG_6853IMG_6854IMG_6855

I then shaped the arms as shown below to make the sector lighter and enhance it’s visual appeal.

IMG_6856

A pin was added to help keep it straight and lined up while stored.

IMG_6857

I then marked the front faces using the inside markings as a reference. The numbers were punched in using my number set.

IMG_6858

Once punched I added black ink.

IMG_6860IMG_6861IMG_6862IMG_6863IMG_6864

That was followed by Woodoc finish.

IMG_6865IMG_6866IMG_6868

23/5/2016

There you go, one Olienhout sector from the world of the late great Herman Charles Bosman.

IMG_6874IMG_6875IMG_6876IMG_6877IMG_6878IMG_6879IMG_6880

The Fountainhead – part 2

15/2/2016

The first post in this riveting series can be found here.

So after all the drama of the past 11 days we can get back to the usual business of documenting a slow, yet delightful woodworking journey. The jaws of my fountainhead were fixed to the arms using slow setting epoxy and an almighty Assegaai draw pin. As I mentioned in the previous post, one should be carefully not to offset the hole through the tenon by too much if working with such extremely hard wood as this. You will be able to appreciate from the pictures below, how the excessive offset I used caused an obvious deviation in entry angle on the entrance side. You will also notice the gap on the exit side. If the offset was even slightly more it would have destroyed the jaw on the exit side.

IMG_6217IMG_6218IMG_6219IMG_6220

A quick test fit.

IMG_6221

Here you can see the so called leather hinge.

IMG_6222IMG_6223

Driven by my shame regarding the issue of copying some else’s design, I decided to created my own unique clamping mechanism. It all started with a laminated block of Kaapse Swarthout (Maytenus peduncularis).

IMG_6225

Which received an Ysterhout (Olea capensis macrocarpa) footing. The tool supermodel is obviously pre-glass-door-incident. The photos should paint a fairly comprehensive picture of how I went about shaping this wing nut on steroids.

IMG_6230IMG_6231IMG_6232IMG_6233IMG_6234IMG_6235IMG_6236IMG_6237IMG_6238

IMG_6239IMG_6240IMG_6241IMG_6242IMG_6243IMG_6244IMG_6245IMG_6247IMG_6248IMG_6249IMG_6250IMG_6251IMG_6252IMG_6254IMG_6255IMG_6256IMG_6257IMG_6258IMG_6259IMG_6260IMG_6261IMG_6262IMG_6263IMG_6267IMG_6268IMG_6269

… and Bob’s (Demers) your uncle.

IMG_6273IMG_6274

The final product with a Cape Brewing Company craft beer in the background. Imagine a fountain of craft beer … Sorry I got a bit distracted there.

IMG_6288IMG_6287IMG_6289IMG_6290IMG_6292

You should be able to see the seal leather grip on the inside of the jaw in this picture.

IMG_6294IMG_6297

The shape of my giant wooden wing nut was inspired by my idea of the head of a fountain.

IMG_6295

The fountainhead – part 1

1/2/2016

Seeing that my planer is still in ICU I am continuing to do the odd little jobs that does not get done once the major projects start in all earnest. One of those jobs that has been on the list for a few years is a shop made saw vise. Once again my e-mail advisor Mark Harrell of Bad Axe Tool Works sent me in this direction. He told me about an article in the August edition (#219) of Popular Woodworking by Jason Thigpen. Apparently Mark is using one of these himself and finds it exceptional.

IMG_6119

I found scrap pieces of beach and something I though was Tasmanian Blackwood for the job. At this stage I think it might actually be Walnut, but I am not too sure. While living in New Zealand I restored a few riffle stocks of Walnut and this seems to be quite similar. I am a bit confused about where it came from though. Clearly it was in my father’s pile of wood that came my way, but I do not recall him ever using walnut for any project.

Unfortunately both piece of scrap were significantly twisted, but fortunately thick enough to be planed out. Both these species are so hard that it took me a whole day to get rid of the twist, and square up the four blocks all by hand.

IMG_6118

Marking out the tenons.

IMG_6120IMG_6121IMG_6122

Sawing the tenons.

IMG_6124IMG_6125

Sawing the shoulders.

IMG_6127IMG_6128

I usually stay about 1 mm away from the knife line with the saw and remove the rest by horizontal pairing ala Charlesworth.

IMG_6130

That bit of waste next to the knife line also serves to protect the actual shoulders while I plane the cheeks of the tenons to it’s (almost) exact thickness. I use my Stanley no. 10 rabbet plane and a set square to achieve this.

IMG_6135IMG_6138

A quick change of handle for my Lie-Nielsen chisel. I turned this pairing handle myself, which is one of the wonderful advantages of these socket chisels. The longer handle makes for more accurate and comfortable pairing.

IMG_6140IMG_6139

As you can see here, this Charlesworth method can be frightfully accurate.

IMG_6148

This area was removed on the table saw. I am sure you will excuse me for not wanting to plane unnecessary by hand at this stage.

IMG_6150

It got cleaned up with a Stanley number 78 rabbet plane. No sweat.

IMG_6151IMG_6152

The mortises were first drilled out on the drill press and then fine tuned using a few chisels. The wood was simply to hard for my brace and Irwin auger bit, which is why I had to resort to the drill press.

IMG_6154IMG_6155

8/2/2016

IMG_6169IMG_6170

One of these elevated areas will become the actual jaw of the vise. The other was kept intact to make drilling these holes easier.

IMG_6172IMG_6173IMG_6174IMG_6175IMG_6176IMG_6177

Here I am fine tuning the actual jaw surface. Jason dubbed it a “compound springjoint”. What that basically means is that you first remove a bit of timber from the bottom of the jaw to ensure that the first contact between the jaws occur at the very top of the vise. As the tention increase the slight distortion (bending) of the arms results in the entire jaw face clamping down on the saw plate.

Once that is accomplished you hollow out the length of the jaw by a smidgen. This in turn will ensure that the ends of the jaws make contact first. As the clamping pressure increase the small gap in the middle close up and you end up with even pressure across the whole length of the jaw faces.

IMG_6178IMG_6179IMG_6180

The area I mentioned earlier that was left intact also helped to keep the jaws stable on the bandsaw for this operation. One of the curves were too acute for the bandsaw so I had to use my shop made bow saw.

IMG_6182IMG_6183IMG_6184IMG_6186

At this stage the little area pictured had served it’s purpose and was removed by hand planing, (after an ice cold beer). You would also put ice in your beer if your shop averaged 33-35 °, trust me.

IMG_6187IMG_6188IMG_6189IMG_6190

The table saw once again came in handy for this angled cut.

IMG_6191

As you can see the table saw left nasty burn marks, which were removed by hand planing.

IMG_6192IMG_6193

The second bevel were all done by hand planing.

IMG_6194IMG_6195IMG_6196IMG_6197

Next came the so-called “leather hinge”. It is an appropriately sized block of wood with leather on both sides that keeps the arms parallel to each other. If you read Jason’s article it will become a bit clearer.

IMG_6198IMG_6199

By the way, you might be able to see by how much I chose to “off-set” the draw pin holes. As it turns out this is slightly too much. I realised by doing this that for extremely hard wood like this one should use less. Nothing disastrous happened but if the off-set was anymore I would have destroyed many hours of toil during glue-up.

IMG_6200

Here you can see the leather hinge and (as per usual) my hardware improvisation.

IMG_6201IMG_6202IMG_6203

Unfortunately I did not take a photo of the crucial step of drilling the holes for the two bolts that pass through both arms and the leather hinge. I employed insert nuts to anker the bolts. I used to struggle with these insert nuts. They never used to seat nice and straight. That is until I made this incredibly complex insert-nut-inserter. You screw the insert nut onto the device with enough of a leading section of threaded rod which keeps the nut lined up and launch it with your cordless drill.

IMG_6204IMG_6205IMG_6206

So why the title “The Fountainhead”? I happened to listen to an audio recording of this classic 1943 novel while working on this project. At some stage I realised that the saw vise actually resembles the head of a fountain.

Warning: This post will now deteriorate into a pseudo-philosophical discussion of literature rather than woodwork. Please refrain from reading any further if you are allergic to such quasi-intellectual drivel.

The novel seems to be quite relevant to the sentiments expressed by many woodworkers that forms part of the resurgence in handcrafted furniture. There seems to be an underlying theme  that permeates through most of what is written online by the new generation of woodworkers. The theme can be seen as a reaction against consumerism (gone crazy), industrialisation and it’s decaying effect on quality. The Schwarz has in recent years linked it to American Anarchism.

Interestingly though, one of the main themes of the book is at odds with one of Christopher Schwarz’ ideas. He often argues that most designs that stood the test of time can probably not be improved on. I am particularly thinking of his ideas around workbench design. The main protagonist in the Fountainhead, Howard Roark challenges this idea with his approach to architecture. He is fiercely opposed to any form of copying. So it was with shock that I realised that I was pretty much copying Jason’s saw vise, which I usually do not like doing. Of course a workbench and a building is two different things, but it is interesting ideas to mull over on your journey towards your own philosophy. There are no rights and wrongs I am sure, just concepts to ponder over for woodworkers with a philosophical bent.

One more observation I made was extremely thought provoking. Probably the major theme portrayed through this story is that of individualism being more desirable than collectivism. According to the novel the individual should produce work that is true to themselves and original. They should not merely give the masses what they want, which is usually a slightly tweaked version of what has been done ad nauseum  in the past. What seems to betray this prime philosophical stance of the book, is the fact that in true American style it has a fairly happy ending. In other words, what the masses want.

Anyway, I think that any modern woodworker can benefit from reading this book. It will get you to think about and challenge your beliefs around design and woodworking in general.

I conclude this post with a picture of a Shaft-tailed Whydah (bottom) and a Redheaded Finch (top) that came to visit my shop this weekend. We will hopefully finish the project in part two.

IMG_6214

Shop made reamer and tenon cutter

25/1/2016

I am currently  in an unwanted limbo phase in my shop. My electrical planer was sent to a workshop to get fixed end of last year with the idea that they can get it sorted while I am away on holiday. Unfortunately the curse of Namibia has befallen the planer. They are waiting for parts from some other godforsaken place before they can finish the job. That has forced me to keep myself busy with some of those little jobs that you keep on putting off while working on bigger projects.

One of the fairly quick projects I got stuck into on the weekend was to build a reamer and tenon cutter set. I bought an electronic version of Christopher Schwarz’s new book “The Anarchist Design Book” (highly recommended by the way) last week, which reminded me that I wanted to build such a set. A few people have already written stuff on the detail of how to build such a reamer so I will not repeat all that. Here are a few links that I found helpful.

Greenwoodworking

Peter Galbert

Tim Manney

Gluing Assegaai (Curtisia dentata) for the reamer.

IMG_6026

While that was curing, I used a piece of hacksaw blade to shape the blade. It seems that most of the authorities (including the Schwarz) prefer a 6° angle for the blade. That is exactly what I decided on. It took ages to shape this blade as it is ridiculously hard and I did not want to ruin the temper.

IMG_6035IMG_6036IMG_6037IMG_6050

The next day the Assegaai shaft was turned on the lathe.

IMG_6051

The most frightening thing about making one of these reamers is cutting the kerf to accommodate the blade. The only handsaw I own that would be able to cut such a deep rip is my humungous Disston no. 12 26″ 6 tpi. Now imagine cutting such a precise kerf in a relatively delicate piece of wood with a saw like that. I had to first consume a few drops of usquebaugh before making the cut.

IMG_6052IMG_6053

… and Bob’s your uncle!

IMG_6060IMG_6057

Then the idea is to use your new reamer to produce a perfectly matched conical tenon cutter. For this purpose I went foraging for a suitable blade. Was I not over the moon to find this beauty. One of the dilapidated old wooden planes I bought some time ago for decorative purposes happened to sport this blade/chipbreaker combination. As you can see we have a Robt Sorby blade with a A. Mathieson & Son chipbreaker.  As far as I know, this is seriously good stuff.

IMG_6038IMG_6039IMG_6042IMG_6040IMG_6041

Scrap piece of Tasmanian Blackwood.

IMG_6063

5/8″ hole drilled through it.

IMG_6064

Reamed out to the point where the blade is only just touching the edges of the far side of the hole.

IMG_6065

Despite cutting a type of escape rout for the shavings in front of the blade (as recommended by the gurus), I found that you have to stop quite often to remove clogged up debris.  Despite that it is a legend of a tool to use. You have perfect control and no loud noise or dust to contend with.

IMG_6068IMG_6067

I think I need to get a few more pointers from Jonathan White (The Bench Blog) on photography, because I could for the life of me not capture this nicely. The reamer managed to ream out a hole that has sidewalls as smooth as the usquebaugh I consumed earlier. I had to put on sunglasses to deal with the glare of the midsummer sun rays bouncing off of it.

IMG_6072

Opening up the hole carefully by planing away the waste. Initially quite aggressively so.

IMG_6073IMG_6074IMG_6075

Then quite carefully with my David Charlesworth powered no 5½.

IMG_6076IMG_6078IMG_6081IMG_6082

I used the following methode to secure the blade into position.

IMG_6087IMG_6088IMG_6089IMG_6090

Then you only need to turn a dummy tenon as close to the correct size/shape as possible on your lathe. The dummy becomes the first victim of your tenon cutter and can be used as a guide to check your progress while reaming mortises in future.

OK, time for some more usquebaugh.

IMG_6103IMG_6104IMG_6105IMG_6106

Boorish Pencil Sharpener

7/9/2015

A few months ago I bought an electric pencil sharpener from Tools for Working Wood. Very excited with my new purchase I changed the plug (as we have different plugs in Namibia), inserted it into the power outlet and sharpened a pencil. Afterwards I saw some smoke emanating from the device, followed by a prompt discontinuation of function. On further inspection, I saw that this was a device made for 110 V power! Were the hell do you find 110 V in Namibia, I did not even know something like that exists!

I did, however, not allow my ignorance to get me down. This past weekend I found an old drill stashed away in a corner of the shop. It is in such a poor condition that it cannot be used as a drill anymore, but does still turn the chuck most of the time. For some unknown reason I thought of turning it into a pencil sharpener. Yes, I know it is probably a fire risk, can cause cancer (in California), might disturb the migration of several million mosquitoes during the next rainy season etc etc, but in Africa we do not fuss too much about stuff like that.

The result of my inventive activities is on display in the picture below. Unfortunately, it is probably the loudest tool in my increasingly hand tool orientated shop. One small downside of my ingenious invention is therefore that I need to use earmuffs when sharpening a pencil!

The BPS  works like a one armed bricklayer in Bagdad, but certainly would get some Greenies upset with the speed it churns through a forest. Please feel free to let me know how dumb (and/or politically incorrect) I am, or alternatively how I can find 110 V electricity in Africa, or how to turn the 110 V sharpener (what is left of it) into a 24O V consumer.

IMG_4988

Shop made Fidgenian frame saw – part 3

1/6/2015

I had the pleasure of finishing this Tom Fidgen inspired frame saw over the weekend. If you missed the first two posts in this series, click these links:

Part 1

Part 2

I treated the Kershout with Tung Oil followed by a coat of Woodoc.

IMG_4640IMG_4632


One last foto pre-assembly.


IMG_4645


My righthand man Connor (my son’s best mate) had the honour of first handling the assembled saw. As you can see it came out pretty nice.  Kershout is really one of the most beautiful wood species from this part of the world.


IMG_4647IMG_4648IMG_4649IMG_4650IMG_4653IMG_4651IMG_4652IMG_4654


Unfortunately, I have not been able to weigh it yet, but will post the weight as soon as I have it.  However it felt reasonable during a test cut, but I will have to report on how it feels after a few heavy re-sawing cuts. Before I can do that I need to build a kerfing plane. I have an idea which departs significantly from Tom Fidgen’s model, but you will have to wait with me to see if it works, otherwise we will revert to his version.

Shop made Fidgenian frame saw – part 2

26/5/2015

Finally the next chapter in this fascinating series arrive to ease the eager anticipation of the woodworking proletariat.  If you missed part one, simply click the link. Since part one of this story I’ve realised that it is a lot more work than the previous two saws I’ve built.

In the pictures below you can see how I started to shape some of the parts. The Kershout is so freaking dense and heavy that I really had to remove as much timber as possible to reduce the weight.

IMG_4545IMG_4546IMG_4547

I first tried to use my vintage Witherby drawknife to remove material from these long sections (not sure what the correct term is for these parts), but the wood is simply too hard. Then I tried the bow saw I built recently, followed by a Veritas spoke shave and it worked much better.

IMG_4548IMG_4549IMG_4550IMG_4551IMG_4577

I reassembled the saw to check that the chosen shapes work aesthetically.

IMG_4589IMG_4587IMG_4588

As you can see, I did not do myself any favours in terms of reducing weight with the dimensions of the steel I chose for the hardware. That is because I usually use the bits of scrap (that I collect religiously) lying around the shop rather than to go and buy stuff.

IMG_4594IMG_4595IMG_4596IMG_4597IMG_4598IMG_4599IMG_4600IMG_4607IMG_4623

This piece of steel is meant to protect the wood from potential damage by the tensioning bolt.

IMG_4608IMG_4609IMG_4610IMG_4611IMG_4612IMG_4628

Then followed the careful shaping and smoothing phase. You will notice the range of tools used sitting on my bench.

IMG_4613IMG_4619IMG_4625

This is a picture I was reluctant to share, but decided that it would be silly not to. What I needed to do here was to fill quite a few wood borer holes with epoxy. It must be borer that did it’s damage while the tree was still alive or at the very least still green, as the wood is simply too hard for borer now. Looking at the stuff I had to dig out of the holes they had severe constipation even at that stage. I knew about these imperfections from the start. It is a fairly frequent obstacle I face while working with the feral woods of the Knysna Forest.

It simply serves as a reminder to all of you out there who can walk into a lumberyard and choose from board after board of perfect wood that you are very lucky. So remember that.

IMG_4626

… and finally a brief preview of what’s to follow in part 3.

IMG_4629IMG_4631IMG_4634IMG_4637

Shop made Fidgenian Frame saw – part 1

20/4/2015

The next traditional saw on my list to build is a frame saw. You might remember that I have completed a 12″ bow saw and a 700 mm Roubo-esque cross cut bow saw already. After some research I decided to use Tom Fidgen’s (The Unplugged Woodshop) design as inspiration for my version. Tom is an icon of note as far as I am concern and that was enough reason for me. He produced two excellent videos on how he built his frame saw (see the link profided if you are interested.

For this project I chose Kershout (Pterocelastrus tricuspidatus) which is ridiculously hard with a specific gravity of > 1 (it sinks in water). The third picture show the end grain of a small piece. I tried to count the year rings and got to about 120. This gives you an idea of how slow it grows and why it is so dense.

IMG_4133IMG_4134IMG_4137


The usual lamination process I have to endure to make up stock with appropriate dimensions.

IMG_4146IMG_4147


The rough stock before work started.

IMG_4460


Living in Africa means I have to cobble together my own hardware for the saw. A scrap piece of mild steel angle iron seemed to fit the bill. As you can see I am no welder, but we all have our little problems.


IMG_4461IMG_4462IMG_4463IMG_4465IMG_4466IMG_4468IMG_4469


My shop built Jack plane came in handy to square up the parts.


IMG_4471IMG_4476


I have been struggling to saw off smaller pieces of stock like this perfectly square. Since I received my holdfasts I tried this approach and it improved my accuracy immensely being able to see the two lines you are sawing. You then flip it over and repeat on the other side.

IMG_4479IMG_4480IMG_4475


Dual tenon design, ala Mr. Fidgen.


IMG_4504IMG_4506


I like making a small notch with my chisel to start the crosscut saw.

IMG_4507IMG_4508IMG_4509IMG_4511


My shop made bow saw removed the waste between the two tenons.

IMG_4513IMG_4514


Dual tenons necessitates dual mortises.


IMG_4523IMG_4540IMG_4527IMG_4535


Now the fun part will start. Shaping the saw will be the topic of the next riveting installment in this series.

IMG_4544

Shop made Roubo-esque crosscut bow saw

13/4/2015

This is the second of a working set of bow saws that I am building at present. I decided to use Andre Roubo’s plates as inspiration for this one. If you are interested in this brilliant book by Lost Art Press, check it out here. The final picture in the series below is what I was aiming for.

IMG_4034IMG_4031IMG_4058

My bench while all this was going on.

IMG_4056

In terms of wood, I thought Assegaai (Curtisia dentata) would be perfect given it’s strength and resistance to splitting when flexed. In the pictures below you can see the pieces I selected. You might be able to see how the grain is running off to the side at one end of both pieces destined for the cheeks. I specifically chose it like this to follow the curve of the top end of the cheek, hence improving the strength.

IMG_4051IMG_4052

I used dividers to get a sense of the proportions of Roubo’s saw. One fixed measurement was the length of the saw blade (700 mm) as bought from Dieter Schmidt. I applied the proportions to this starting point to establish the length and width of the cheeks. In terms of the shape I simply drew something that followed the grain and added some artistic je ne sais quoi.

IMG_4057

I drilled and chopped the mortises in the cheeks prior to shaping.

IMG_4090IMG_4091

With the stretcher in position I marked out the correct location of the holes for the cross pin (6 mm or ¼” steel bolt in this case)

IMG_4059IMG_4060


20/4/2015

These holes were tapped and countersunk.

IMG_4092

Next step was to cut the kerf for the blade.

IMG_4085IMG_4087IMG_4089

I used the bandsaw to do the rough shaping.

IMG_4096IMG_4097IMG_4098

The lines to guide the next phase of shaping were drawn as shown, using my finger as a fence. It is quick and easy.

IMG_4099IMG_4100

The rest of the shaping were accomplished with spokeshaves, files and a card scraper.

IMG_4102IMG_4103

I used the same piece of Tamboti as mentioned in my previous post for the spindle of this saw. It was simply a bit bigger.

IMG_4105IMG_4113

A quick test fit. I really hope Brian Eve (Toolerable) does not get on my case again with regards to the string I used. I do not even know what this stuff is called, but it is cheap and available so that is what I went for.

IMG_4117IMG_4118

Tung oil treatment.

IMG_4119

Don’t you think Assegaai is exceptionally beautiful? I do. This saw hums through African hardwood. Viva Monsieur Roubo!!

IMG_4123IMG_4124IMG_4125IMG_4126IMG_4127

My next project will be a Fidgenian frame saw. The other saw I have built already is a 12″ bow saw. Go here if you want to take a look.

Shop made 12″ bow saw

13/4/2015

As you probably know by now, I am in the process of building a working set of frame/bow saws. For the small bow saw I decided on Witpeer (Apodytes dimidiata) to compliment the quality hardware from Gramercy tools. I also decided to use their design, as their reasoning for how they came up with their design made perfect sense, given all the other reading I did on the topic. This is a link to their plans. I found this discussion very helpful in terms of understanding the important design aspects.

In the picture below you can see how my new bench light made it much easier than before to chop the two tiny mortises in the cheeks after removing the bulk of the material by drilling.

IMG_4023IMG_4024IMG_4025

The rough shaping was done on the bandsaw.

IMG_4026IMG_4027IMG_4028

Just a quick reminder of what the hardware looks like.

IMG_4029

The rest of the shaping provided me with an ideal opportunity to use my new spokeshaves from Veritas. We were in Johannesburg over the Easter Weekend, which meant that I could do some shopping at the Hardware Centre in Randburg. They usually have bits and pieces of Veritas tools lying around.

IMG_4038IMG_4039

Sawing the tenons of the stretcher.

IMG_4040IMG_4041

IMG_4042IMG_4043

Shaping the stretcher.

IMG_4044IMG_4045

First fit.

IMG_4047

I then turned the handles and epoxied the brass pins into position.

IMG_4048IMG_4049

Fitting the handles.

IMG_4063IMG_4064IMG_4065

A picture to show what my bench looked like while building the first two bow saws.

IMG_4056

20/4/2015

For the spindle I found a Tamboti (Spirostachys africana) off-cut. This is as far as I am concerned one of the most precious African woods. If you want to know a bit more about Tamboti, use this link.

IMG_4104IMG_4105

It is very difficult to turn small pieces like this in my lathe. Therefore I decided to used the method illustrated below to turn the Tamboti spindle.

IMG_4106IMG_4107IMG_4108IMG_4109IMG_4110

I flattened two sides of the lower section with a block plane.

IMG_4111IMG_4112IMG_4114

The first assembly prior to finishing …

IMG_4115IMG_4116


… which was followed by a Tung oil treatment. You can also see some of the parts of my monster Roubo-esque crosscut bow saw these pictures. I will write a separate post on that project, which should be publish later this week.

IMG_4119IMG_4120

There you go … one 12″ Witpeer bow saw completed.

IMG_4128

I recently bought an old number/letter punch set and tried it out for the first time on this saw.

IMG_4129IMG_4130IMG_4131IMG_4132

The Roubo Beast Master (to steel a term from Mark ‘Bad Axe’ Harrell) crosscut bow saw is also finished.

PS – Thank you to my friend Jonathan White (The Bench Blog) who taught me how to insert links.