
12/10/2014
The bench was finally assembled on Sunday 22/10/2014!!!
We managed to do the glue-up in two very stressful hours between 15h30 and 17h30, after working under the gun all weekend to get the last prep work done.
At the beginning of the week I drew up a list of the most important bits to get done before assembly, which was scheduled for Sunday. As you can see it is a curious eclectic ensemble of Afrikaans and English.


Early in the week I made these custom 20 mm bolts, which will fix each of the two parts of the twin-top to the aprons in two places.


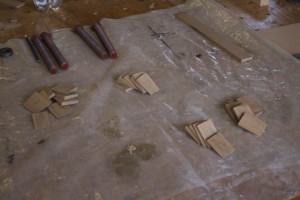
This is the board of Assegaai I transformed into drawpins. The process is documented chronologically in the pictures. Curtisia dentata is especially well suite to use as draw pins due to it’s characteristics of being extremely tough, strong and elastic. Dry Assegaai also shrinks less than most other wood, which is why it was the preferred wood to use for wagon wheel spokes in the Old Cape Colony.


Some handcut Witpeer wedges to lock the through-tenons permanently in place.


The tenons of the long stretchers ended up looking like this, shortly before being glued into place for ever (I hope).


The final dry run went very smooth. I expected something to not fit perfectly, but for a change it was not the case. You can see how my wife and friend Siegmund Mengersson (who happened to be around) helped, as this is not a one man job.


We then took the whole thing apart and took a few photos with the whole family. The reason being that the whole family spent the weekend wondering in and out of the shop.


Then on Sunday afternoon we mixed the epoxy (discussed in an earlier post) and raced through 2 hours, which felt like 15 min. We only just managed to get the job done within the recommended 2 hours open-time of this particular epoxy adhesive.
What impressed me most was how the Assegaai drawpins closed up the shoulders of the aprons and stretchers. We used clamps to take the stress off the pins while hitting them home, but could visually see how they tightened up the joints. We removed the clamps immediately after and the joints stayed perfectly tight and closed up.
What worked particularly well, was the 13 mm x 150 mm drawpin that was tapped through the sliding-dovetail-through-tenon into the top. These did not need any assistance from clamps. It simply pulled the leg into the top as if they were made out of the same piece of timber. I have never seen this method used for the mentioned joint, but I can really recommend it (from this case study of one).


A few pictures of an exhausted yet relieved wannabe-18th-century-woodworker, his heir and the object of his toil since the 2nd of February 2014.


That is one massive bench! I admire your dedication and I’m sure it’ll give you lifelong satisfaction.
My woodworking philosophy is similar to yours. I made 2 machines (a saw guide for a Makita 9″ circular saw and a router table for a Tritan router) and I bought 2 machines (a band saw and a pedestal drill press) before I started to understand that hand tools are not only more satisfying to use, but are often quicker and more economical ($ and space) for the hobbiest. Have you read or watched Paul Sellers?
Hi Gordon, Thank you for your comment, it is much appreciated. It has been a long hard slog and not finished yet, but very satisfying to get it assembled finally. I have watched a bit of Paul Sellers’ stuff and really enjoyed it. My favourites are David Charlesworth and Chris Schwarz. I bought a few of their videos (you can get them through Lie-Nielsen or Lost Art Press) and it (especially Charlesworth) has changed my approach completely. Keep in touch.
My roubo is coming up to the anniversary of buying the lumber! Unlike you I don’t have it growing in my backyard. [You detected the envy?]. I’m use Victorian Ash aka Tasmanian Oak (actually a eucalyptus species). My design is classical (not split-top) Roubo. Legs, stretchers, breadboard end, wagon vise are all done. Leg vise, sliding deadman are in progress. Final assembly will be entirely glue and draw bored M&T’s.
Legend Gordon, do you have some pictures, I would love to see it. Where are you from?
Yes, I have pictures. How can. Get them to you? Email me at gordon_buck@hotmail.com