

25/5/2017
You might say, just not another table project that will drag on for three years. That would be very understandable given my most recent project that necessitated 14 posts. You will therefore be happy to hear that this project is currently almost at the halfway mark and this is the first post. The date above was when I loaded the first set of pictures. At this point it is probably also pertinent to warn the suffragettes amongst us that this post might contain sensitive material.
The Marx family needs a kitchen table able (rather like that two-step) to withstand the eternal destructive forces directed towards every wretched object in our household. The destructive forces are also known as our “offspring” or more specifically Didi and Aoife. To be fair, no piece of furniture including my Roubo workbench will last indefinitely under their perpetual onslaught, but I do not want to have to repeat the exercise within 12 months. To add to the complexity of the brief, I wanted to build something that has a (wait for it …) certain je ne sais quoi.
I rather liked the sort of pagan simplicity of a table design advanced in The Anarchist’s Design Book. Herr Schwarz describes a table that has two thick beams (running diagonally with regards to the grain of the top) under the top into which Windsor-style legs are savagely inserted. This, I am sure, will work exceptionally well if you have a top of reasonable thickness as there are no aprons in his design if I remember correctly. Seeing that I wanted something that would appear more diaphanous, I had to develop the design a wee bit. The other challenge with the peasant design (meant as a compliment rather than derogatory) in Herr Schwarz’ book lie in the lack of inherent stability of my preferred feral African hardwood . Some of the boards I work with will make a late luteal phase female look stable (listen, I warned you, OK!)
The panacea for the stated conundrum seemed quite obvious to me. I needed to incorporate two heavy(ish) beams into a torsion box that would support a light top adequately and resist all other forces such as twist, warping, etcetera. The idea is that the brute strength of the torsion box will be almost invisible to the casual observer while being well hidden underneath the top. All that is supposed to meet the eye is a thin floaty top with four understated yet sophisticated legs protruding (at a barely discernible angle) from it’s belly.
In order to test my ideas on shape and size, I built a very basic model. In terms of proportions, the top is 900 x 2100 mm which makes it a 3:7 ratio. This was dictated somewhat by the space the table is destined for. Seeing that the height is around 770 mm it means that the height is about 1/3 of the length, which seemed like a good ratio. I then added very slight curves to all four sides.
I cannot, for the life of me, find a proper name for this shape. It is basically a rectangle with four convexly curved sides and sharp corners. I will therefore call it a ‘reuleaux rectangle’ (simply because of the enticing alliteration of course), although that is certainly not a formally recognized term. Be that as it may, it is one of the most pleasing shapes in the eye of this humble observer. You might recall a chopping board I have built with the same basic shape.


The lines on the top represent my experiments to find the best rake and splay angles for the legs.

I decided to build the table using Witpeer predominantly and Kershout in very limited amounts to add accent to cardinal curves only.


The legs will have a very slightly tampering (from top to bottom) octagonal shape. The shaping was done by hand planing, in the first place with my shop made scrub plane followed by a no. 606 Bedrock Fore plane. The stock for these legs were made up of two laminated strips of Witpeer. In order to hide the lamination, I marked out the octagon in such a way that the lamination lines run exactly on two of the edges.


19/6/2017 (second set of pictures loaded)
At present (5/2018) the top is in two pieces of the below size …

… and three of the legs are roughly shaped.

I used Tasmanian Blackwood (intruding pest as it is in this part of the world) for that part of the torsion box that will be completely unsighted and Witpeer for the rest. It might sound as if I do not like Tasmanian Black (TB after this), but to the contrary I have a lot of respect for it. My African hardwoods are obviously close to my heart, but the TB did grow on this continent so it is very much local.
Come to think of it, it is very much like my distant German relatives from pre-1710 and I. Not that your average populist majority politician in this part of the world has the intellectual capacity to get this.
Anyway although I find the TB rather difficult to work with (the former being another similarity to my ancestors and I) it has a tenacity second to none. It reminds me of an Australian sports team, although it does not tend to tamper with the ball quite as much (sorry just had to through that in there). The only problem is that I do not have the top end stuff, but rather crappy warped light coloured boards for the most past. The top end stuff can be absolutely spectacular, but mine not so much. Hence why I use it for the unsighted structural parts.
In the picture below you can appreciate one such board. Once you liberate appropriately sized chunks it tends to move, twist, warp etcetera all over the place. I then re-saw these, flip one of the two pieces and laminate them back together so that the apposing forces cancel each other out.


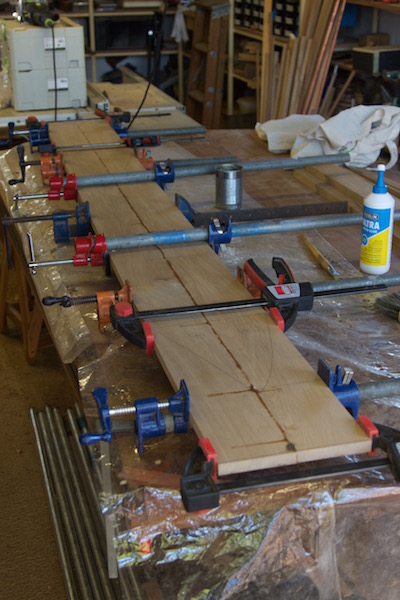
Here I used a Witpeer beam from another project to ensure that the two aprons gets glued absolutely straight. I added a thinner strip of TB to the inside of each apron for strength.


21/5/2018
My torsion box will have two heavy beams at it’s ends. These beams will accept the legs as joined in the same fashion as Windsor chair legs. They are clamp together in the pictures below to mark out the joinery.


Torsion box has four components running longitudinally and five (including the two heavy beams) running diagonal to the aforementioned. The longitudinal components are joined to the beams with through tenons, which will be wedged. The shoulders sit in a rabbet (pictured) to prevent twisting.


This is what the longitudinal components look like. The outside pair (left one in the picture below) is slightly heavier and has a Witpeer face side. The inside (right) pair is made up completely of TB.

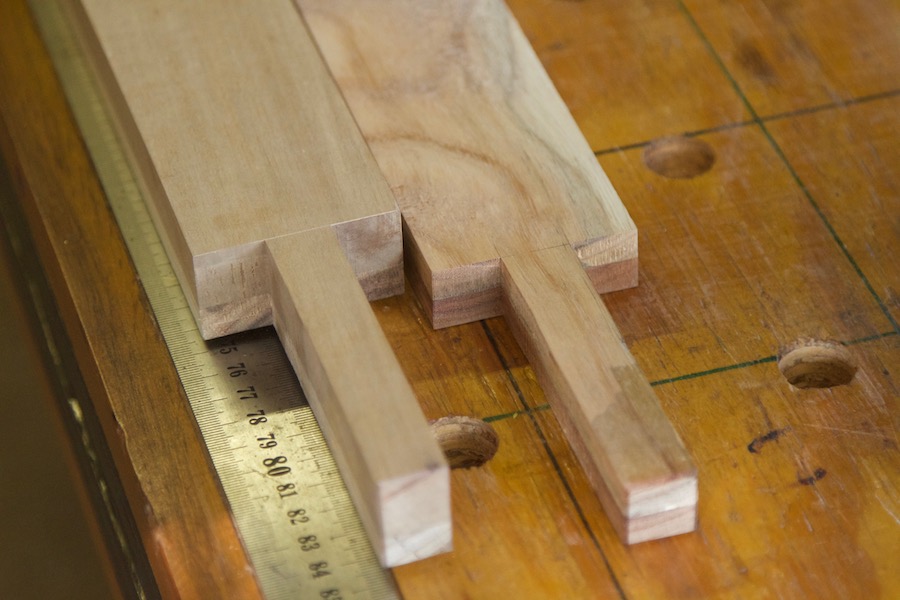
Here you can see how the tenons extend through the Witpeer beam and how their shoulders are located in the respective rabbets.


In these two pictures you can hopefully appreciate another cardinal aspect of the way I designed the joinery. Seeing that the legs will be joined to the heavy beams by means of a tapering round tenon fitted in a round mortise reamed to the same angle of taper, it is likely to exert force that might split the beam. A leg mortise will be located between the 1st and the 2nd through tenon on the near side and the 3rd and 4th on the far side. The two wedged through tenons on each side of the leg joinery should (to my mind at least) go a long way towards resisting a potential split.


Next up are the diagonal members of the torsion box. They are joined in exactly the same wedged through tenon fashion to the outside (apron) longitudinal components. Where they cross the two inside components I prepared a type of half lap bridal joint aided by two rabbits to resist twisting.


Chopping out the mortises in the apron components.


This is where we are at for now. Two of the three cross members fitted with one more to be done between them. The two in the picture slide in from the top and the one to follow will slide in from the bottom, which creates a nice mechanical lock once the aprons slide in to place.

I hope you enjoyed the entrée that took us half way through the meal.