
25/1/2016
I am currently in an unwanted limbo phase in my shop. My electrical planer was sent to a workshop to get fixed end of last year with the idea that they can get it sorted while I am away on holiday. Unfortunately the curse of Namibia has befallen the planer. They are waiting for parts from some other godforsaken place before they can finish the job. That has forced me to keep myself busy with some of those little jobs that you keep on putting off while working on bigger projects.
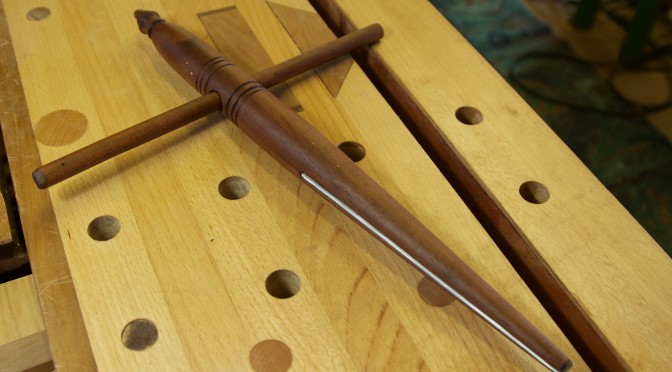
One of the fairly quick projects I got stuck into on the weekend was to build a reamer and tenon cutter set. I bought an electronic version of Christopher Schwarz’s new book “The Anarchist Design Book” (highly recommended by the way) last week, which reminded me that I wanted to build such a set. A few people have already written stuff on the detail of how to build such a reamer so I will not repeat all that. Here are a few links that I found helpful.
Gluing Assegaai (Curtisia dentata) for the reamer.

While that was curing, I used a piece of hacksaw blade to shape the blade. It seems that most of the authorities (including the Schwarz) prefer a 6° angle for the blade. That is exactly what I decided on. It took ages to shape this blade as it is ridiculously hard and I did not want to ruin the temper.


The next day the Assegaai shaft was turned on the lathe.

The most frightening thing about making one of these reamers is cutting the kerf to accommodate the blade. The only handsaw I own that would be able to cut such a deep rip is my humungous Disston no. 12 26″ 6 tpi. Now imagine cutting such a precise kerf in a relatively delicate piece of wood with a saw like that. I had to first consume a few drops of usquebaugh before making the cut.


… and Bob’s your uncle!


Then the idea is to use your new reamer to produce a perfectly matched conical tenon cutter. For this purpose I went foraging for a suitable blade. Was I not over the moon to find this beauty. One of the dilapidated old wooden planes I bought some time ago for decorative purposes happened to sport this blade/chipbreaker combination. As you can see we have a Robt Sorby blade with a A. Mathieson & Son chipbreaker. As far as I know, this is seriously good stuff.


Scrap piece of Tasmanian Blackwood.

5/8″ hole drilled through it.

Reamed out to the point where the blade is only just touching the edges of the far side of the hole.

Despite cutting a type of escape rout for the shavings in front of the blade (as recommended by the gurus), I found that you have to stop quite often to remove clogged up debris. Despite that it is a legend of a tool to use. You have perfect control and no loud noise or dust to contend with.


I think I need to get a few more pointers from Jonathan White (The Bench Blog) on photography, because I could for the life of me not capture this nicely. The reamer managed to ream out a hole that has sidewalls as smooth as the usquebaugh I consumed earlier. I had to put on sunglasses to deal with the glare of the midsummer sun rays bouncing off of it.

Opening up the hole carefully by planing away the waste. Initially quite aggressively so.


Then quite carefully with my David Charlesworth powered no 5½.


I used the following methode to secure the blade into position.


Then you only need to turn a dummy tenon as close to the correct size/shape as possible on your lathe. The dummy becomes the first victim of your tenon cutter and can be used as a guide to check your progress while reaming mortises in future.
OK, time for some more usquebaugh.


Beautiful job! I love using mine, they are fun. And, it is amazing how accurate you can be.
I have the same problem with shavings building up on my reamer. Over time, I’ve become faster at clearing the Dreck by lifting the reamer most of the way out, pushing it to the side so the edge of the mortise kicks the blade part way out, and the chips – if they don’t fall away on their own – can be cleared easily.
Hi Brian
Thanks mate, I agree they are lovely to use. I will try your tip, sounds like a very good technique. Now I am one step closer to building a chair with you.
Have a wonderful day.
Gerhard
Hey Gerhard,
A beautiful job as always. I love that Assegai. Does it turn nicely? I have a couple of questions though there are a few parts that I’m not sure I quite understand. How did you cut the hacksaw blade or did you just grind away the extra? Did you sharpen both edges of the blade or just the one? How did you sharpen such a long blade? What holds the blade in the kerf in the reamer handle? Did you epoxy it in? I don’t see any fasteners.
Sorry for all the questions. This is a cool project.
Jonathan
Hey Jonathan
Thank you for the questions. The Assegaai is one of my favourite timbers for toolmaking. It is incredibly fine grained, strong, hard and flexible. Therefore it also turns very nicely.
I took a small hand held electrical grinder with a cutting disc and cut the rough shape of the blade staying about 2 mm away from the actual line. I made only very short cuts before stopping to spray the area with water. I used the plant spray bottle I use to wet my sharpening stones. This way I was able to keep the temper in the blade. Then started the long process of grinding away the 2 mm of hardened steel on a soft stone in my small bench grinder, as well as the 45 degree angle of the bevel. The actual edge is created the way you created the burr on a card scraper with a burnisher. If you have a look at the link to Peter Galbert’s post, he explains it very well and has some nice drawings too.
The blade is not held at all, and does not need to be either. Mine happens to sit tightly in the kerf, but the way the tool works actually keeps the blade in the optimum position by the sides of the mortise you are cutting. This is a very neat part of this tool. If you look at the link to the Greenwoodworking post, you will see it explained very well there.
Have a wonderful day, and thank you for the correspondence I very much appreciate it.
Gerhard
And by the way… the photos are great. Don’t sell yourself short. You need no pointers from me.
I’d gladly share some usquebaugh with you though. 🙂
Jonathan my friend, one day when we are all grownup we will sit sipping the best usquebaugh money can buy on the Mighty Okavango savouring an African sunset.
That is one nice looking reamer, Good Job!
Now, I got to ask, what kind of liquor is the aforementioned
“usquebaugh”
Your uncle, Bob 🙂
Apparently it is an old name (probably from Scottish gaelic) for whiskey, Uncle Bob!! I understand that they make a pretty good drop of usquebaugh in Canada too?? Maybe one one we will share some while chatting about old tools.
I cannot wait for the second post on Yankees.
Kind regards
Gerhard
…and I wanted to buy the Veritas or Axminster versions!! This is really great, thanks, so much more creative. Myself wants to venture into a few of these stools that the Schwarz writes about, and they need these tools!
Regards
No worries Frank
I am also keen to get stuck into building some of these statements of my disgust for consumerism and industrialisation.
Cheers
Gerhard