
16/7/2015
It has been quite a few years now since becoming disillusioned with the DeWalt radial arm saw that used to belong to my father. I used to think that it is the best thing since cream cheese, but realise more and more as time went on how inaccurate and dangerous the thing is. It takes ages of fiddling around and making copious test cuts to get it to saw square in two different planes. Then you might get two descent cuts and before you know it the blade grabs the stock and the setting is lost again. It also tends to burn the incredibly hard African timber I work with.
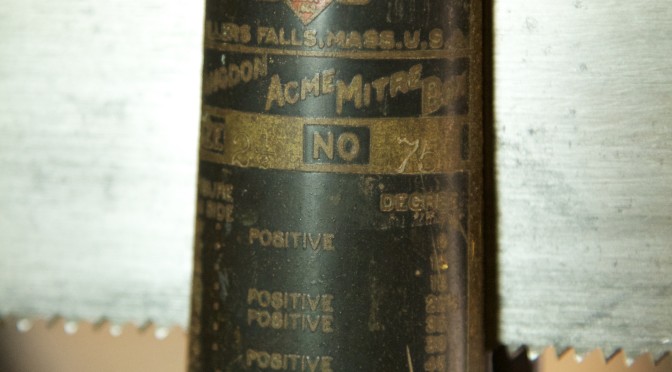
So I decided to look for an alternative solution. My research into the topic of mitre saw boxes confirmed that the Langdon ACME no. 75 would be my first choice. Some of the literature on the Old Tool Haven website suggests that “the Langdon Acme miter box represented the zenith of the Langdon Mitre Box Company’s achievements“.
After waiting patiently for the desired mitre box to become available, I finally bought a Langdon ACME from Jim Bode. Kathryn who is my usual contact person at Jim Bode Tools, was so kind as to send the Simonds saw (that came with it) to Mark Harrell at Bad Axe Tool Works for a sharpening.
Mark had the following to say about the mitre box/saw combination: “NICE score on the Millers Falls No. 75 miter box setup. I have the exact same large miter box and saw here at the shop. The saw’s manufacture happened at some point BEFORE 1928, when Simonds abruptly ceased making hand and backsaws. There’s a bit of a mystery surrounding that, because they were competing quite nicely against Disston. My theory is some sort of dope deal transpired between the two manufacturers. I do know that of all Disston’s competitors (that they couldn’t either drive out of business or buy out), Simonds’ quality and marketing ran toe-to-toe against Disston. In any event, they quite surprisingly quit making hand and back saws in 1928—so, your saw pre-dates that.”

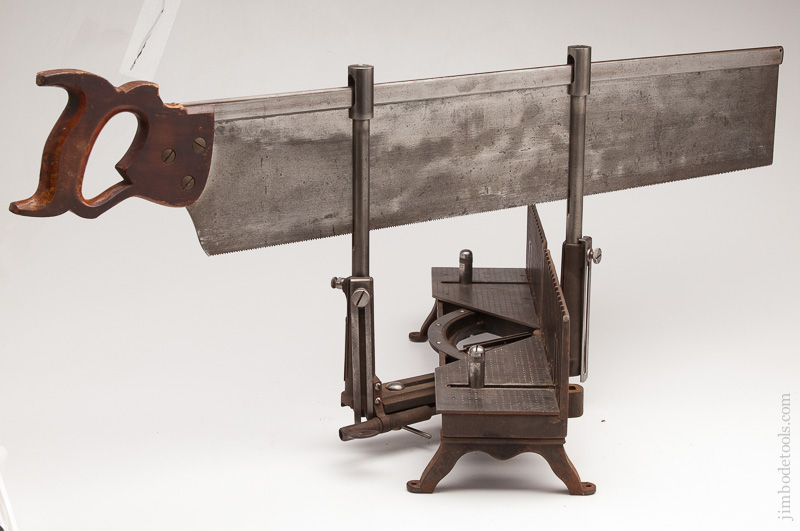


I tried to zoom in on Mark’s dating by looking at the mitre box. From looking at the Old Tool Haven write-ups the saw box was made after 1906 when Millers Falls bought the Langdon Mitre Box Company as mine has the Miller’s Falls brand name on it. Further more it has a 1909 patent date on it, thus after 1909 then. The pictures below show how the plate looked like before the Miller’s Falls takeover and what the mitre box in question looks like.


The following picture from the MF 1939 catalogue show a slightly more evolved mitre box, so mine should be older than that.

I then had a look at the saw to see if that can help us to zoom in on the date of manufacture. I already knew it pre-dates 1928 from Mark Harrell’s information. According to the Saw Nuts website this medallion was used between 1922-1926. Thus this setup was probably manufactured during the early to mid 1920’s.


17/9/2015
As a result of making a detour via Bad Axe Tools, the Simonds saw arrived a month later. Mark did an absolutely brilliant job of sharpening this beast, it is lethal.


21/1/2016
I noticed that although I took every precaution to set it up perfectly, the saw drifted ever so slightly to the right. Luckily my personal tool historian/magician Bob Demers (The Valley Woodworker) mentioned to me last year that it might well do something like that. I therefore asked him how to fix the problem. This was his advise:
After making sure that the box is mechanically “tuned” to cut 90 degrees and the saw sharpened correctly. Having been done by no less than Harrell, you bet it is,
then comes the fine tuning of the saw set.
Unless the saw sharpener has the box with him, it is impossible for him to know witch way to tweak the saw set.
You see if the saw want to naturally favour one side or the other (Not following a straight line) it is because there is a tad more saw set on the offending side and it is compound by the small mechanical errors introduced by the box mechanisms .
The set being slightly more on that one side the saw is cutting an asymmetrical kerf and want to drift toward that side.
Think of two guys paddling a canoe. If one guy is paddling a tad stronger on one side, the canoe will drift toward that side.
We are not talking of much of a difference so go easy….
The way to fix that is by GENTLY running a mill file (no handle) with NO pressure or a oil stone (must be flat, and never a waterstone, too soft) on the side the saw is drifting toward
That action will just abrade the tip of the offending saw tooth set. Go easy, you do not need much to teak it.
Re check the action after each pass, often 1 or 2 pass is all that is needed.
You will probably hear or feel the file when it catch the offending proud saw tooth.
So if that is all, why don’t the saw filer do that themselves?
Because even if the saw was perfectly tuned to go straight, there is still some minutes mechanical things in the box itself which could force it ever so slightly left or right
What we are doing in effect, is tweaking THAT saw for THAT mitre box
Hence why you must ensure first to eliminate all gross errors in the box mechanism and ensure that the saw is travelling true.
Once that is done, it is simply a matter of tweaking the set of the saw to achieve a true cut.
To test how true the saw is cutting, flip over one cut piece and put it back against the other fresh cut. They should lay flat and straight.
The error you see is TWICE the actual error that way
NEVER force the saw to correct a wandering cut. ALWAYS let the saw cut the way it wants.
As we often says: Get out of the way, let the saw cut. It want to cut straight that way, let it
Once the saw AND the box are adjusted to each other, it is possible that a check with a square will reveal a small error, but the saw will still cut square.
It is adjusted to that box…
At this point it is a wise idea to some how identify THAT saw goes with THAT box… Just saying, especially if you have a “few” 🙂
Once you get it as close as you can get it, just remember that other ultimate weapon at our disposal: A shooting board and a freshly sharpen heavy plane 🙂
Hope this answer your question.
It is faster and easier to tweak it than to write about it 🙂
NEVER used a long mitre saw (23 to 28 in long), free hand outside its box. It will bend
The spine is not strong enough to resist bending forces, it is designed to be restrained by the saw box guides.
Now if that is not a master on this topic then I do not know who is!! Thanks Bob!
So that was exactly what I did and true as Bob (pun intended) it took two light touched with the mill file and it was humming to a perfect 90 degree with every single cut.


I know Patrick Leach often speak of the “tool model”. I mean no offence to Patrick, but I think this is the tool supermodel of the woodworking blogosphere. I might be slightly biased, but what the heck.


As you can see here the cut is sublime, all credit to Mark Harrell.

Woo Hooo you done it! 🙂
That was easy, wasn’t it? You can use the same trick on any other handsaw, back saw etc, but BEFORE you do it just make sure to let the saw cut as it want too. I usually make a bunch of vertical lines then cut repetitively to see I can can saw straight. YES some of the errors are often introduced by us with our own techniques but by doing it repetitively it should point out if it favored one side or the other.
Miter box saws are somewhat easier since the box mechanism is forcing the saw to travel true (once properly adjusted)
But in all cases we are talking of a very minute tweaking, so just remember to go easy and check often as you go.
Like I often say about tools restoration: Less is More
Congrats on the Tool super model, give her my best regards 🙂
Bob, with his small family reunited this week
Hi Bob
Thanks again for the wonderful advice, it worked a treat. I am glad you are united with the family, please send my regards. The Tool Supermodel is also in fine form.
Have a great day.
Gerhard
Great post. I’ve been interested in purchasing one of these boxes for a long time, but I got myself terribly confused with all the different makers and models. Looks like I jump on tieback of your research and start looking out for a 75!
I have a Stanley mitre saw in the same condition as your Simonds, will it work with the 75 you think?
thanks
Gary
Hi Gary
Thank you for your comment. You are welcome to use my research. The way I understand it the no. 74 and 75 mitre box is exactly the same. The only difference is that the latter came with a 30″ x 5″ saw and the former with a 28″ x 5″ saw. My saw therefore is 30″ x 5″ so I would imagine if your saw has the same dimensions it should work. However, I am no expert at all so would actually recommend you discuss with Bob Demers (The Valley Woodworker) before making any purchase. He will definitely give you better advice than me.
Please stay in touch.
Gerhard
Hi Gary
To answer properly your question: Will my mitre saw fit model X mitre box, you need to take into account two critical dimensions: The depth of cut (distance from the toot line and the bottom of the back spline and the length of the saw plate.
These dimensions are critical to the proper operation of the mitre box and they are fixed by the post design. Yes, some boxes gives you some adjustment range, but you still cannot stray too far from it. That adjustment range is mostly to accommodate the loss depth of cut on the saw as it is sharpened.
A properly adjusted box should just kiss the bottom board of the box or penetrate slightly under the cutting slot. They are often found poorly adjusted (in depth) with the resulting backing board cut too deeply.
The better boxes can also be adjusted to a preset cut depth (not all the way thru) handy feature when you do lap joint. BUT again to reap the benefits of those adjustments, you need the correct depth of cut for the saw it was designed for.
The length is determined by the box capacity (how wide a board can you saw) and the optimum cutting stroke without having the saw jump off its rail/track/post what have you.
Sometimes, but not always, the model Nos of the miter box gives us a clue about the saw that it originally came with. For Examples some
Stanley models:
Stanley models 300s series
Model 346 came with a 26X4 backsaw
Model 358 came with a 28X5 backsaw
Stanley Model 2200s series
Model 2244 24X4
Model 2246 26X4 and etc.
MIllers Falls/Langdon mitre box see http://oldtoolheaven.com/miter-boxes/miter-boxes.htm.
As far as the backsaws are concerned, besides these two dimensions talked about, from any manufacturers would fit. The ones you will encountered the most are Disston, Simonds, Harvey Peace, Atkins (US) or Shurley Dietrich (Canada) In other words, the main saw makers listed all made mitre box saws for Stanley and Millers Falls/Langdon under contract and are sometimes labeled made exclusively for… or simply stamped Stanley or Millers Falls. MF and Stanley did not make their own saws.
So all you need to know are the two dimensions required for your mitre box. Give me a make and model No and and should be able to find out.
Cheers
Bob
One last thing about mitre box saws. You will notice that the saws’s hang angle varies slightly from saw makers or from the same model thru the years. For best operation your mitre box should be set up at a proper height. That height is best determined by how your back and wrist feel after using it…
And of course that is dictated by the saw hang angle. Which means that the ‘ideal’ height will varies with each one of you(s)
Proper hand tools usage should not tired you or cause you pain.
If and when it does, you are using the tool wrong and or not at a proper stance/height for you.
Bob
I found a pic of the saw I have, the Stanley further down the post…http://hackneytools.com/2014/08/good-times/
Hi Gary
I am very jealous of people like you who are able to find such wonderful old tools in their own backyard. That is an absolutely brilliant find. The saw looks very similar to mine, but do chat with Bob first.
Kind regards
Gerhard
Great looking setup,that is a hole in the hand tool side of my shop I need to take the time to hunt for a decent box and saw. I have the Dewalt 1st gen 12″ silder that has been dead nuts straight out of the box and has needed little maintenance over the years.
Hi Matt
Thank you for your comment. If your Dewalt is working well you might not need one of these, but they are a pleasure to use. So far anyway.
Please stay in touch it was nice to hear from you.
Gerhard
OK I lied, one more thing 🙂
Just came across this site, good reference for these Langdon/Millers Falls boxes
https://sites.google.com/site/langdonmitreboxes/home/model-guide
Bob
Turning green this side……. Always wanted one..
Regards
Frank
Hi Frank
I will let you know if I come across one in future. It will however now be impossible to buy these from US due to the exchange rate and shipment cost and I have not seen any in SA yet. If I find one you will be the first to know.
Kind regards
Gerhard
Ja, the rate is hurting us! A very nice Stanley (358 I think) was listed some weeks ago in Jan Kempdorp, but I couldn’t get in contact with the owner! Bummer!!
Regards
Frank
Hi Frank
Do you know the name of the owner? I know people who knows people in Jan Kempdorp. From my memory the population is less than 10 in the shade, so we are bound to get in touch with the right person, or did the item get sold?
Let me know
Gerhard
Thanks Gerhard for the note on the Stanley 246 this morning! Immediately made the 150km roundabout trip and got it!! Was not going to let this one slip. Quite complete as well, as far as I can tell. Seems to be an older model 246 with a bit more decorative feet and with the brass label mounted on the side.
Has a Disston mounted that looks to be 24×4. Not sure about the 4 but I measured the 24 inches. Will now take the WD40 and lots of patience to see if there are any hidden flaws likes stripped screws or that had been rusted solid.
Will unfortunately have to wait as my wife already have other “priorities” lines up for tomorrow…
Read through Bobs’ blog re mitre saws, great stuff!!
Regards
Frank
Hi Frank
I am so glad it turned out to be a good find, it is such a small world hey?? I can really recommend Bob’s advice and he is very helpful when it comes to sharing his vast knowledge.
Please send me an update from time to time on how the restoration is progressing. I would love to see how it turns out. If you take lots of pictures we can publish it on my website if you like??
Kind regards
Gerhard
Uhmmmm…. we can try….
I’ve actually been logging/photographing a few projects for my benefit these past few years and perhaps I should send one or two sets to you? Then we can discuss it and see how to go about it, if at all? Some sets are a bit cryptic and have minimum pics (perhaps combine them?) Perhaps create a separate blog heading like “Friends’ efforts” or something and see how it progresses? But you’ll have to help with the wording because I’m not nearly as fluent as you in English! Otherwise, you can just consider publishing photo sets?
And furthermore, you shouldn’t publish something detrimental to this classy site!! Keeping a tight leash! Your readers will understand if something is best not published because it may just ruin other prospective traditional woodworkers view on our “hobby” (by lack of a better word)…
Regards
Frank
Hi Frank
I think that is a very good idea to trial. Thank you for the classy complement, but I have to disagree on the comment regarding my English. It is suffering severe decline here in the Land of the Brave were Afrikaans and it’s close relative Namlish is the going rate. If you hear such gibberish all day it is a challenge to hang on to proper English.
Anyway, let’s try one for a start. When ever you are ready send me a few photos, with or without text we see how it works out. Maybe it will encourage a few more Southern African woodworkers to do the same?
Have a wonderful day.
Gerhard
I recently picked up a Millers Falls no 75 miter box, similar to the one on this page. It is in fairly good shape, not much rust, but gunked up. Not much movement on the moving parts. So I want to disassemble, clean well and reassemble. Does anyone have parts or assembly drawing for this vintage, I can find the manuals for the newer models (with the sprung-tab below the rotating assembly) but not for this one.
Thanks
Hi Paul
Thank you for your question. I am glad you found one of these beauties, they are well worth the effort to restore. If there is one man who would be able to help you it is Bob Demers. He is the Valley Woodworker at http://thevalleywoodworker.blogspot.ca/
Have a chat to him, you can tell him that I referred you to him.
Kind regards
Gerhard
thanks for quick reply and the reference Gerhard. And thanks for all the info on this site, I have just started to look through it all.
No worries Paul, please do stay in touch. Bob is the most knowledgeable guy I know of on the topic of antique woodworking tools. He will definitely be able to point you in the right direction.
Cheers
Gerhard